
 09/02/2021
  3792
3792


Інтернет-маркетинг
простою мовою
Content of the article

How to install Google Analytics code via GTM on your website
Installing Google Tag Manager
To get started, you will need to register a Google Tag Manger account using the link https://tagmanager.google.com/. Follow the link and click create account

In the next window fill in:
- Account name – we give a clear name so that you don’t get lost in the future and effectively manage your accounts.
- Select a country.

If you wish, we allow you to transmit anonymous data to Google. We give the container a name, most often we write the domain name. As well as the target platform, depending on where the GTM will be installed: website, application, etc.

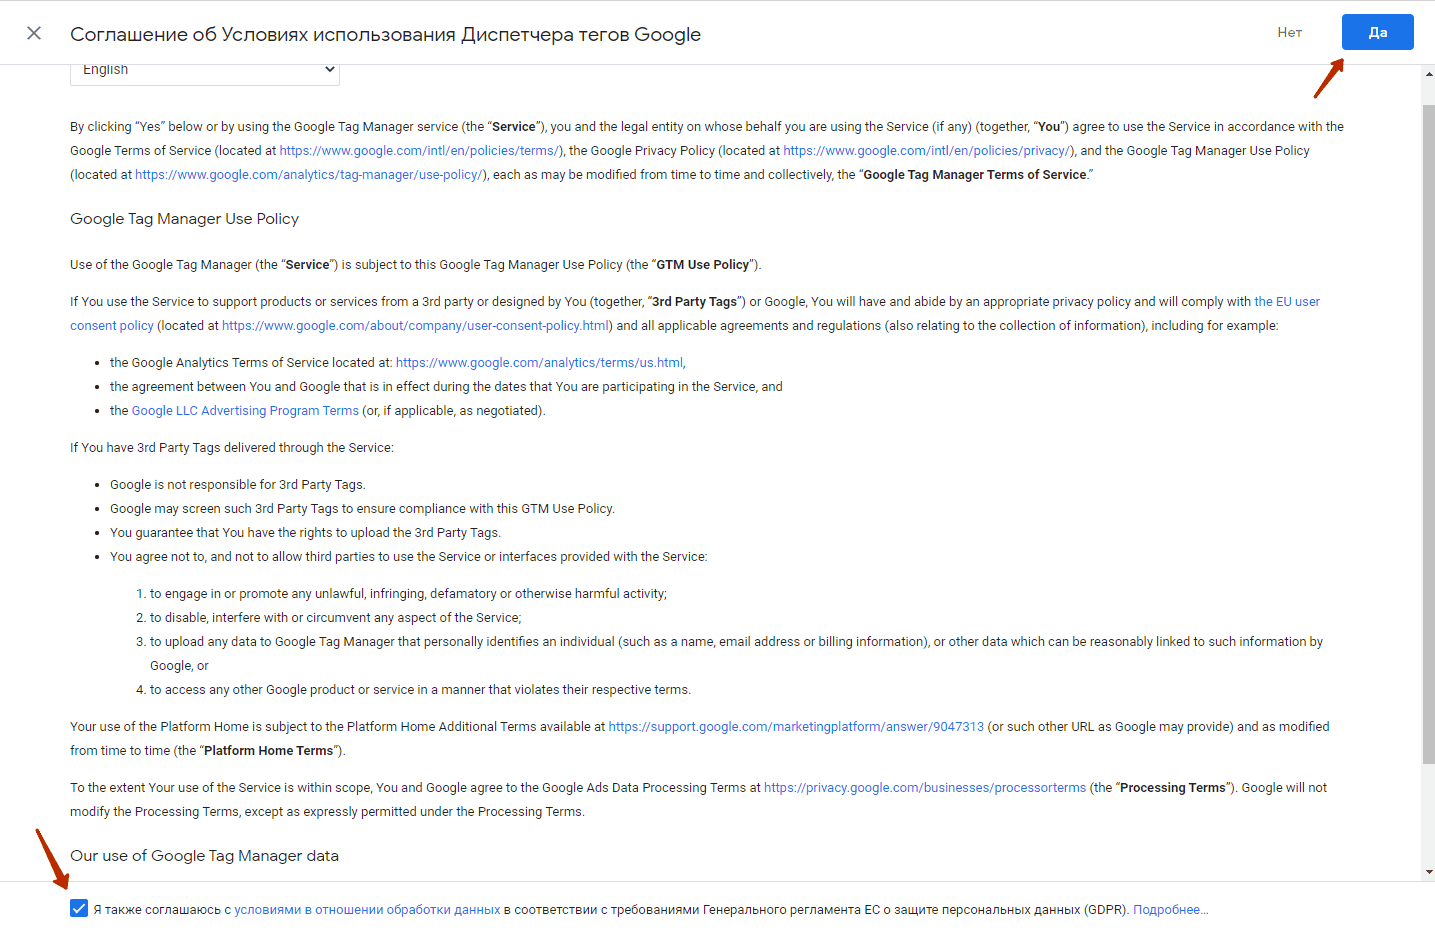
Click “Create”. In the next window we accept the user agreement.
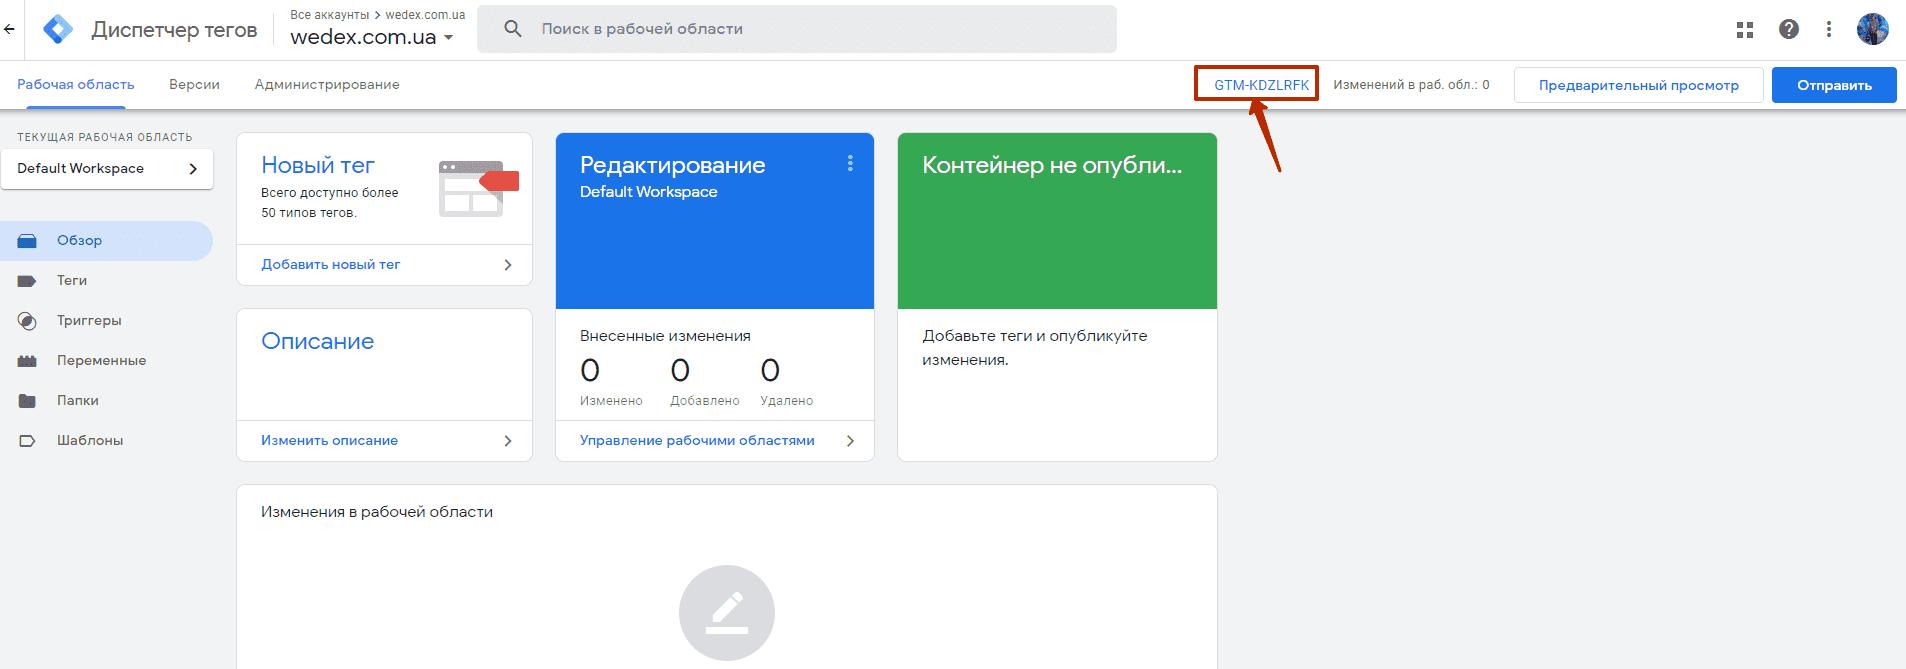
Next, the container workspace opens with a modal window that contains codes for installing GTM on the site. Now you need to submit these codes to the developer. We draw it up in the form of technical specifications.

If you suddenly close the window with installation codes, you can always find them again by clicking on the container identifier.
To check that the GTM code is installed correctly, you can use the browser application – Tag Assistant Legasy (by Google)

With this application, you can always quickly understand whether Google Analytics, Google Tag Manager, as well as their identifiers are installed on the site. After the programmer installs the codes on the site, a GTM with the required identifier will appear in this application. The icon will be displayed in yellow and give a 404 error. Don’t be alarmed, an empty container always returns a 404 server code. After adding the first tag, everything will be fine.


How to install Google Analytics – Universal Analytics code on a website via GTM
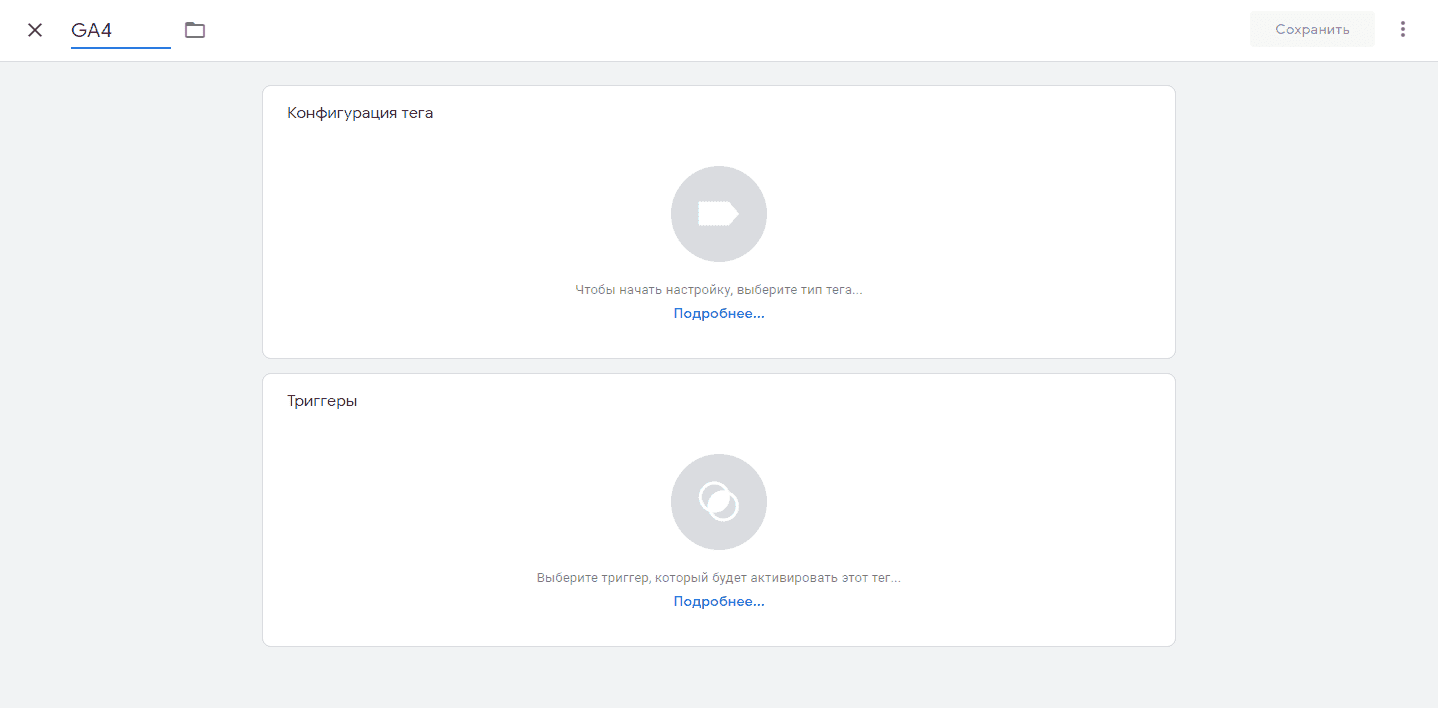
In the workspace, go to the “Tags” tab

Click create and give a clear name.

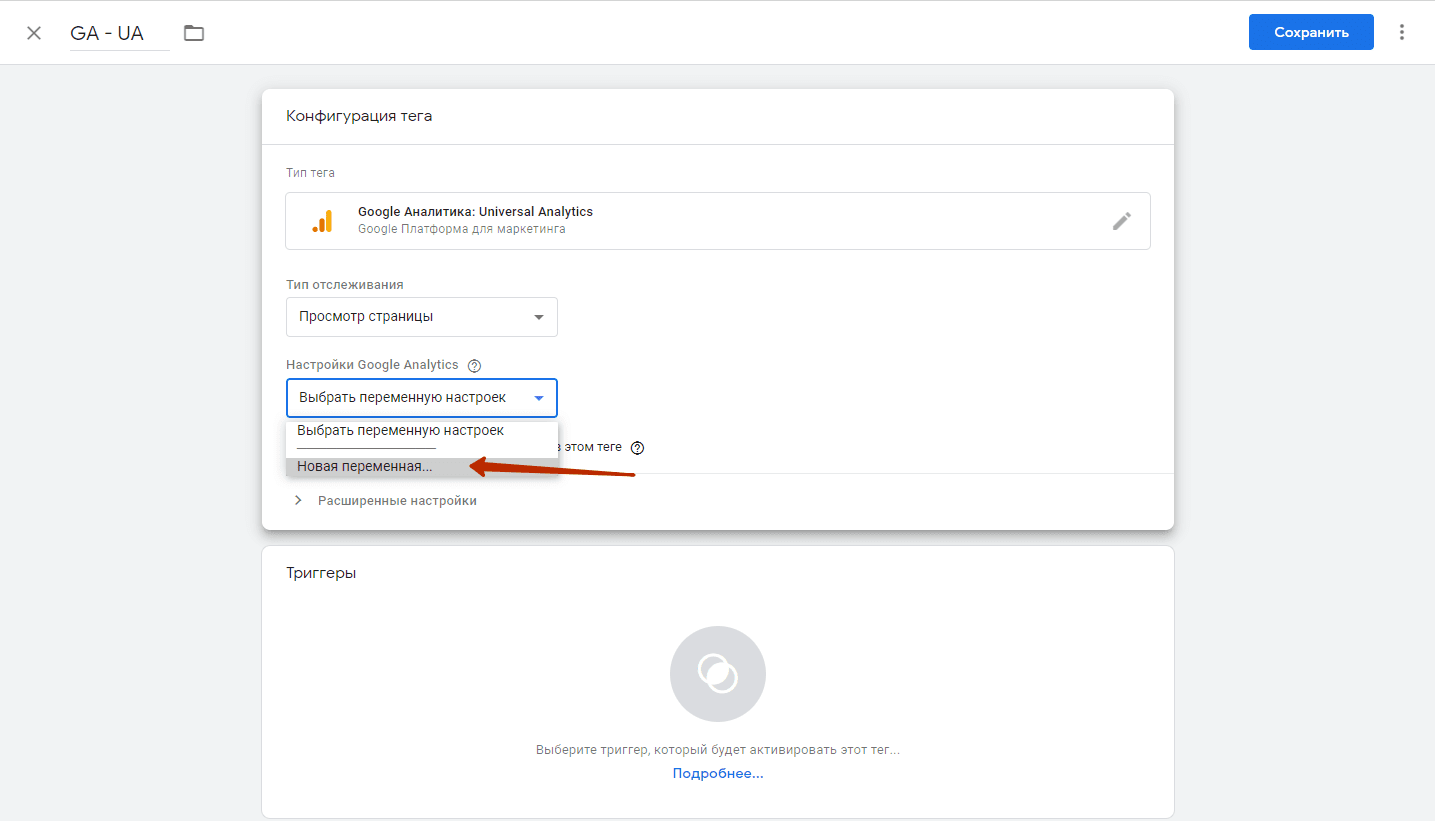
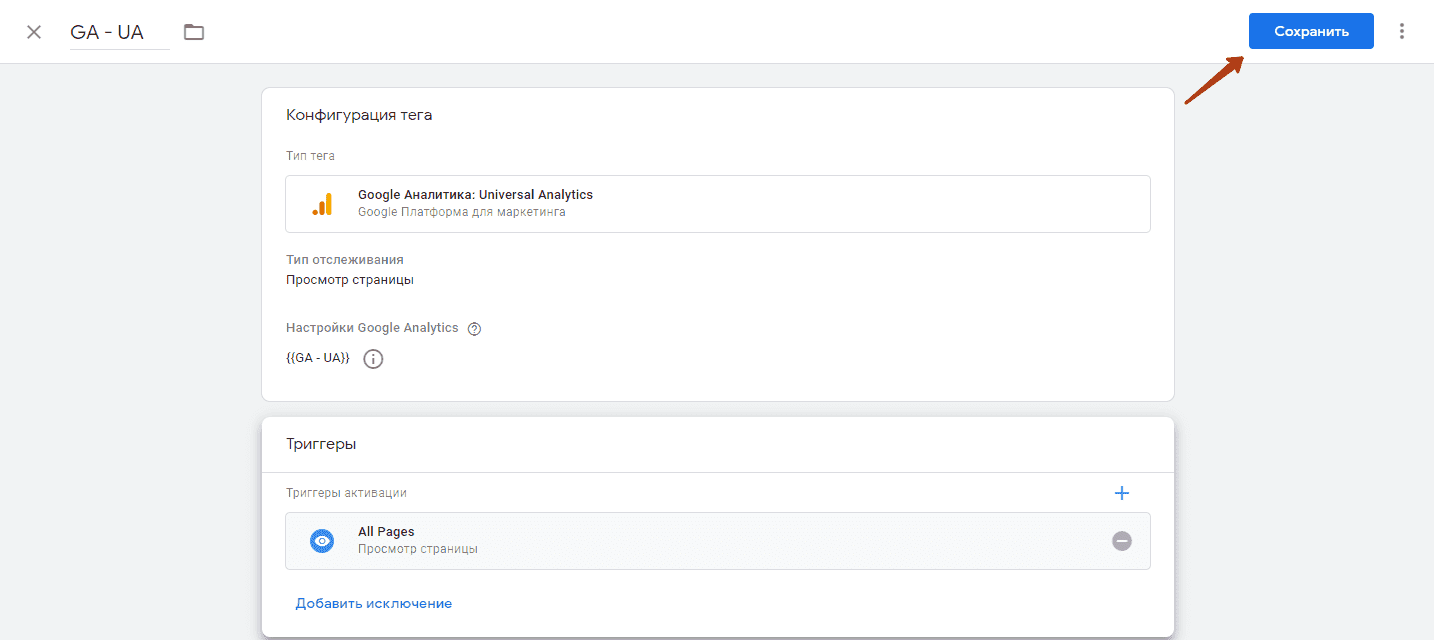
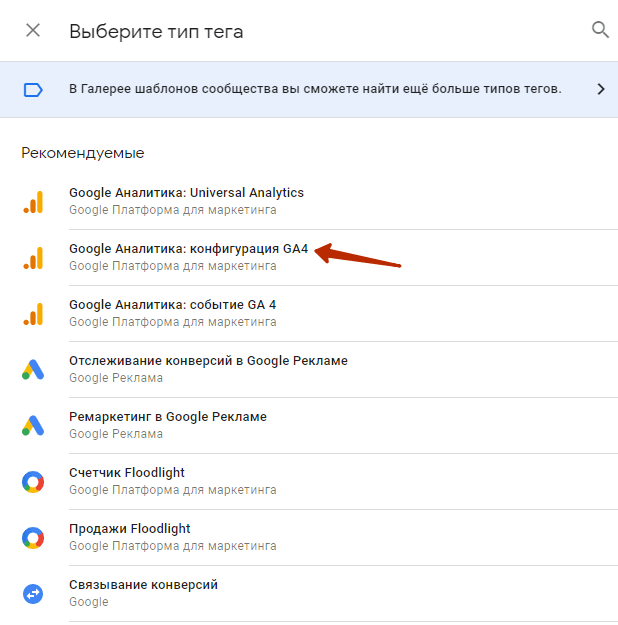
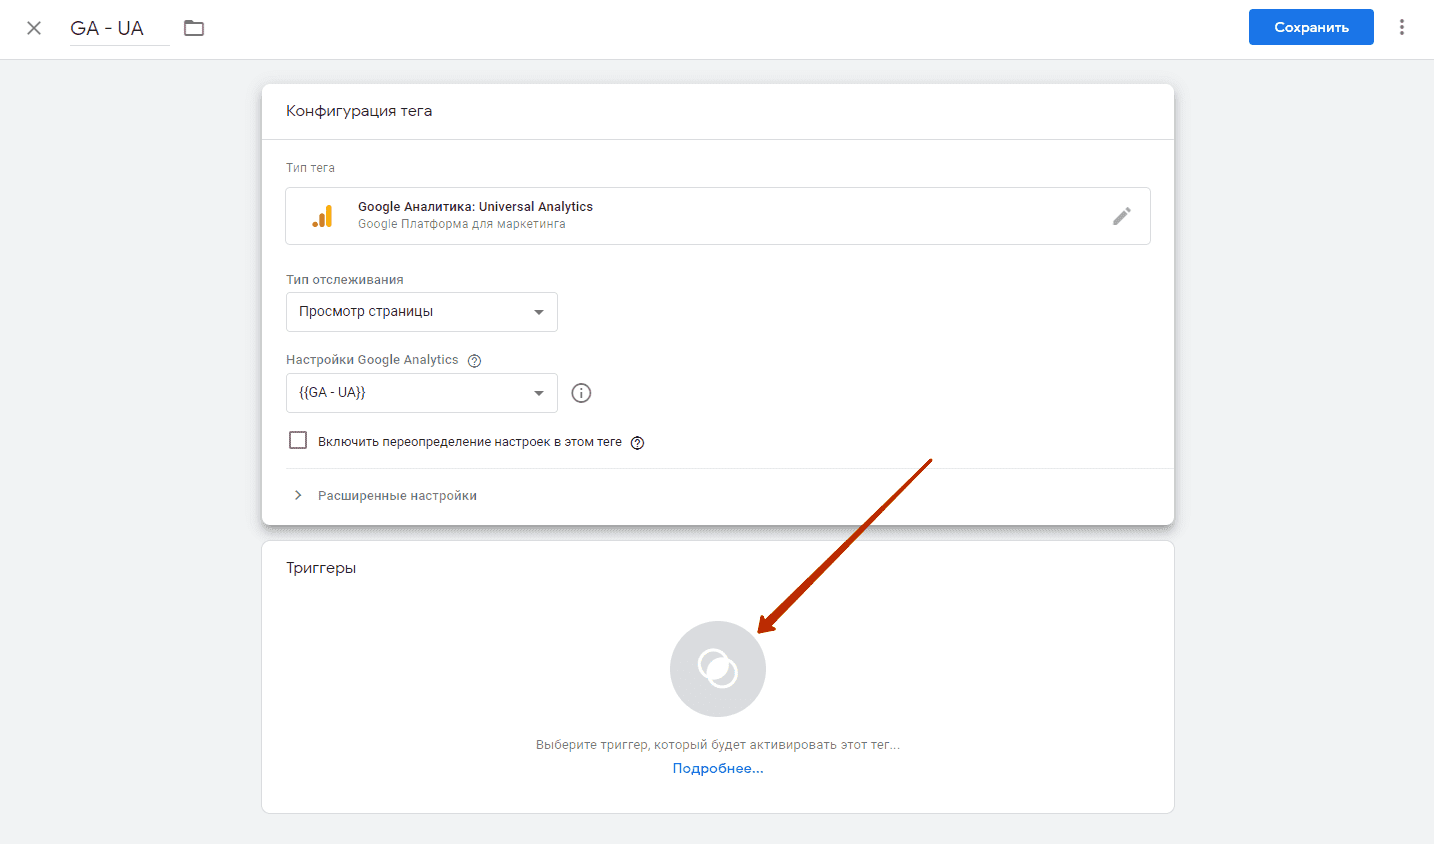
We select the tag configuration – for GA tags, standard installation codes are already entered in the system, so we only have to configure correctly.

Select the tracking type – Page View
Create and add a new variable
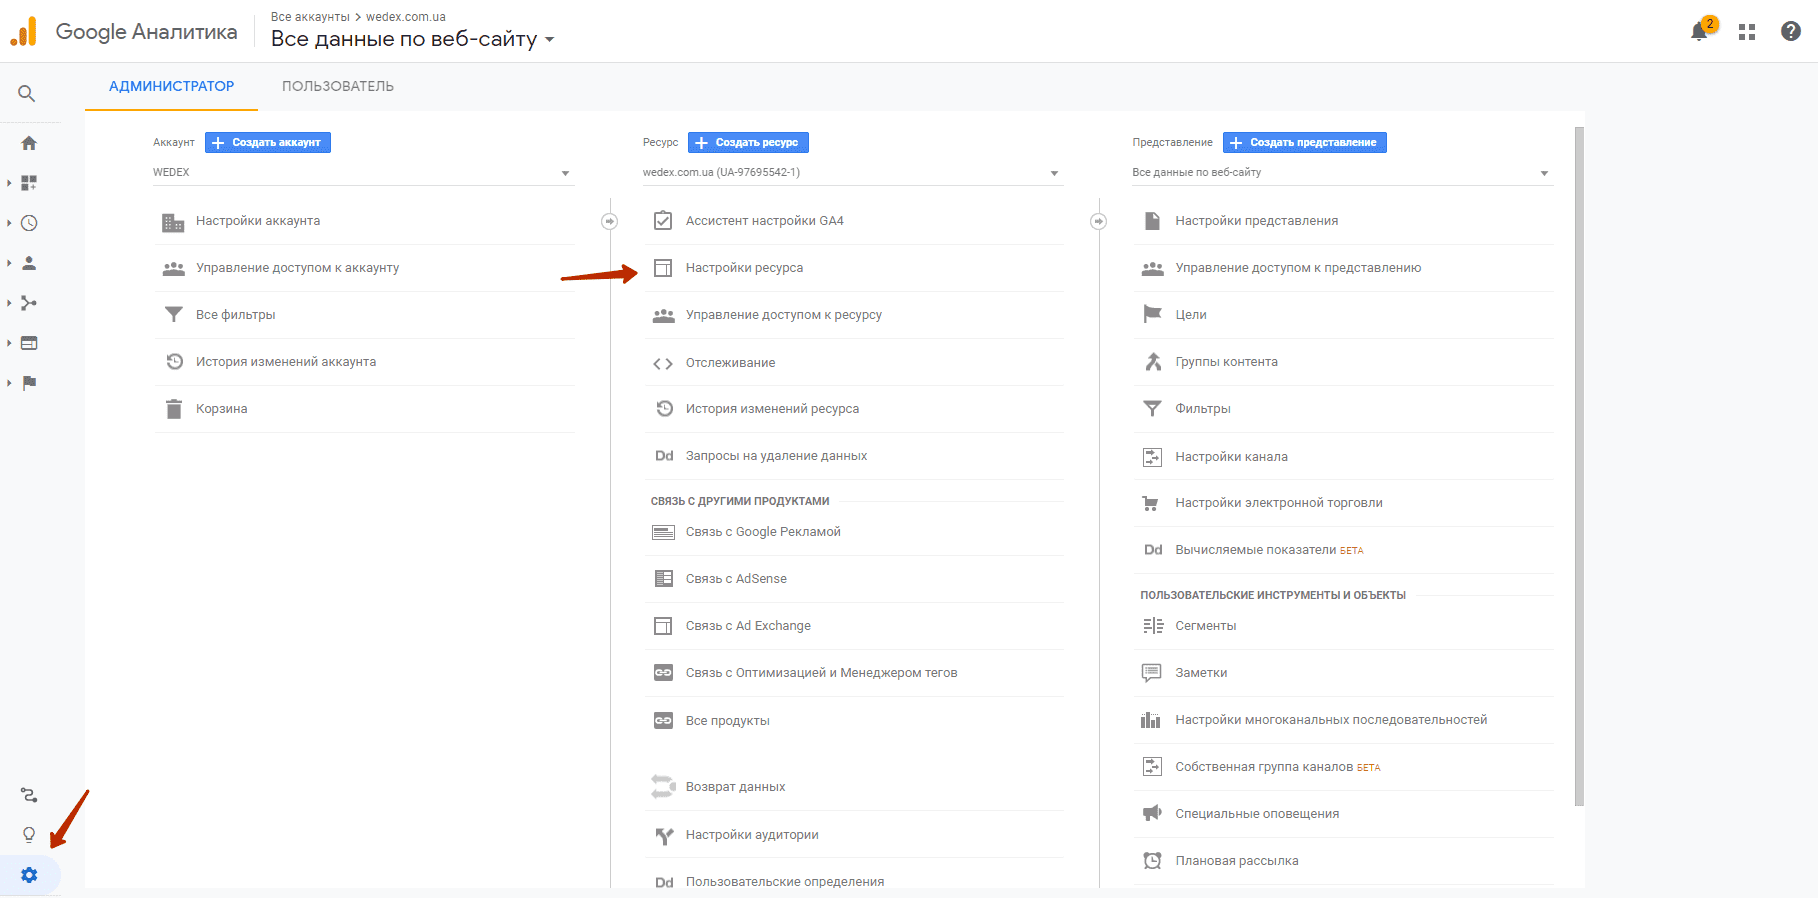
We give a clear name and enter the Google Analytics view ID.

The identifier must begin with UA. You can find it in the Google Analytics view.
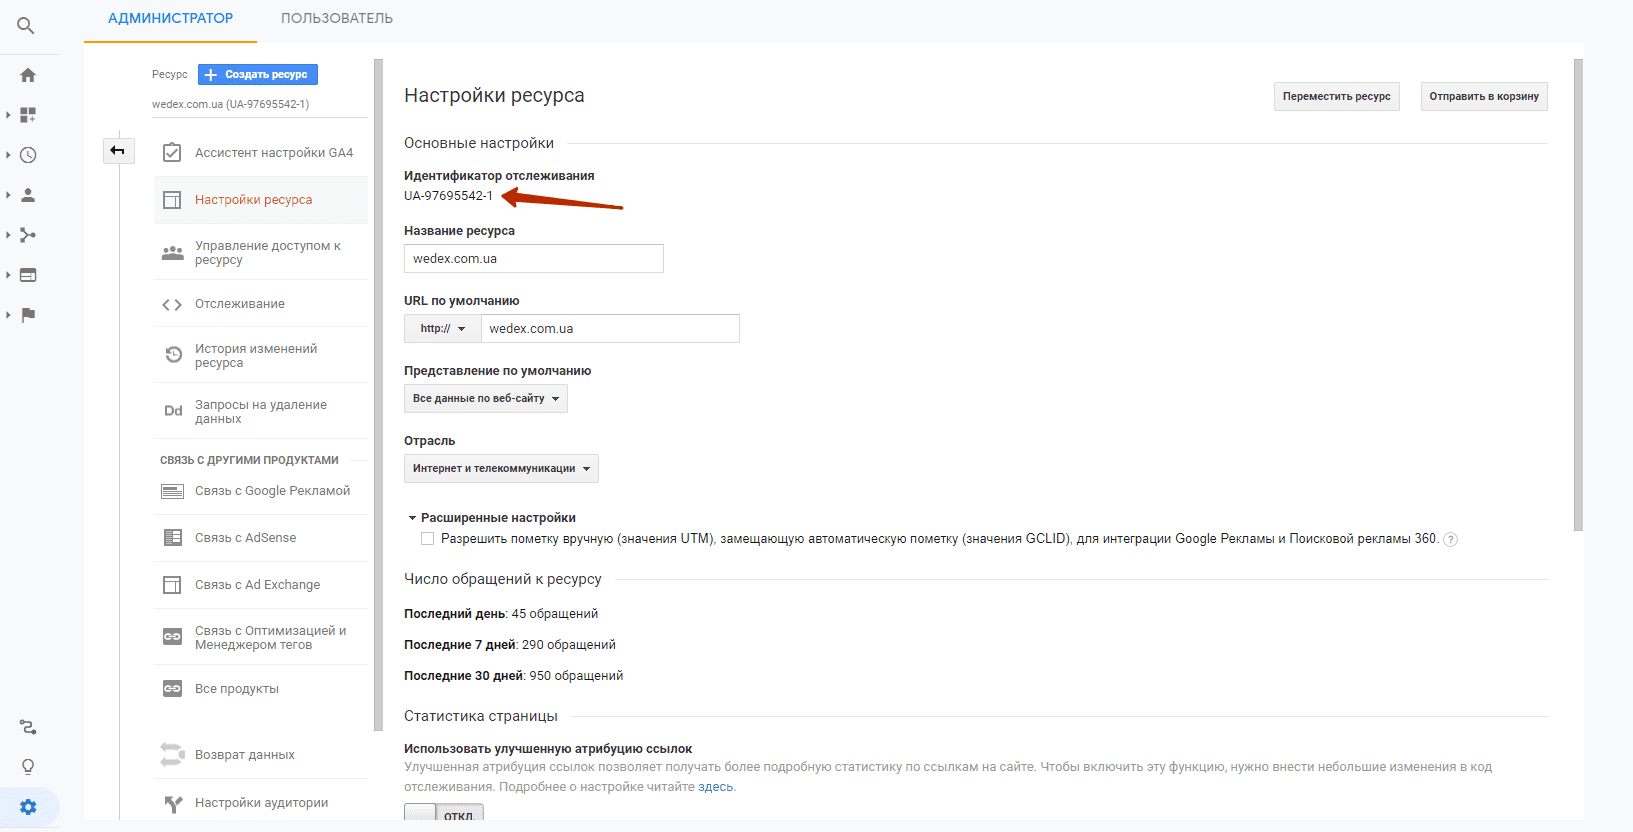
Next we save the variable. And add the tag configuration window to the “Google Analytics Settings” field.

Now let’s move on to setting up the trigger.

Select “All Pages”

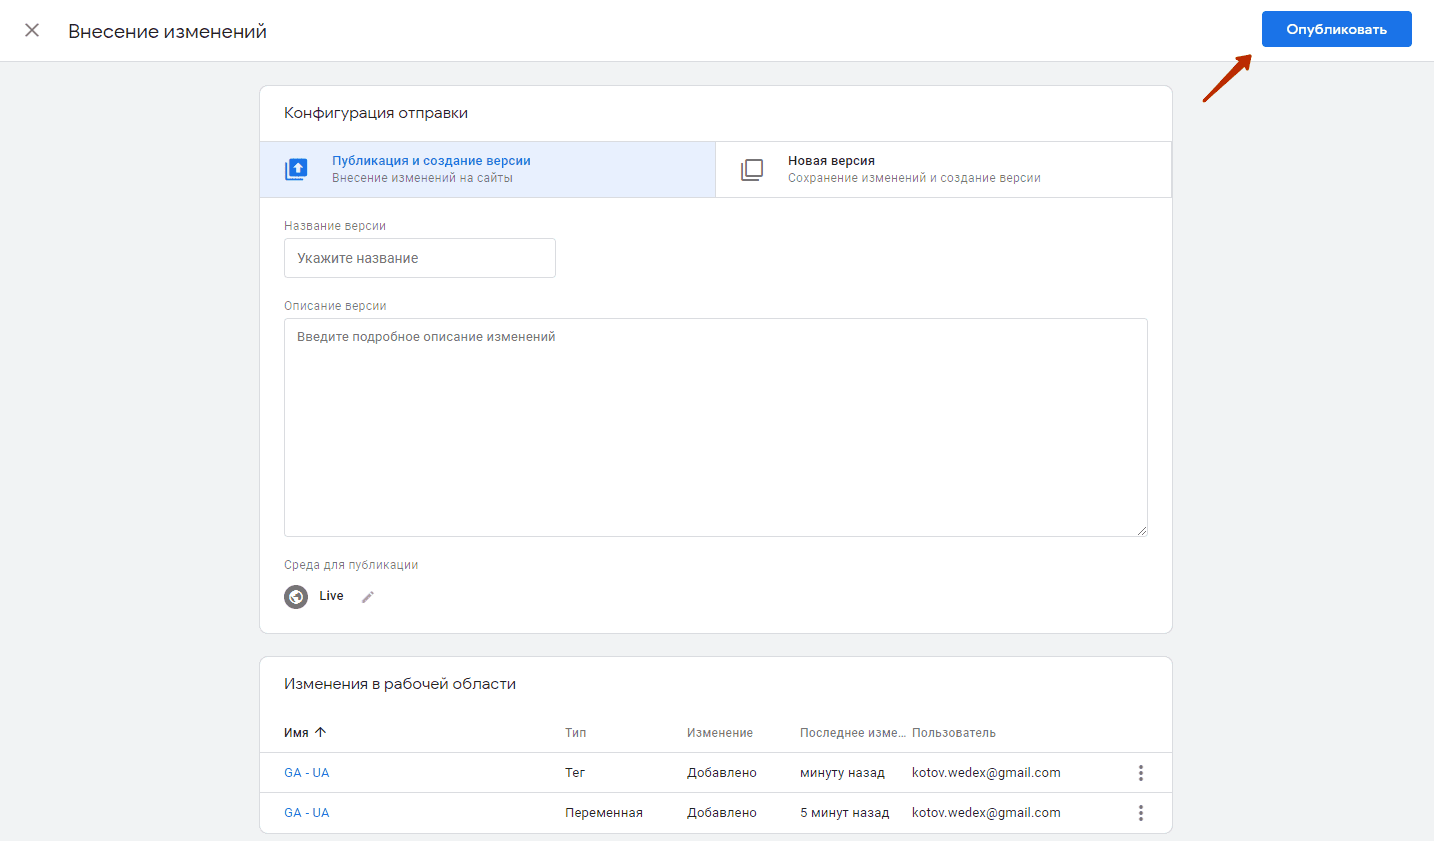
Saving configurations
Click “Send”

And publish the change to the container
Congratulations, you have independently installed the Google Analytics – Universal Analytics counter on your website.
How to check if the GA meter is installed correctly via GTM
This can be done in several ways
- Through the built-in debugger, transfer to analytics tools. In the work area, click on “Preview”
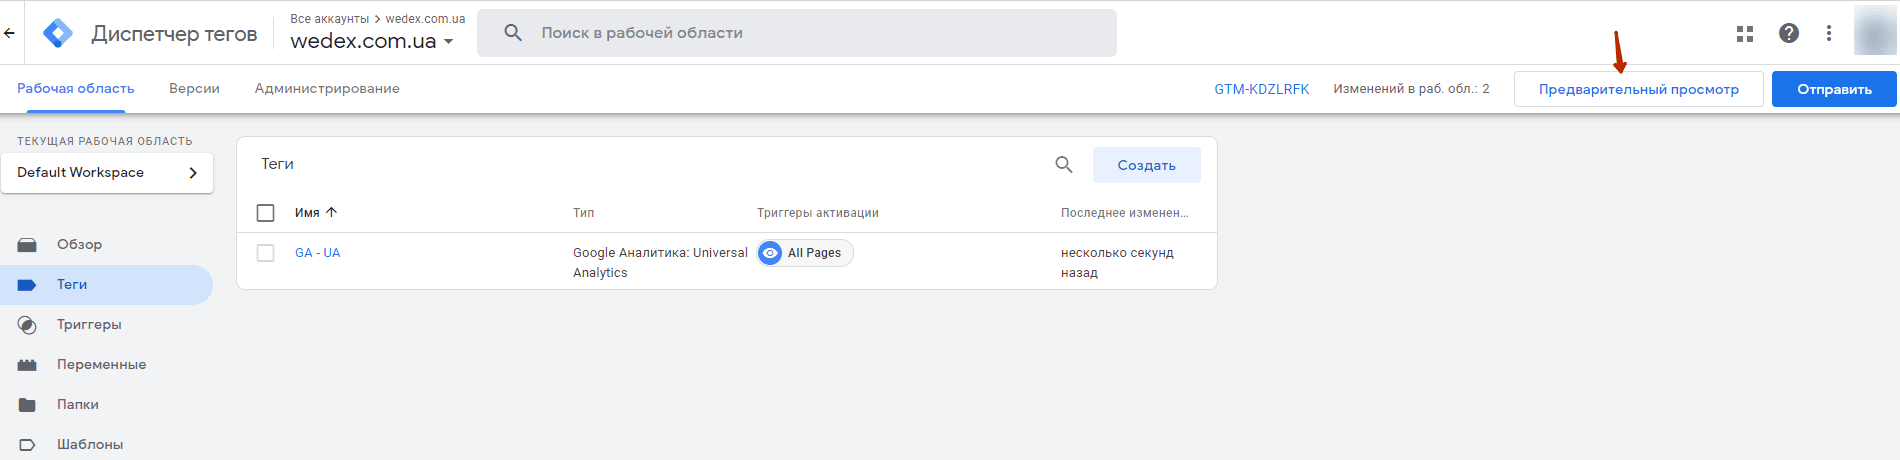
- After the transition, we enter the domain of the site on which we check the functionality of GA.
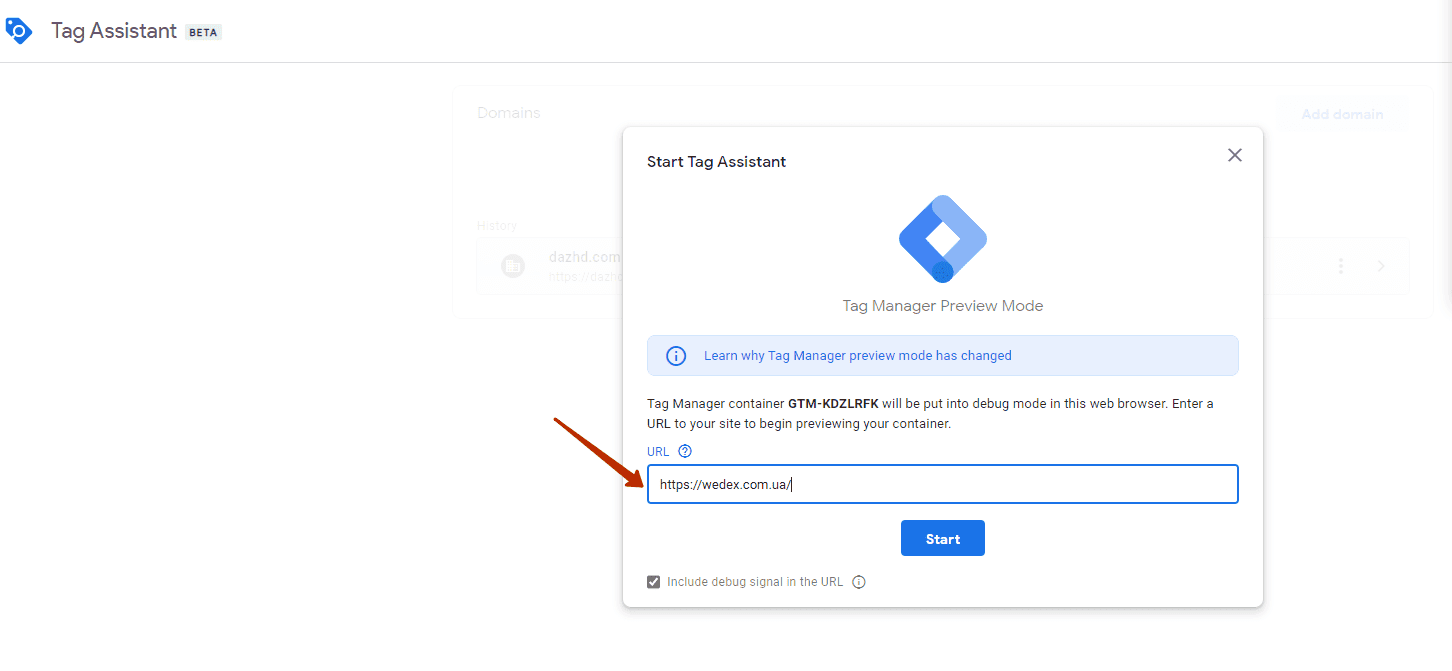
- After the “connection” we see that the Analytics tag worked

- You can also check the installation of Google Analytics in its own interface. To do this, you need to go to the website and also open an overview of the report in real time in analytics.

How to install Google Analytics 4 (GA4) code on a website via GTM?
In the workspace, click on the “Tags” tab

Click create and give the tag a name.
We select the tag configuration – for GA4 tags, standard installation codes are also already entered in the system.
Copy the identifier from GA4 and paste it into the appropriate field.

The ID can be found in the Google Analytics property settings.

Select “All Pages”

Saving configurations

Click “Send”

And publish the change to the container

The Google Analytics 4 counter code is installed on the site. It is also possible to check whether the meter is installed correctly:
- Via the built-in debugger
- In its own interface. To do this, you need to go to the website and also open an overview of the report in real time in analytics.

commercial offer
Other articles by the author

23/08/2023
Content marketing is a special method of product promotion aimed at increasing customer confidence. It differs from classical advertising in that it introduces customers to a product without imposing it, but only offering useful material. Consumers like it when a product description is close to reality and gives clear advice on how to use it.

10/09/2024
In the modern world, where speed plays a key role, it is important to take this indicator into account. Slow loading speed can lead to the loss of visitors and lower rankings in search engines, as search algorithms take into account loading speed as an important factor.

09/07/2024
Target is an English word that translates to "goal" or "purpose". That is why targeted ads are shown to the target audience that can potentially perform the desired action, such as buying a product or signing up for a service.
Latest articles by #GTM

08/05/2026
Influencer marketing for businesses is not just a way to draw attention to a brand. When part of a well-designed strategy, it helps achieve multiple objectives at once.

06/05/2026
A workshop is an interactive, hands-on session during which participants listen to an expert and work together on a specific task.

30/04/2026
Mandela effect proves that our perception of reality may differ from objective facts.