
 04/09/2023
  4667
4667


Інтернет-маркетинг
простою мовою
Content of the article

How to use the Yoast SEO plugin for WordPress
Yoast SEO is a world-famous plugin for CMS WordPress, with the help of which you can promote websites to the top of search engines without the involvement of a specialist. You can use both its free version and Premium version. The paid version differs from the usual one in the absence of advertising, 24/7 support, better ranking with the use of keywords and other features.
Why you should choose Yoast SEO
Using this plugin, you can deal with such problems and get a number of benefits:
- Surpass the competition. With the help of SEO tools, you can leave your competitors behind and enjoy high traffic.
- Optimize your SEO strategy. This plugin regulates technical elements such as canonical URLs and meta tags, gradually automating optimizations. Therefore, you will be able to forget about the complexities of SEO while you are busy creating interesting and useful content.
- Rise in the rankings. If you take advantage of features such as Schema.org structured data integration, title and meta description templates, and XML sitemap, you will give search engines the ability to evaluate and understand your site, which will help you get to the top of the results.
- Optimize content ownership. The Yoast SEO plugin has analysis tools that will improve the SEO and readability of your blog. Moreover, it has inherent generative artificial intelligence features with which you have the ability to create gorgeous headlines and meta descriptions.
- Improve the quality of user experience. With this plugin, you can attract and retain your audience through fast loading times, quality content, and clear site navigation chains.
How to install Yoast SEO
One option for installing the plugin on your site is to automatically install it in your WordPress personal account. Below we will consider how to do it:
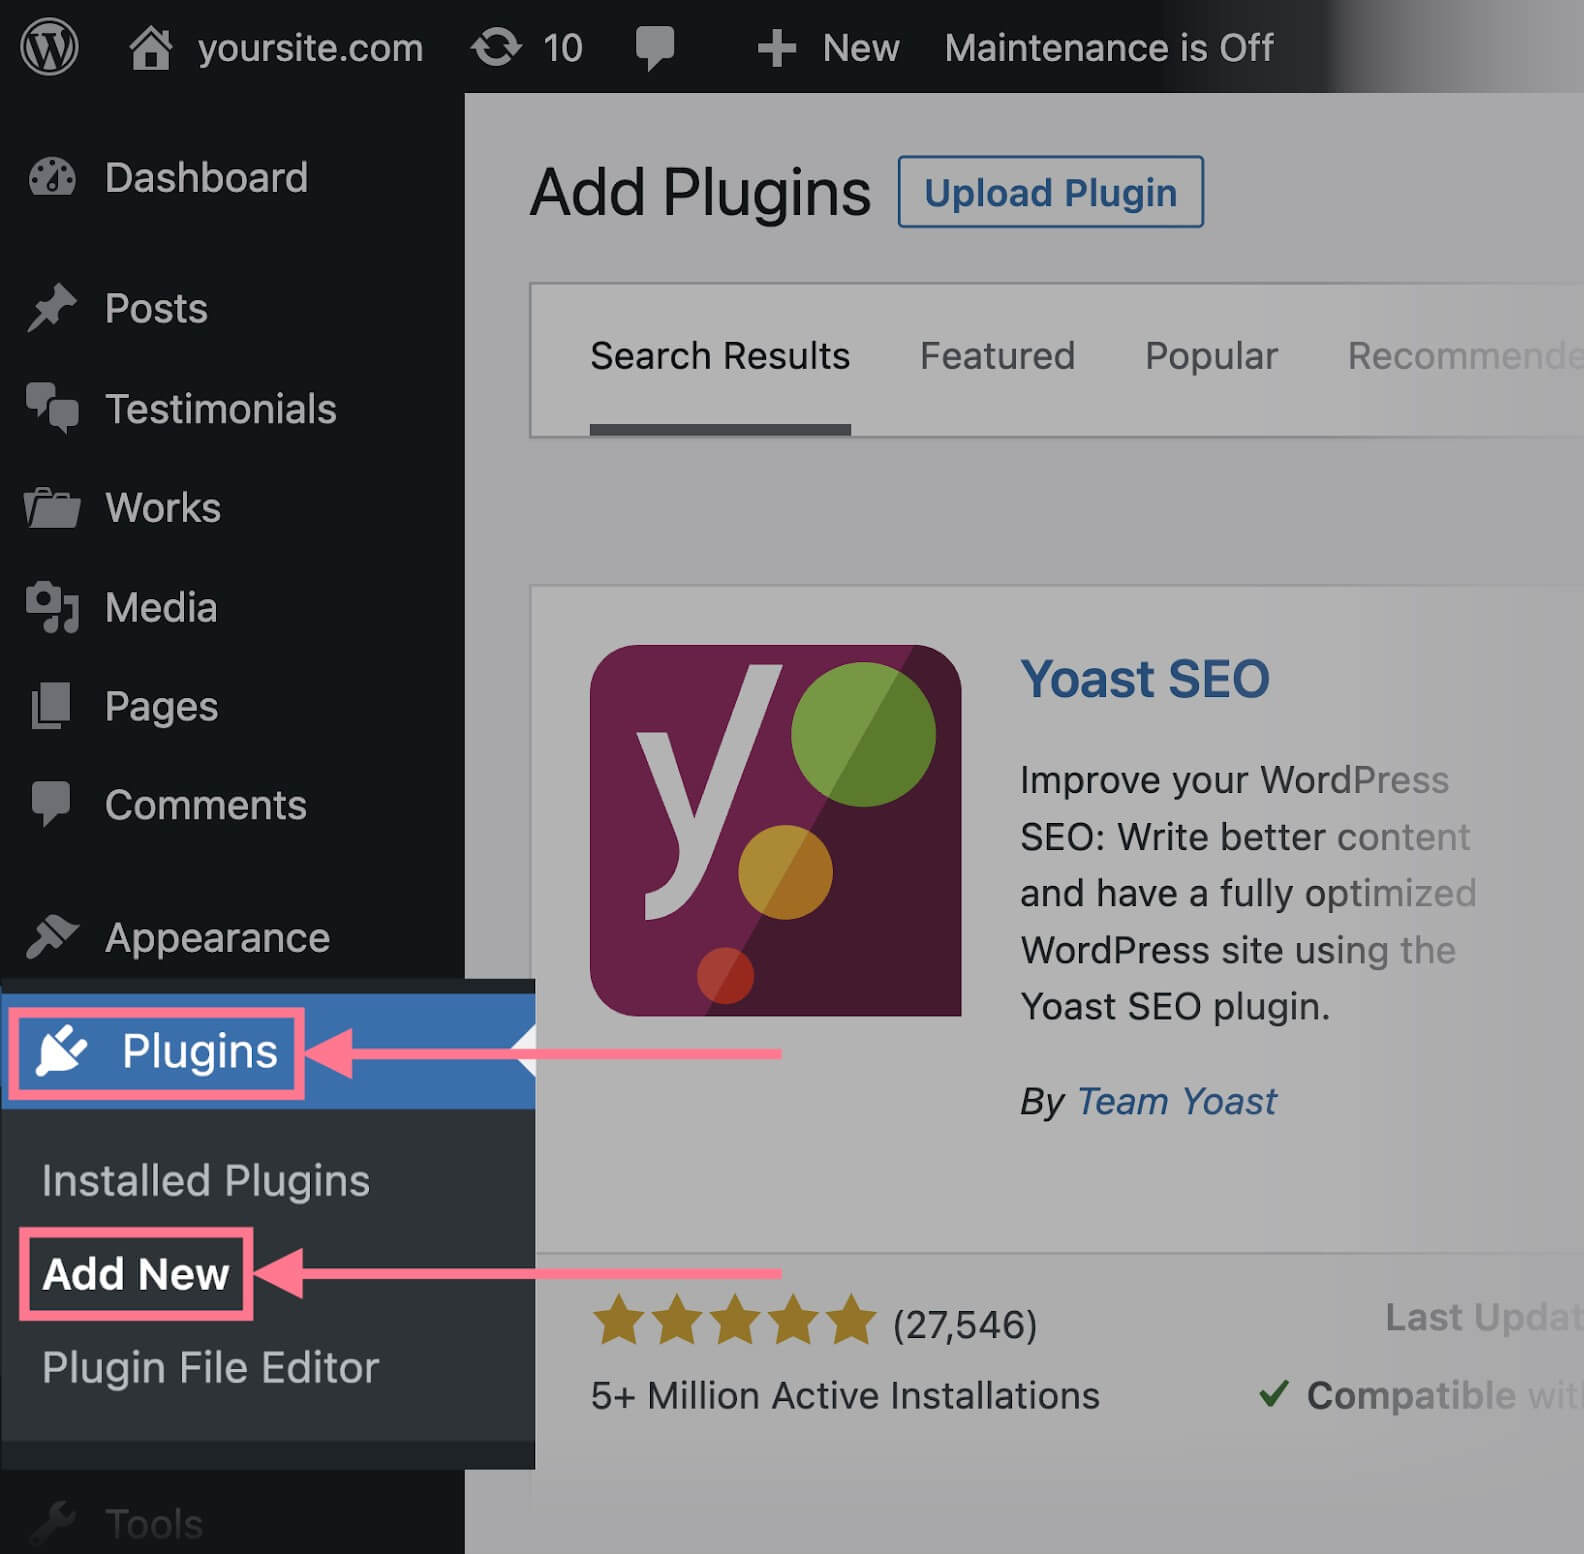
- First, you need to go to the WP admin panel and open the “Plugins” section.
There are already different plugins installed here by default. We need to install a new one. To do this, click “Add New”.
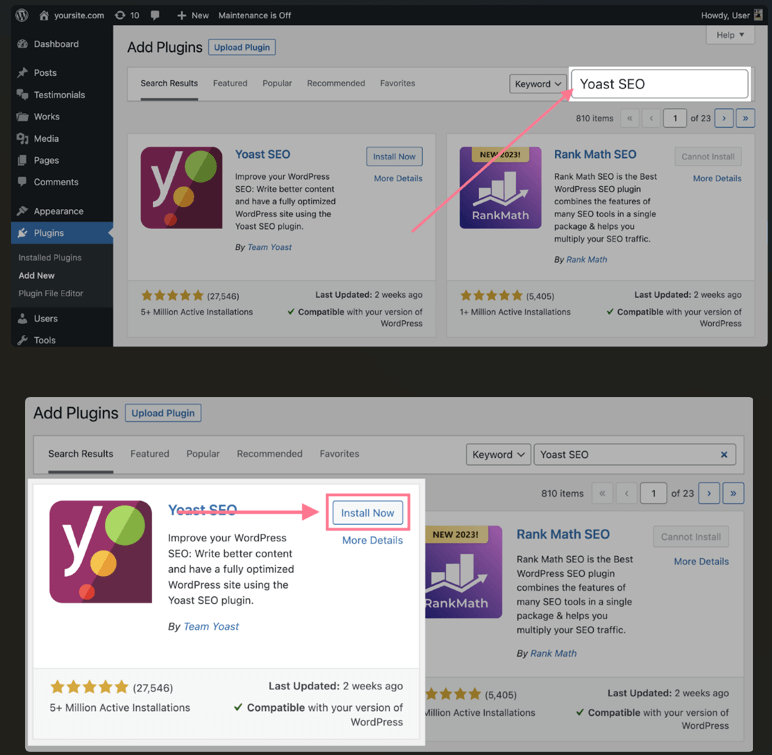
- Next, on the right side in the search bar you need to enter the query Yoast SEO and find this plugin. Opposite its name there is an “Install” button, click on it.
That’s it! You have successfully installed the plugin on your WordPress site. Always update the plugin, as Yoast regularly releases new versions to ensure compatibility with the latest version of WordPress and changes in search engine algorithms.
How to customize the Yoast SEO plugin
You can access the plugin customization wizard by clicking on the “Yoast SEO” button in the left menu of your WordPress dashboard.
To set up Yoast SEO for your site follow the instructions in the “First Setup” section. If you don’t get automatic redirects, click on “Plugins” in the side navigation menu and then find Yoast SEO and click “Complete First Setup”.

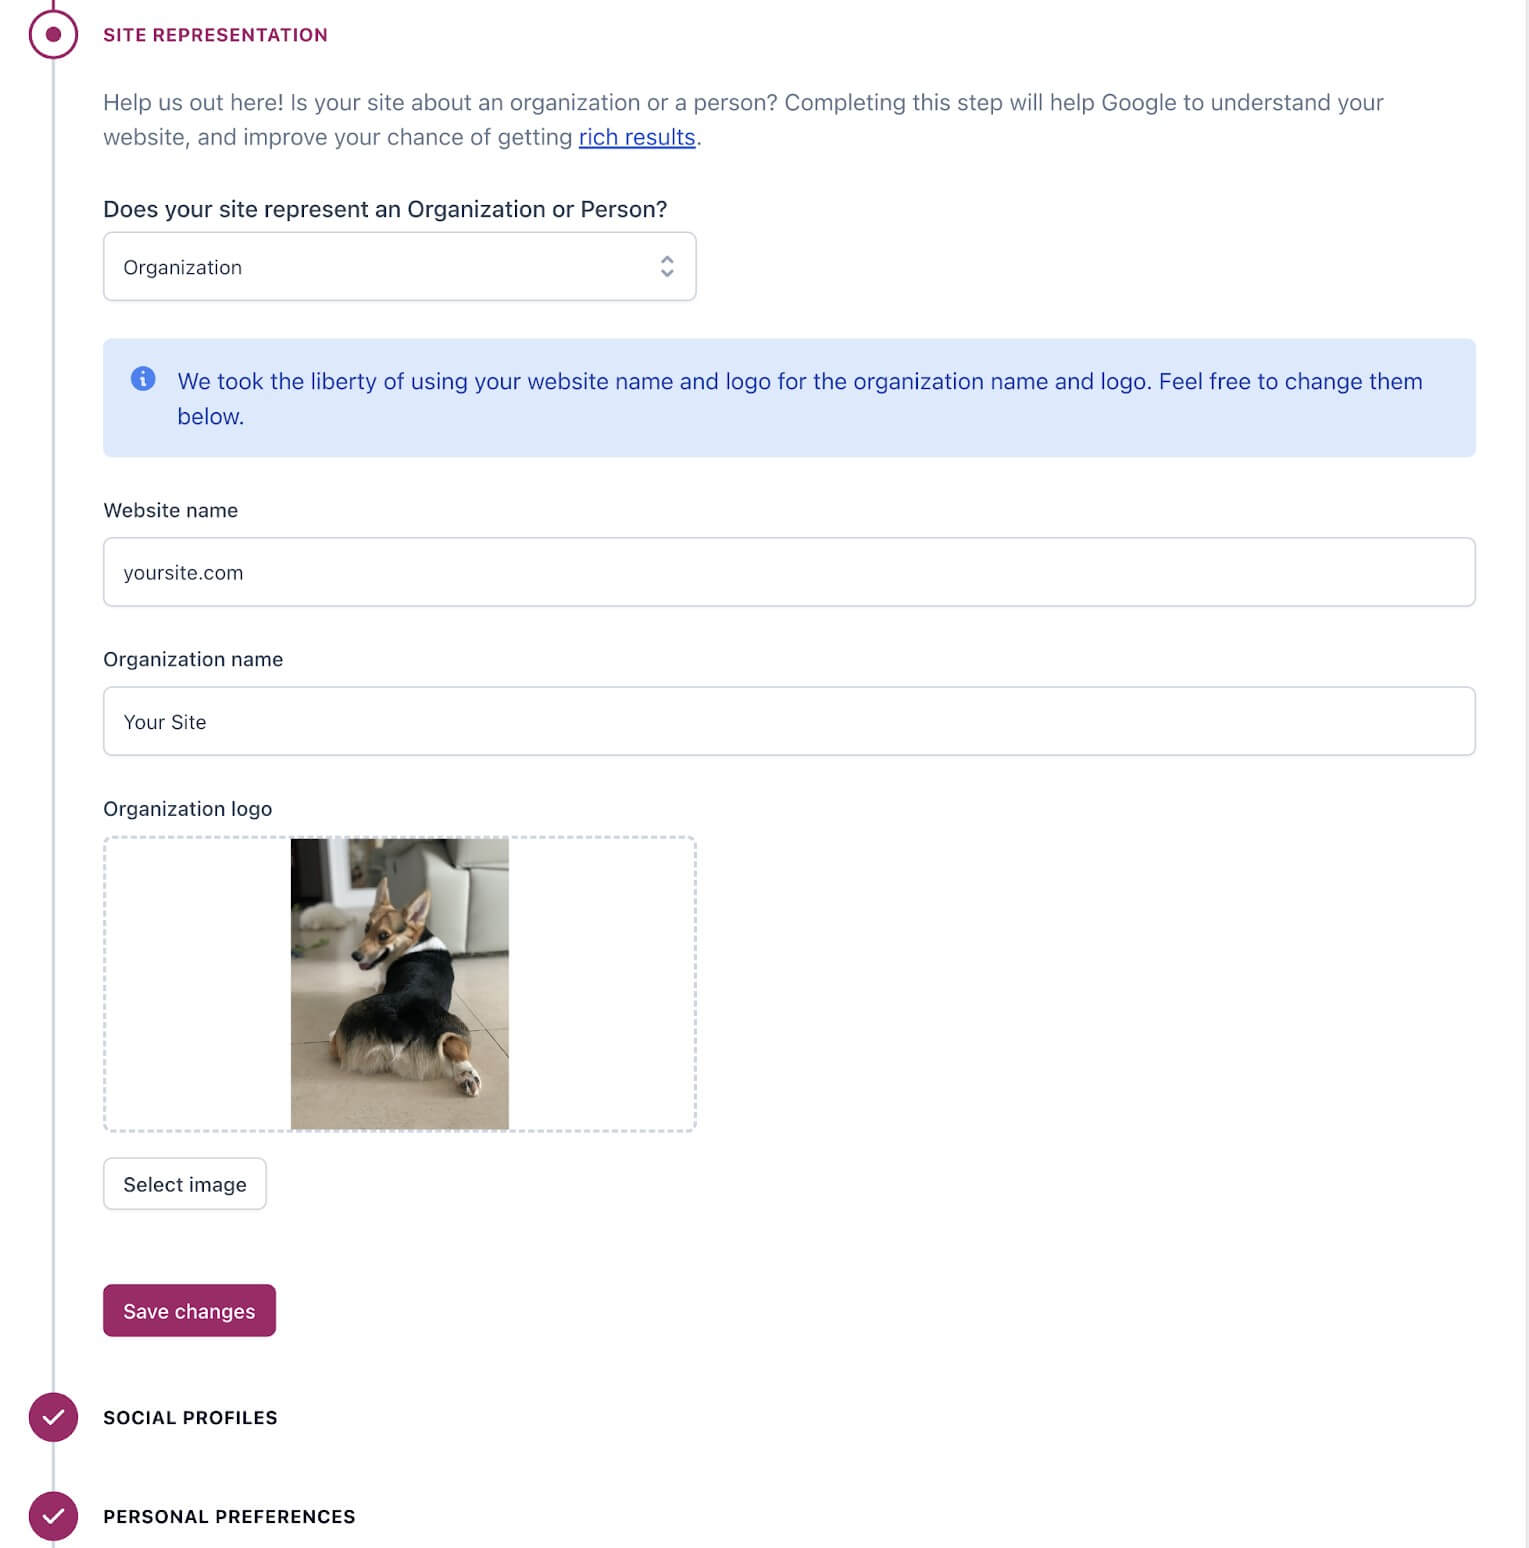
First, Yoast will optimize your data and fix some technical issues. At this stage you don’t need to do anything, you just need to click “Continue”. Next, you are required to enter some information about your website. For example, the name, logo and social profiles.
That’s it. And even if you don’t do anything with the plugin in the future, it has already made enough optimizations for now. For example, it has created the following:
- XML sitemap
- File robots.txt
- Basic layout of the circuit (based on the information specified in the configuration)
Now let’s take a look at how Yoast SEO can help you in other areas of SEO.
How to use Yoast SEO in the WordPress editor
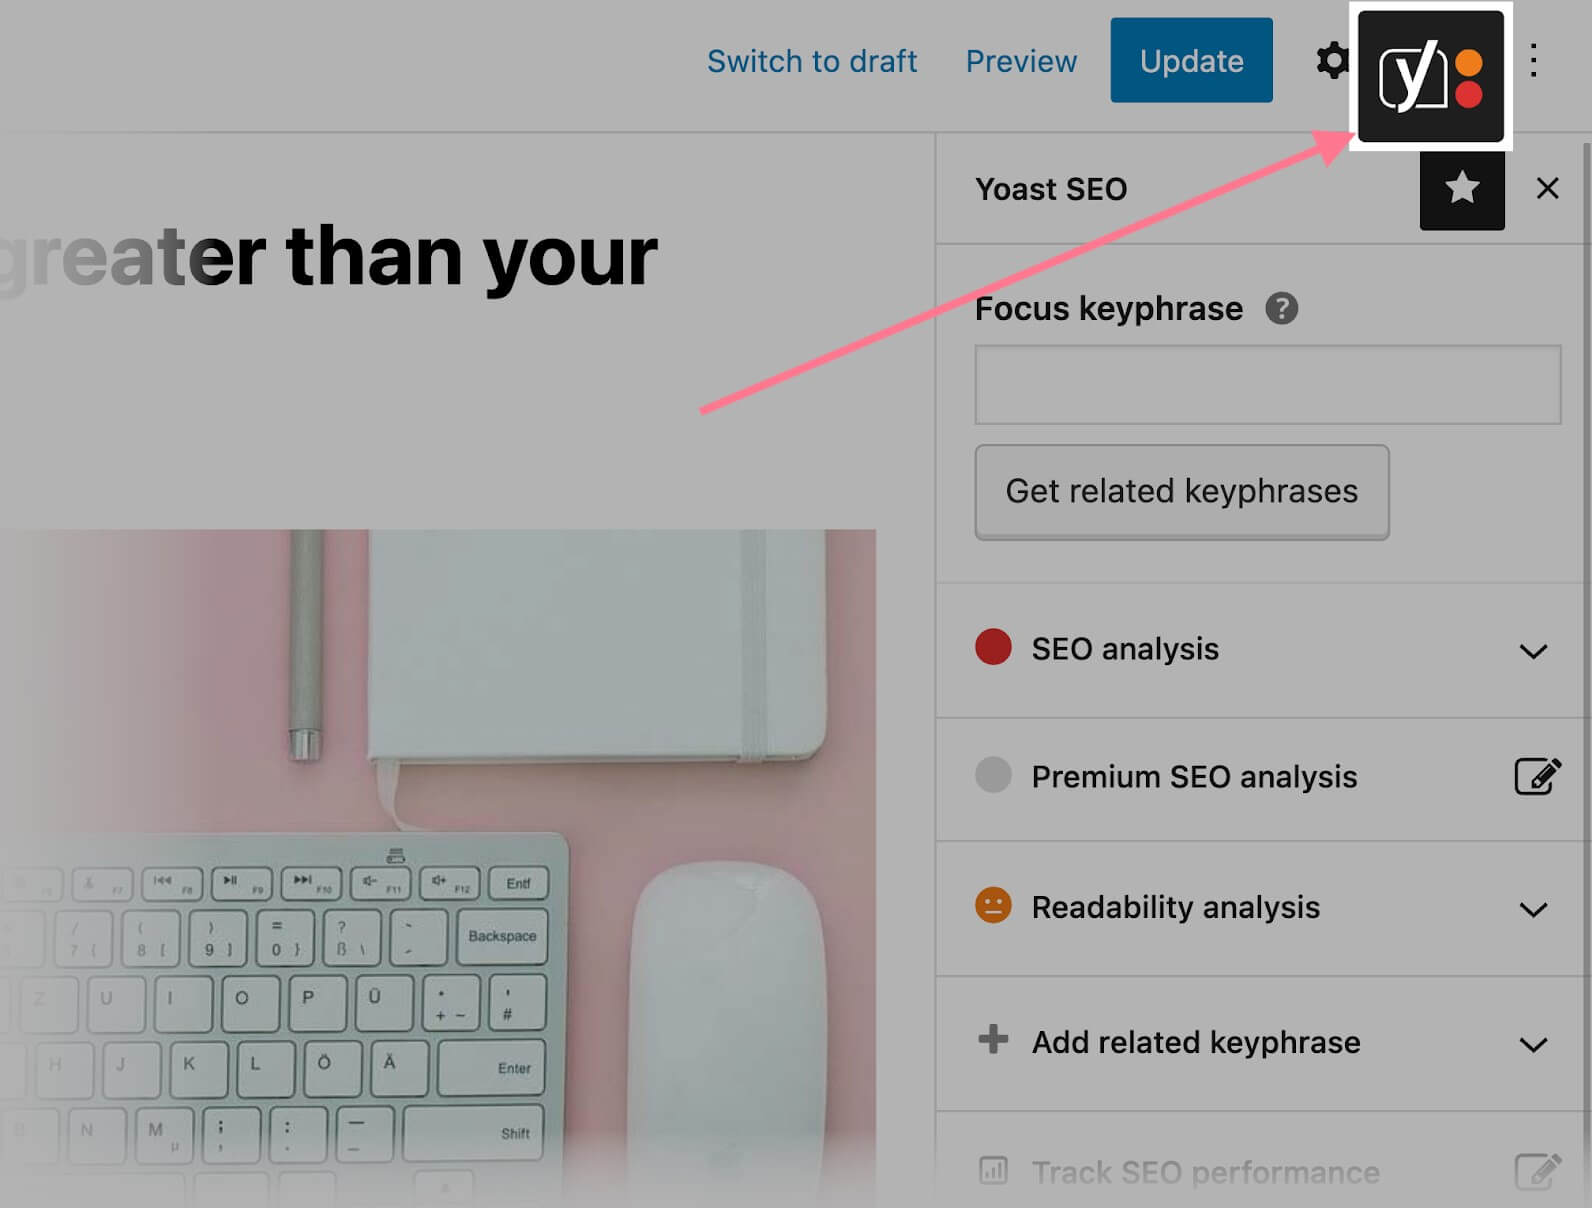
The WordPress editor is where you most often interact with the Yoast SEO plugin. When editing a specific page in WordPress, you can either expand the plugin settings in the sidebar or use the “Yoast SEO” section at the bottom of the editor. To expand the sidebar, you need to click on the Yoast SEO icon in the right corner of the top menu.
Let’s take a closer look at the important sections below.
Focal Key Phrase
The first section is the “Focus Phrase.” Here Yoast asks you to enter the word or phrase you want to rank for in search results. After entering the key phrase in the “SEO Analysis” section, you will get direct information about how well it is implemented in your text.
SEO analysis
The SEO Analysis section provides an overview of your on-page SEO. The icons next to the problem are divided into three categories:
- Problems (red color)
- Improvements (orange color)
- Good results (green color)
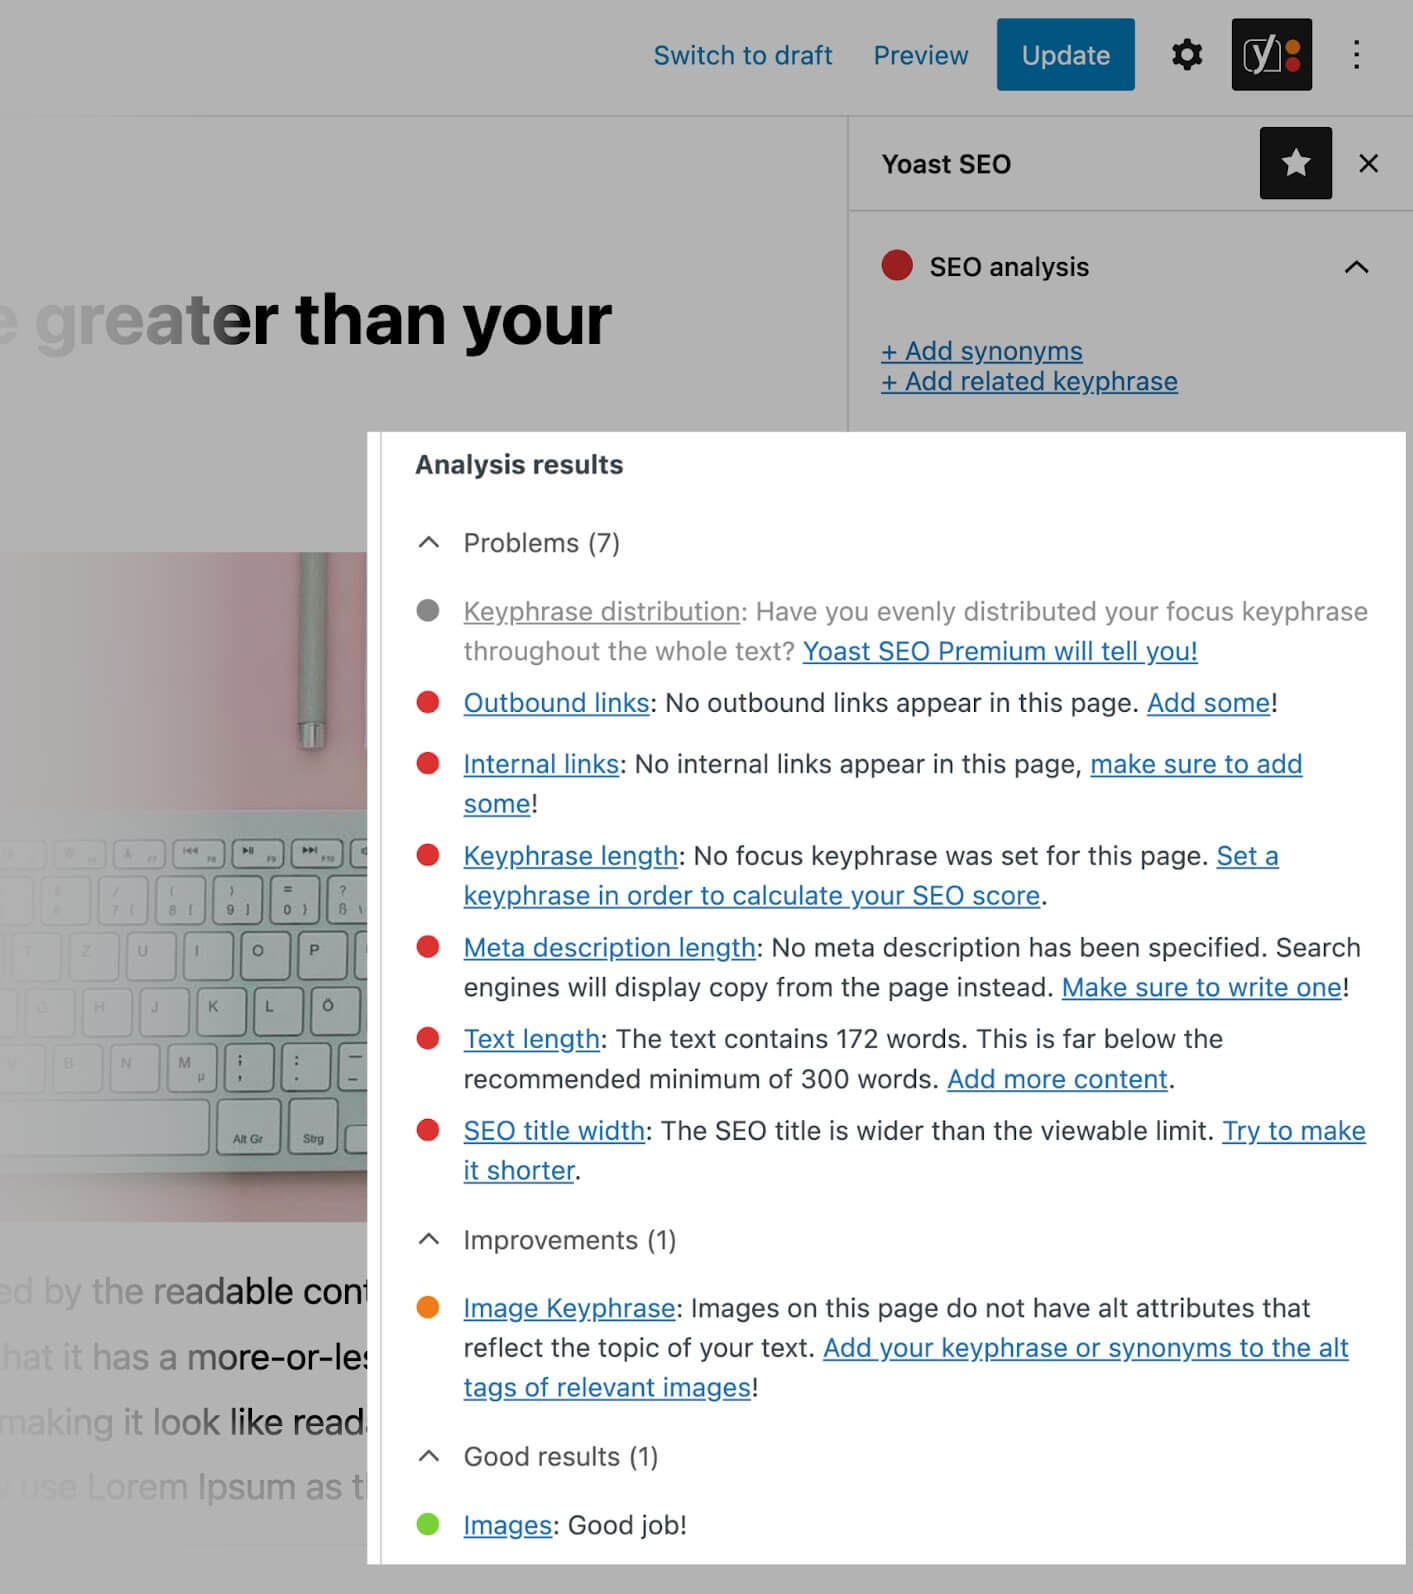
If the icons are colored green, then you are ready to work. But remember that these are only recommendations.
Parameters such as “Keyphrase Density” and “Keyphrase Length” are arbitrary metrics that can give you an idea of your optimization, but should not be something that should be followed at all costs. Since it is better to avoid keyword clutter after all.
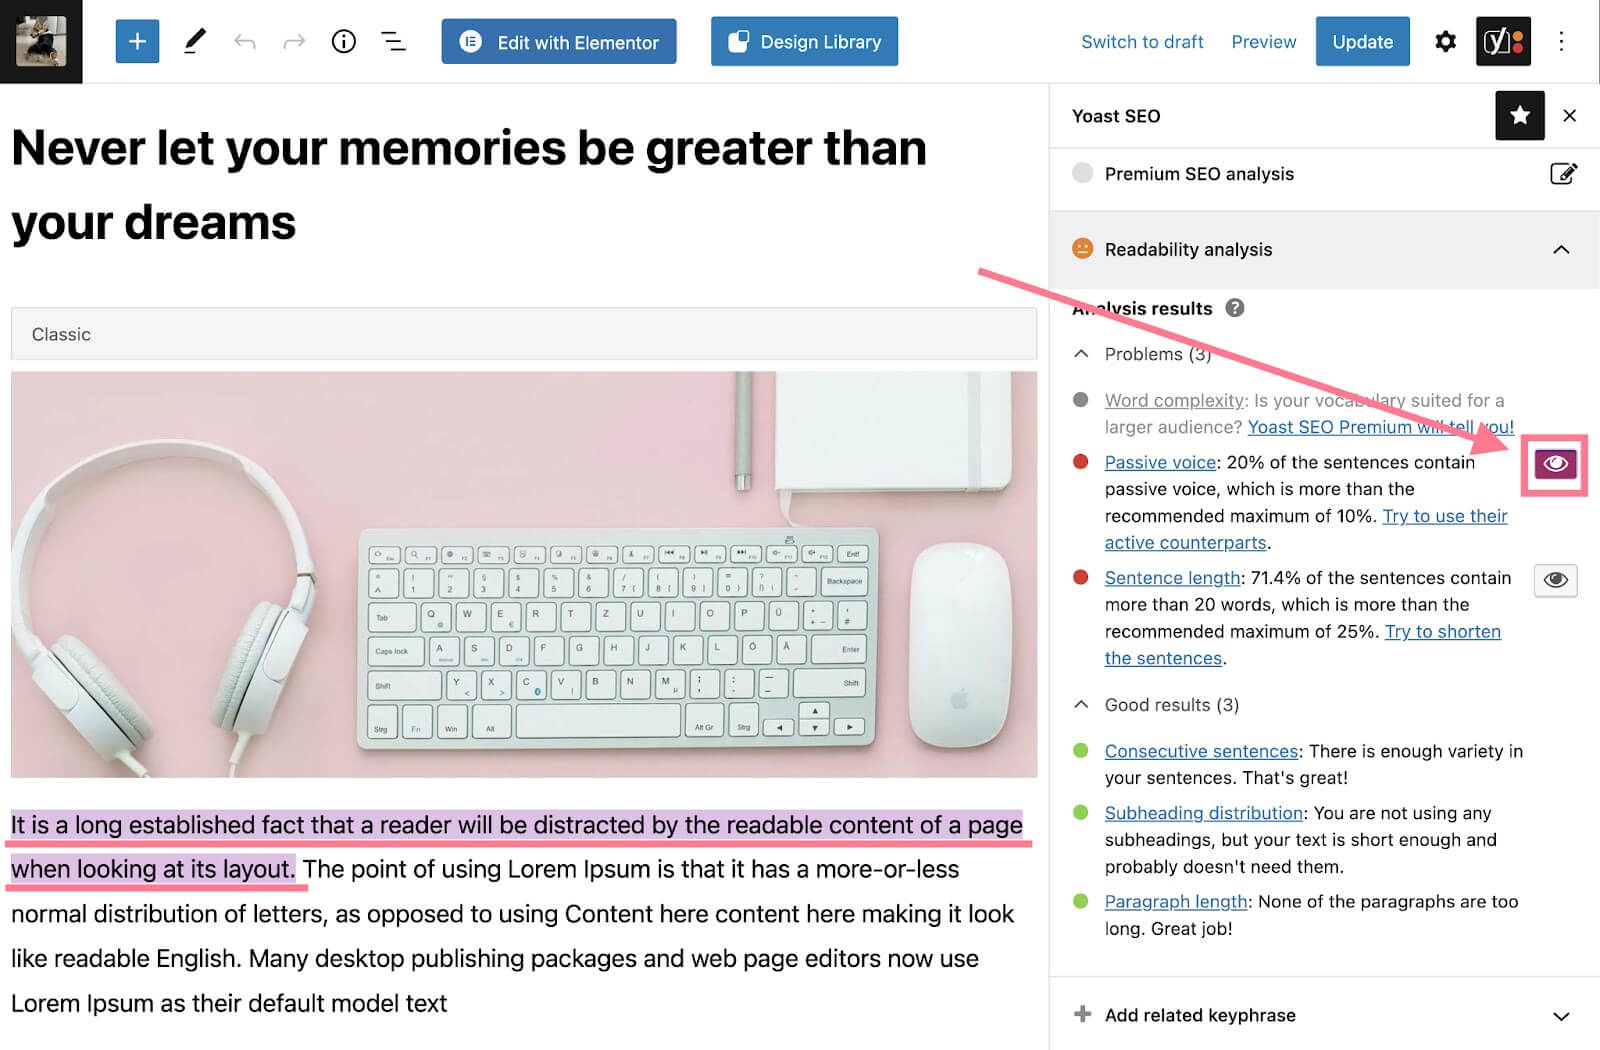
Readability analysis
Readability is very important for good SEO, as unclear or poorly structured text can lose readers and confuse search engines.
In the “Readability Analysis” tab, Yoast analyzes your post to determine how easy it is to read. Like the “SEO Analysis” section, this provides recommendations on how to improve different aspects of your content’s readability. For example:
- Use of active speech
- Short paragraphs and sentences
- The use of sufficient transitional words.
When you click on the eye icon next to some of these recommendations, the plugin will highlight the relevant pieces of text, indicating the problem at hand.
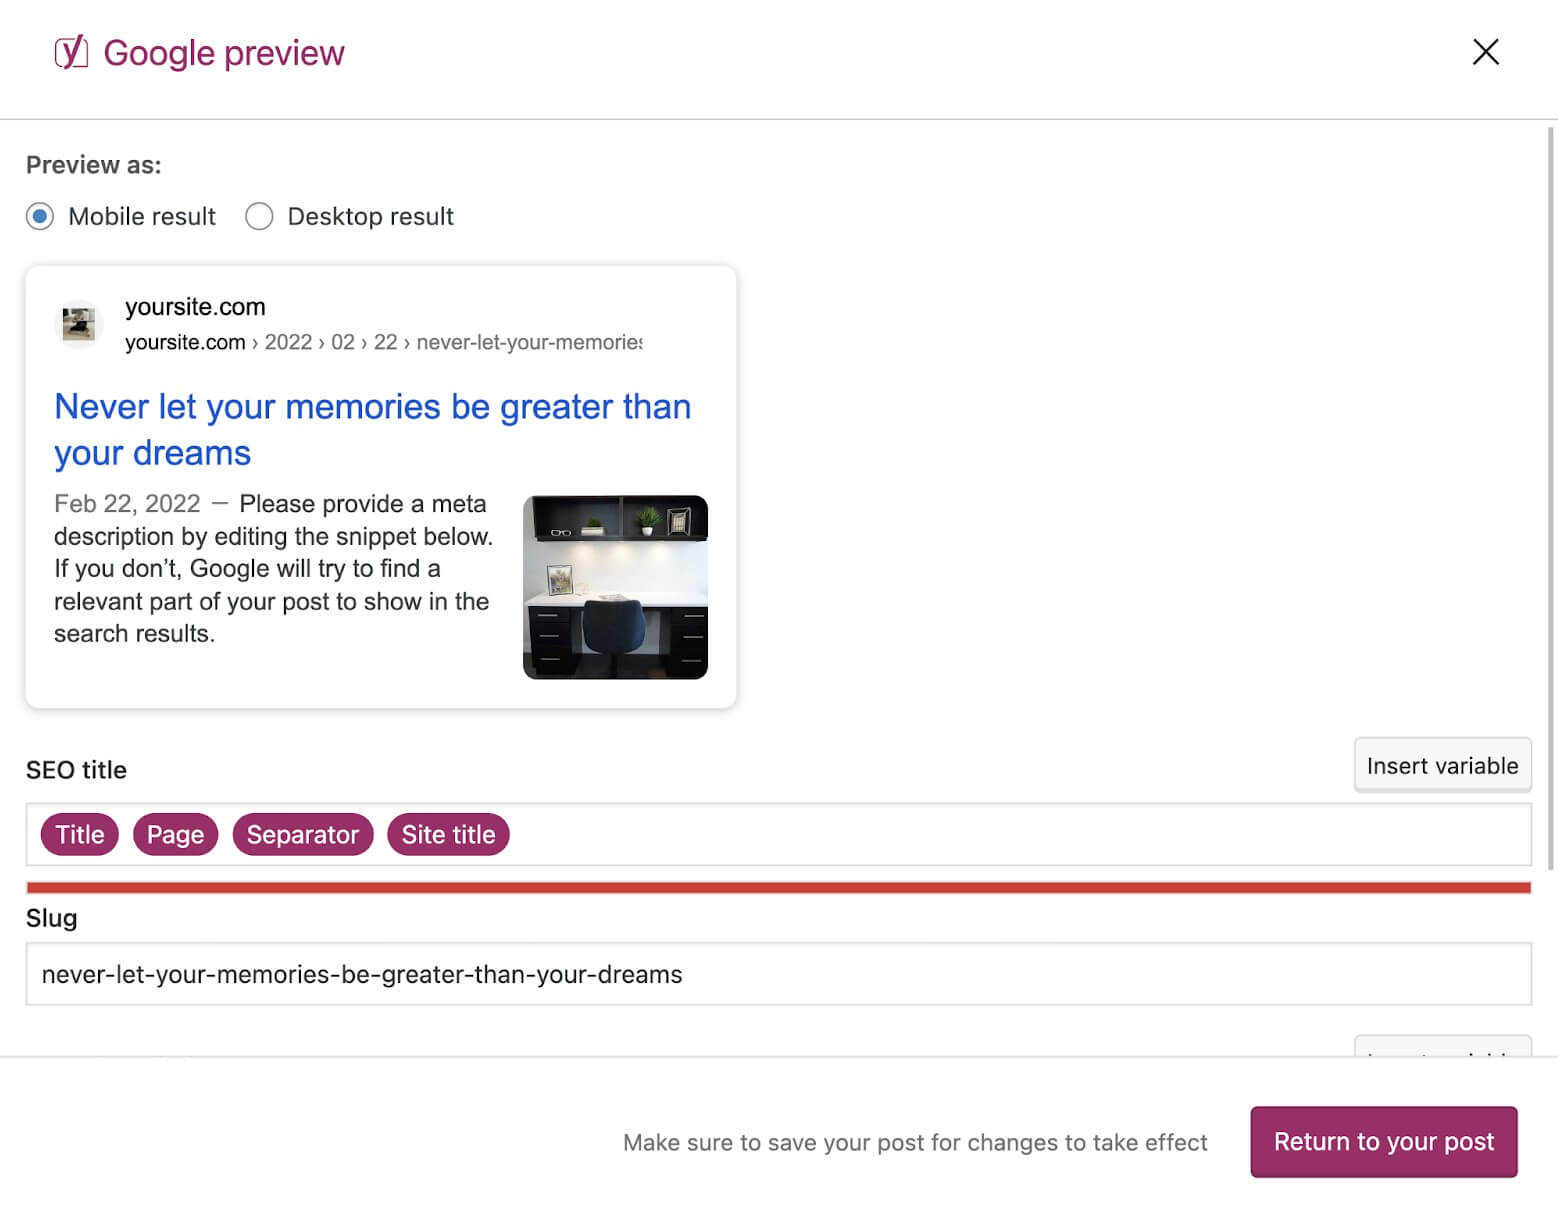
Google Preview
This section allows you to edit the title tag, URL and meta description. It also shows a page preview on Google SERP (search engine results page). This is one of the most useful features of the plugin.
Schema
Schema data helps search engines understand the type of content they are interacting with. By default, Yoast uses the “article” value for a post. However, you can customize this setting on the Schema tab for individual posts and pages. If your content belongs to a different category, choose a more precise option. For example, with Schema, you can select one of the options:
- About Us page
- FAQ page
- contact page
- profile page
- checkout page, etc.
Social
The next two sections allow you to review and edit how the post will look once published to Facebook or Twitter. They include the following:
- Uploading the main image
- Changing the header
- Changing the meta description
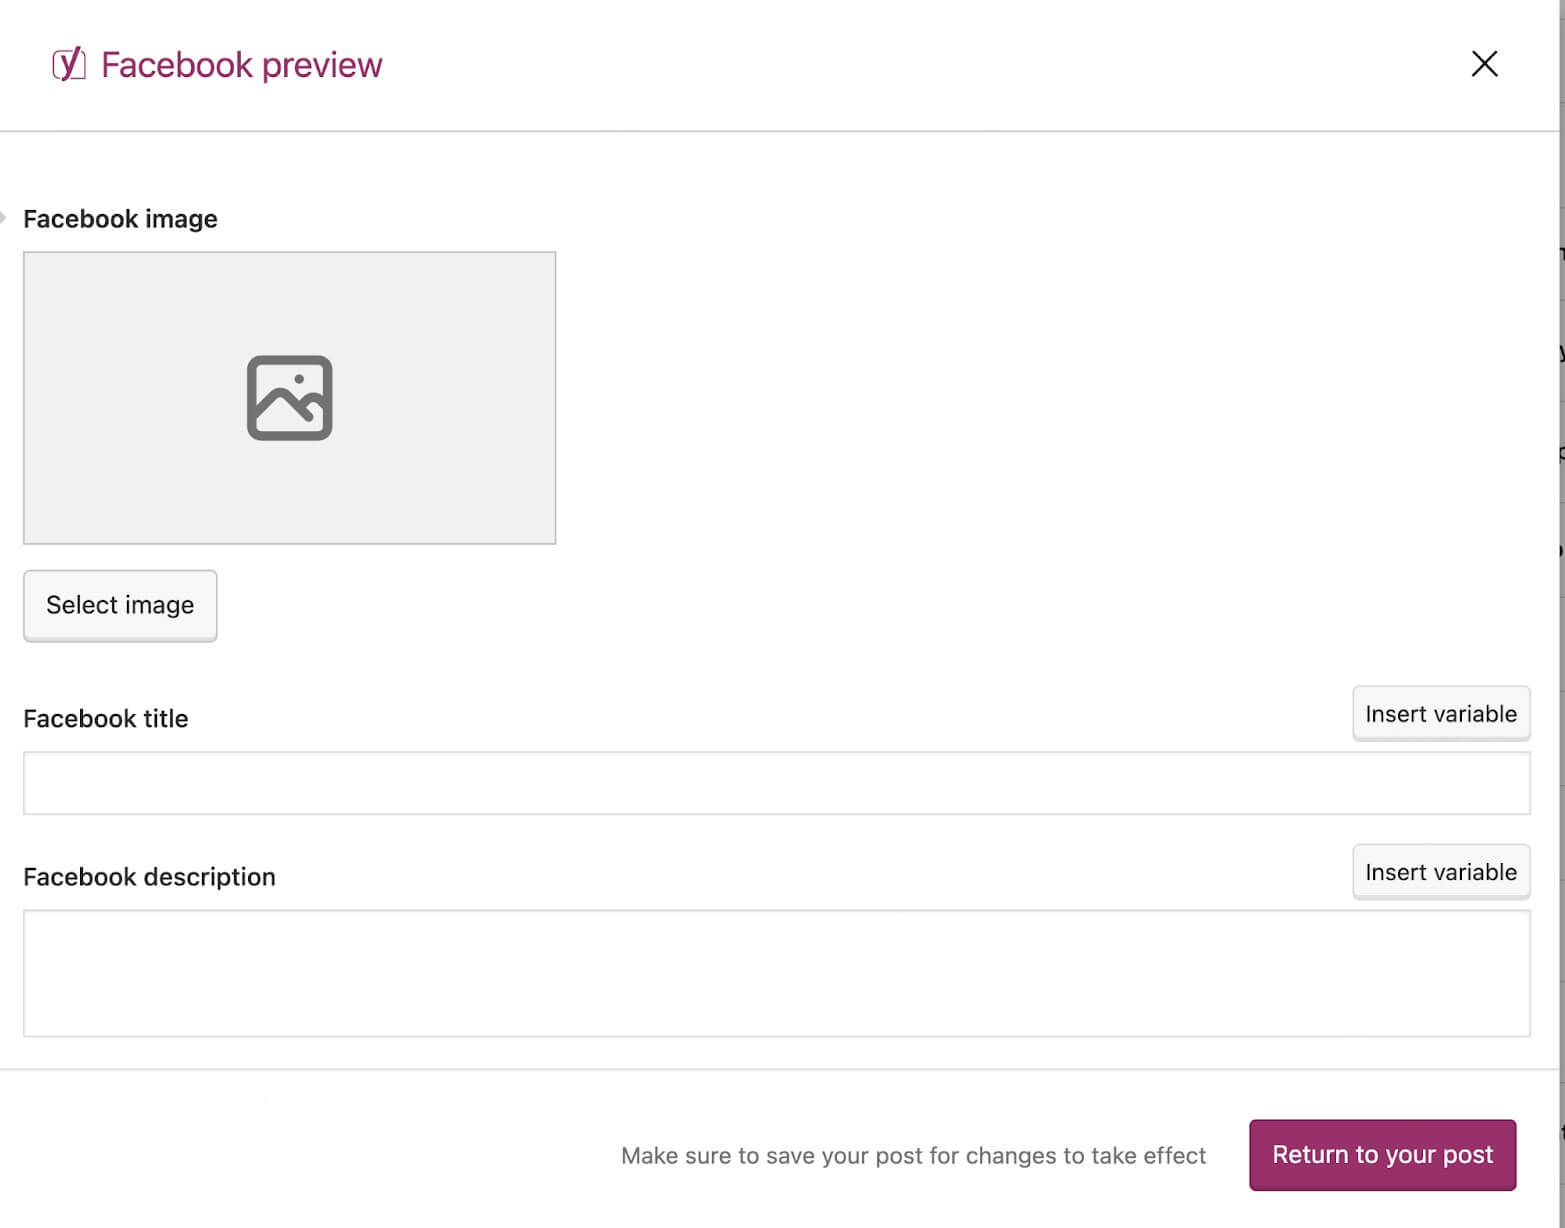
Note, if you don’t set any of these parameters, social media platforms will use your default WordPress image selected in the WordPress editor, along with the title tag and meta description.
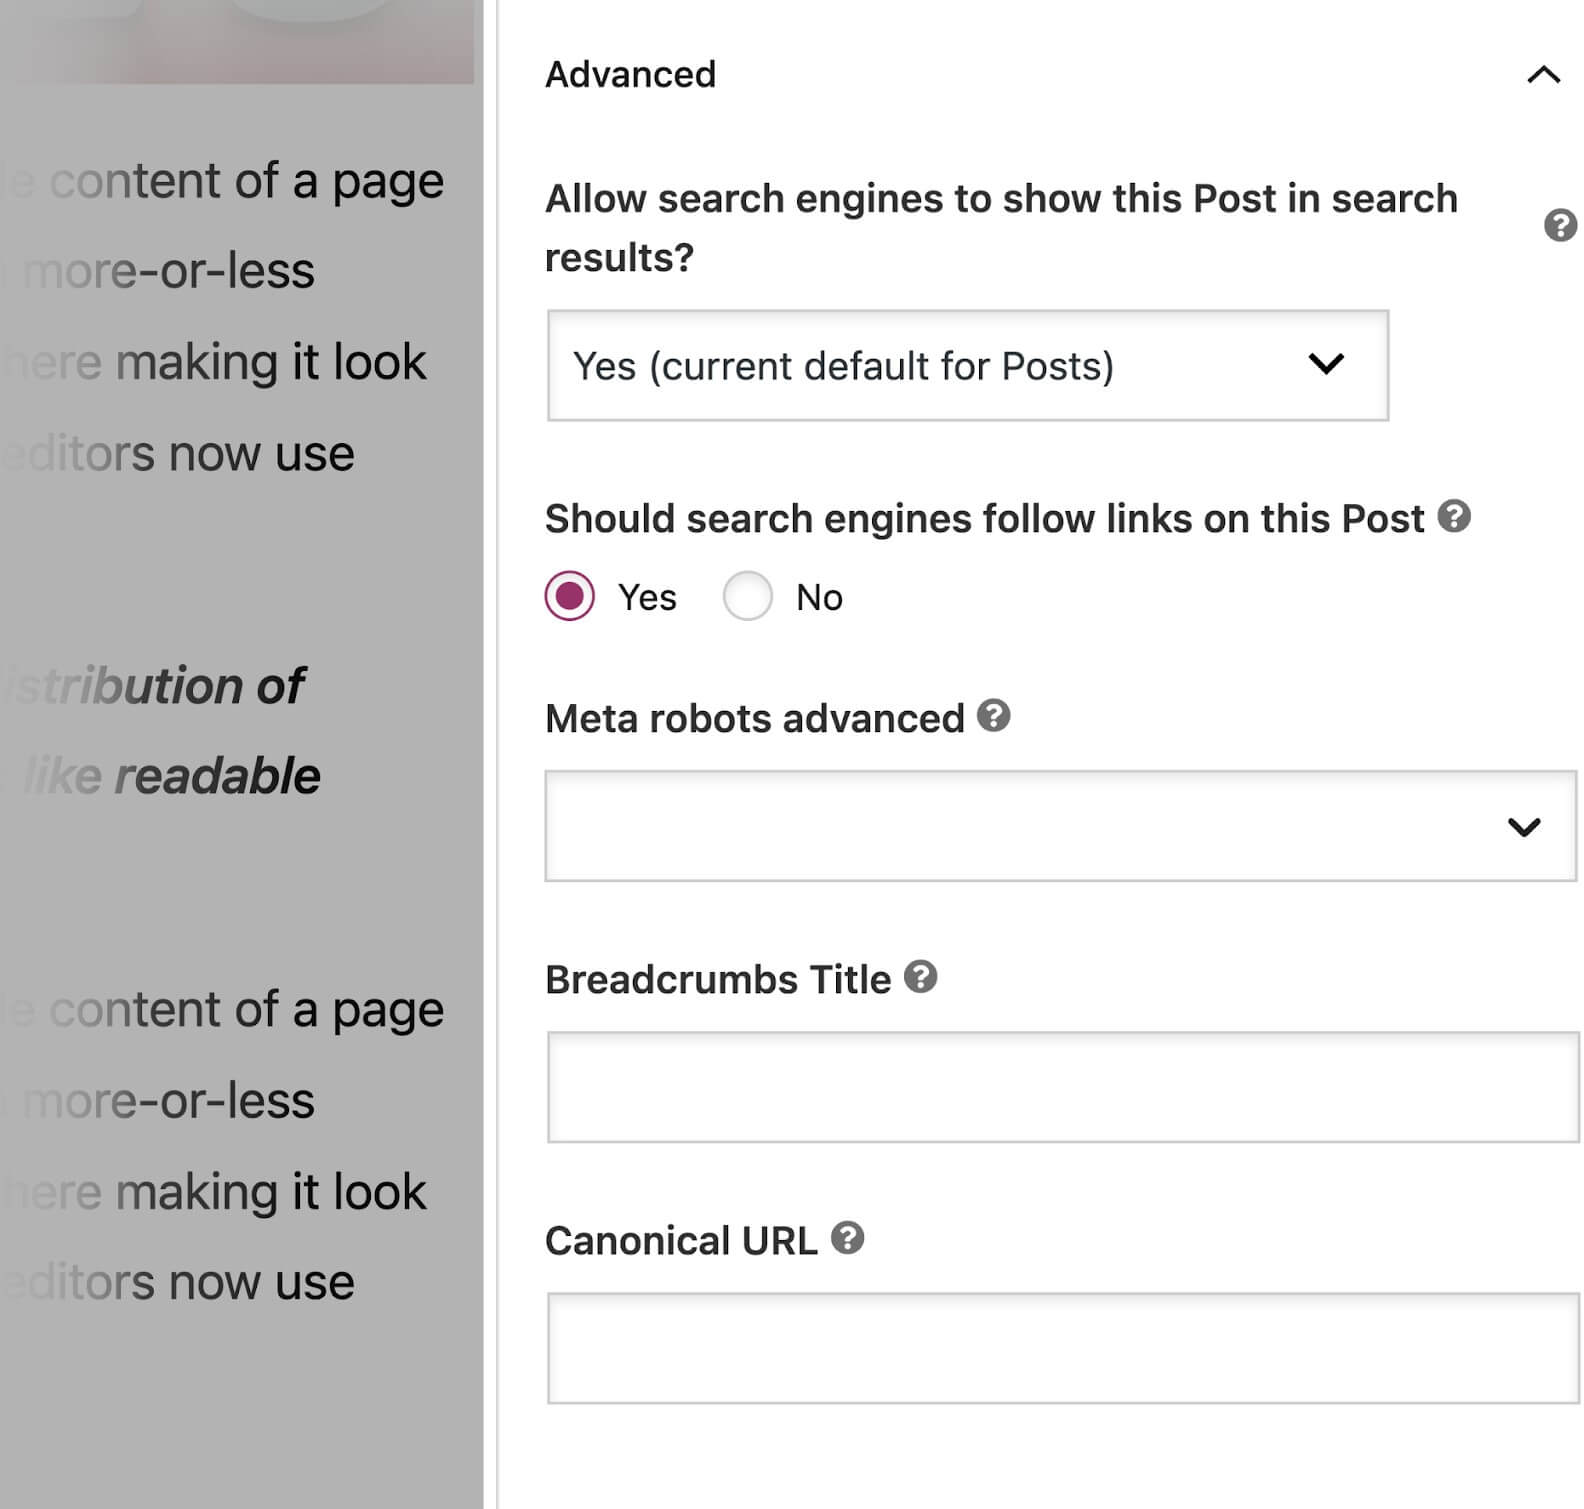
Additionally
In this section, you can perform the following actions:
- Prohibit search engines from indexing the page
- Prohibit search engines from following links on a page
- Configure advanced meta robots settings (e.g. noarchive or nosnippet).
- Provide a header for the breadcrumb page (we’ll talk more about breadcrumbs later)
- Set the canonical URL for the page.
There’s a simple rule at work here:
In 99% of cases, Yoast’s default settings will be enough for you. If you don’t know what these settings mean, you probably don’t need to worry about them.
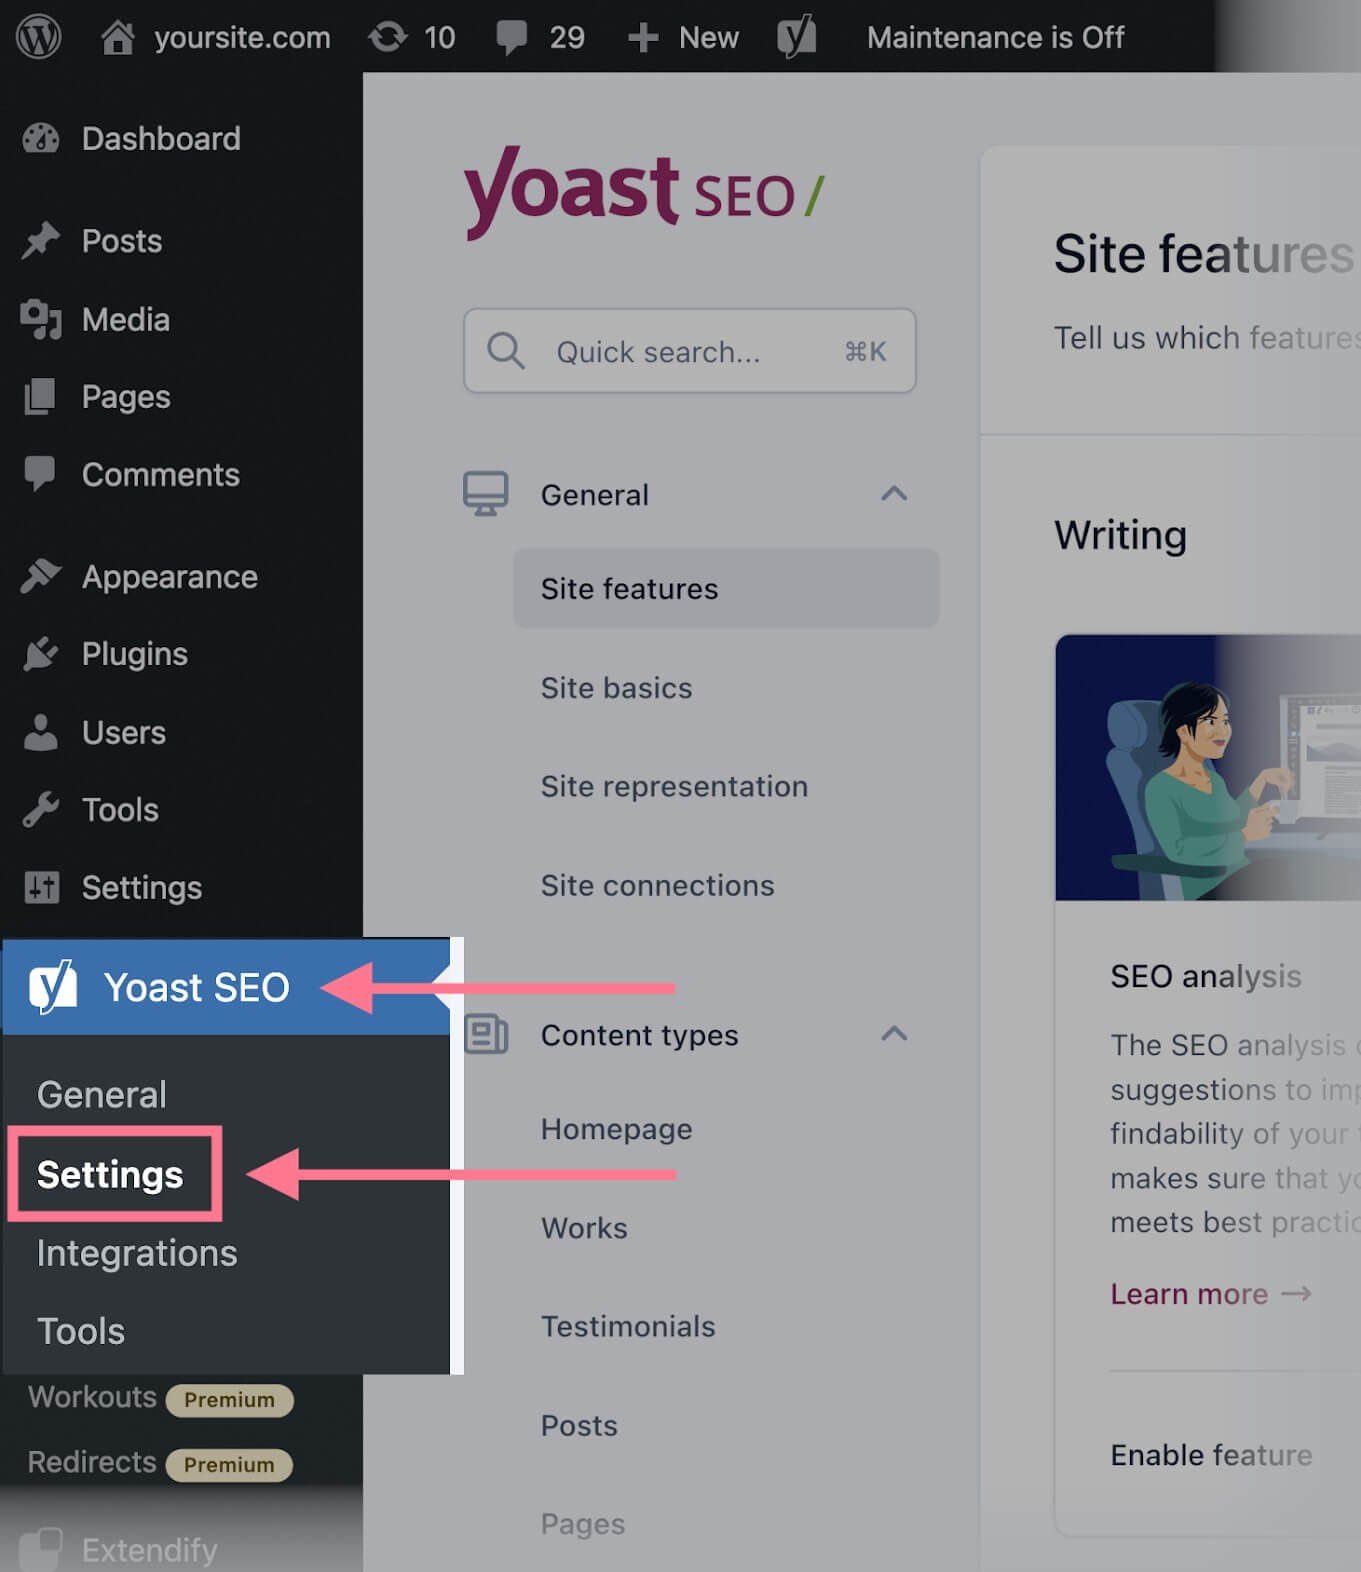
Yoast SEO Settings
To access the plugin’s general settings, simply click the “Settings” button under “Yoast SEO” in the WordPress menu.
Below, let’s take a look at the four sections of Yoast SEO settings and what you can do in them.
Section “General”
This section contains various settings in four subsections.
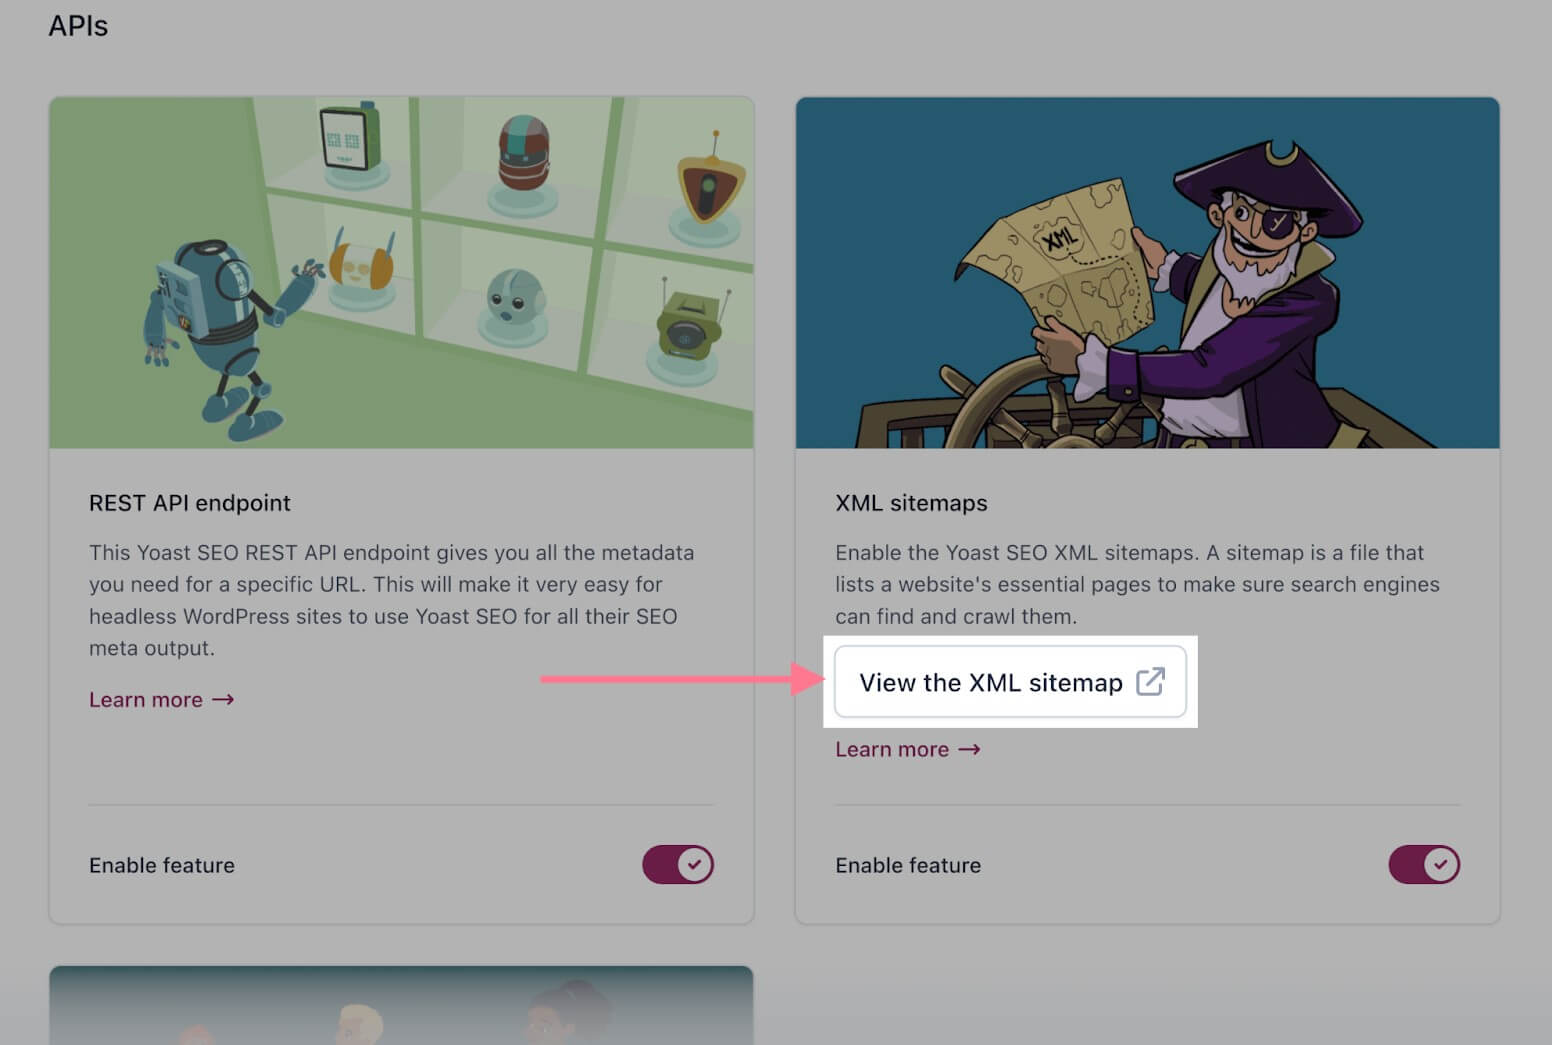
In the “Site Features” subsection, you can enable or disable various features (for example, SEO analysis or readability analysis, which we talked about earlier). Here you can also view the Yoast SEO sitemap – just scroll down to the API section and click “View XML sitemap”.
In the “Basic Site Settings” subsection, you can specify basic information about your site. Here you can also select a title separator. A title separator is a character that separates the page title and the site name in the title tag.
“The Site Submission” subsection contains the same information you entered when you initially set up the plugin. It is designed to feed the Google Knowledge Network.
Finally, the “Site Links” subsection allows you to check your site in various tools, such as Google Search Console.
Content Types section
The Content Types section allows you to define how different types of content will appear on search engines and social media. The section includes the following:
- Homepage
- Records
- Pages
- Landing pages
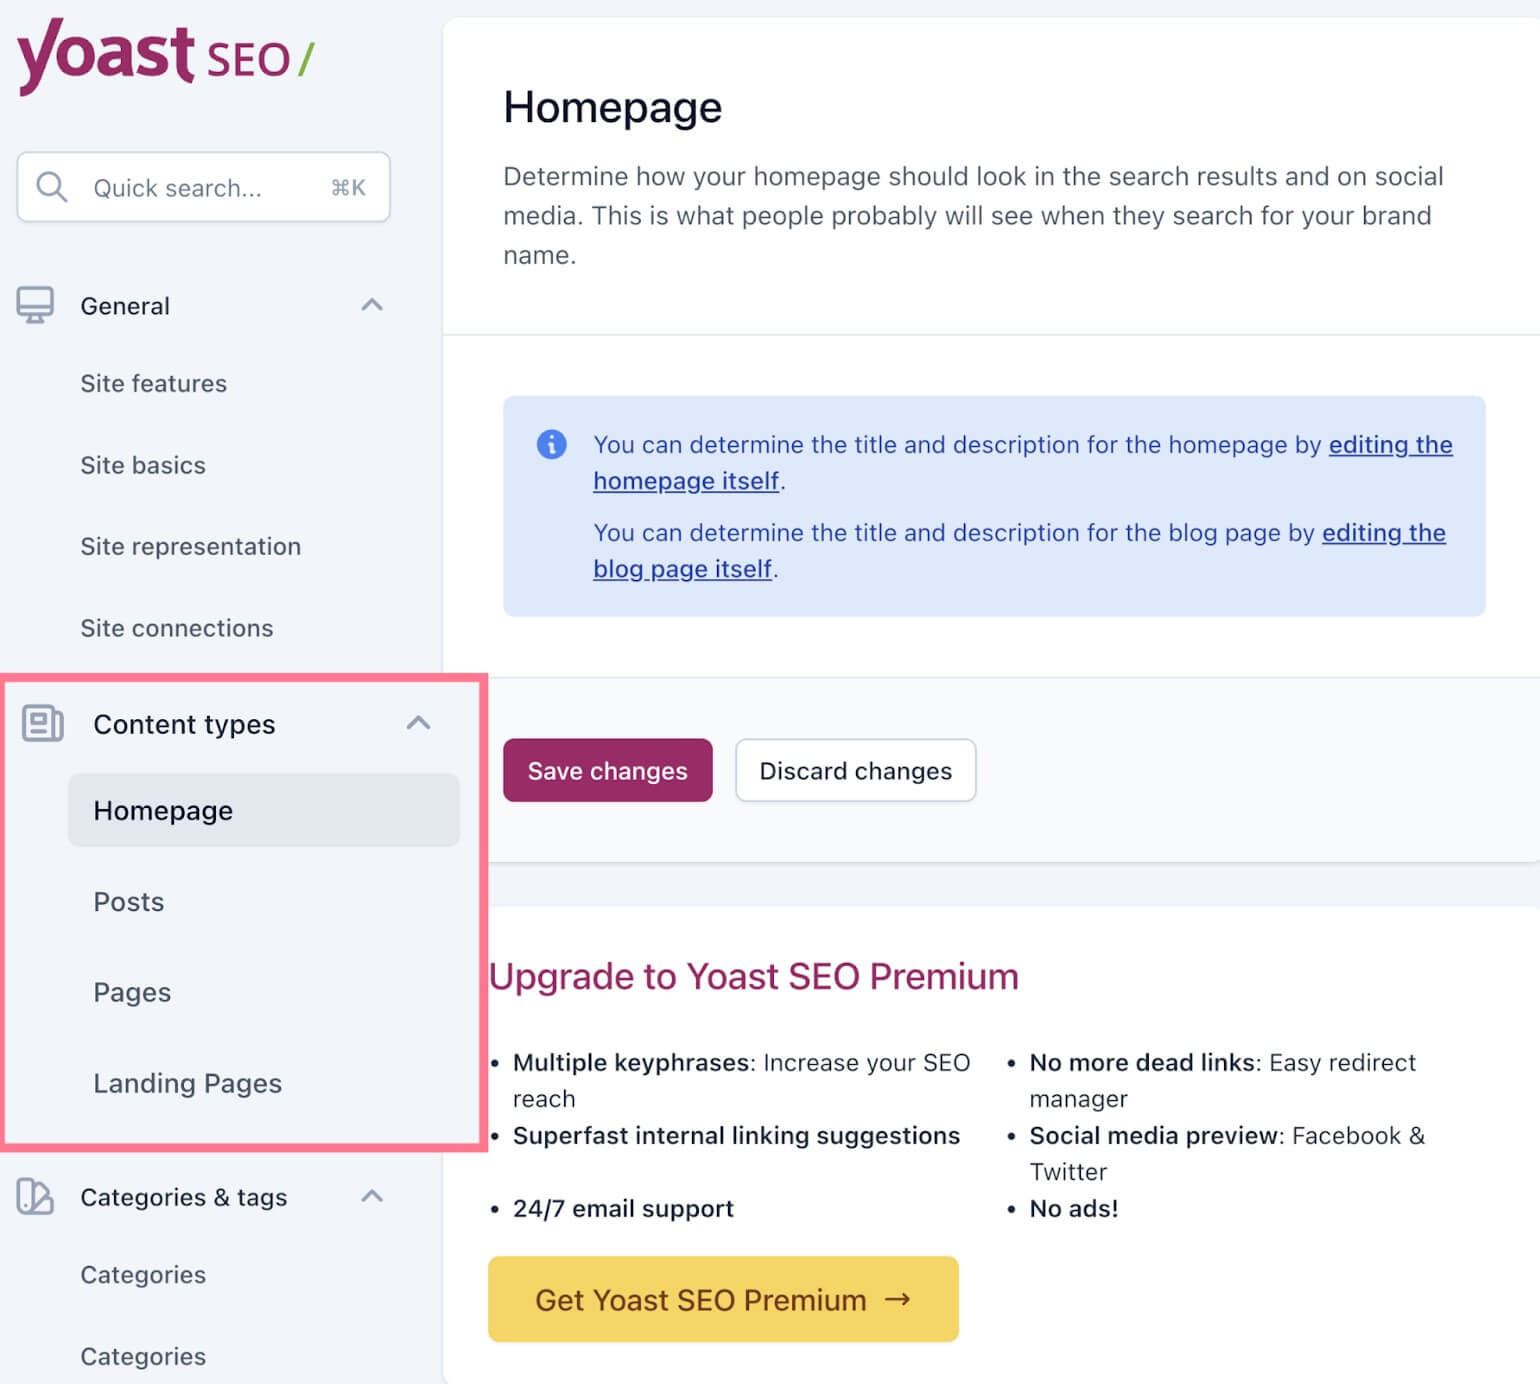
These are general settings for individual content types. You can specify them or customize them differently for individual pages in the content editor. For example, here you can set a default SEO header or change it for each page in the Google Preview part of the Yoast SEO section in the editor.
Categories and Tags section
In this section you can customize the appearance for search and social networks for the so-called taxonomies: categories and tags. Here you can also exclude these taxonomies from being indexed by search engines.
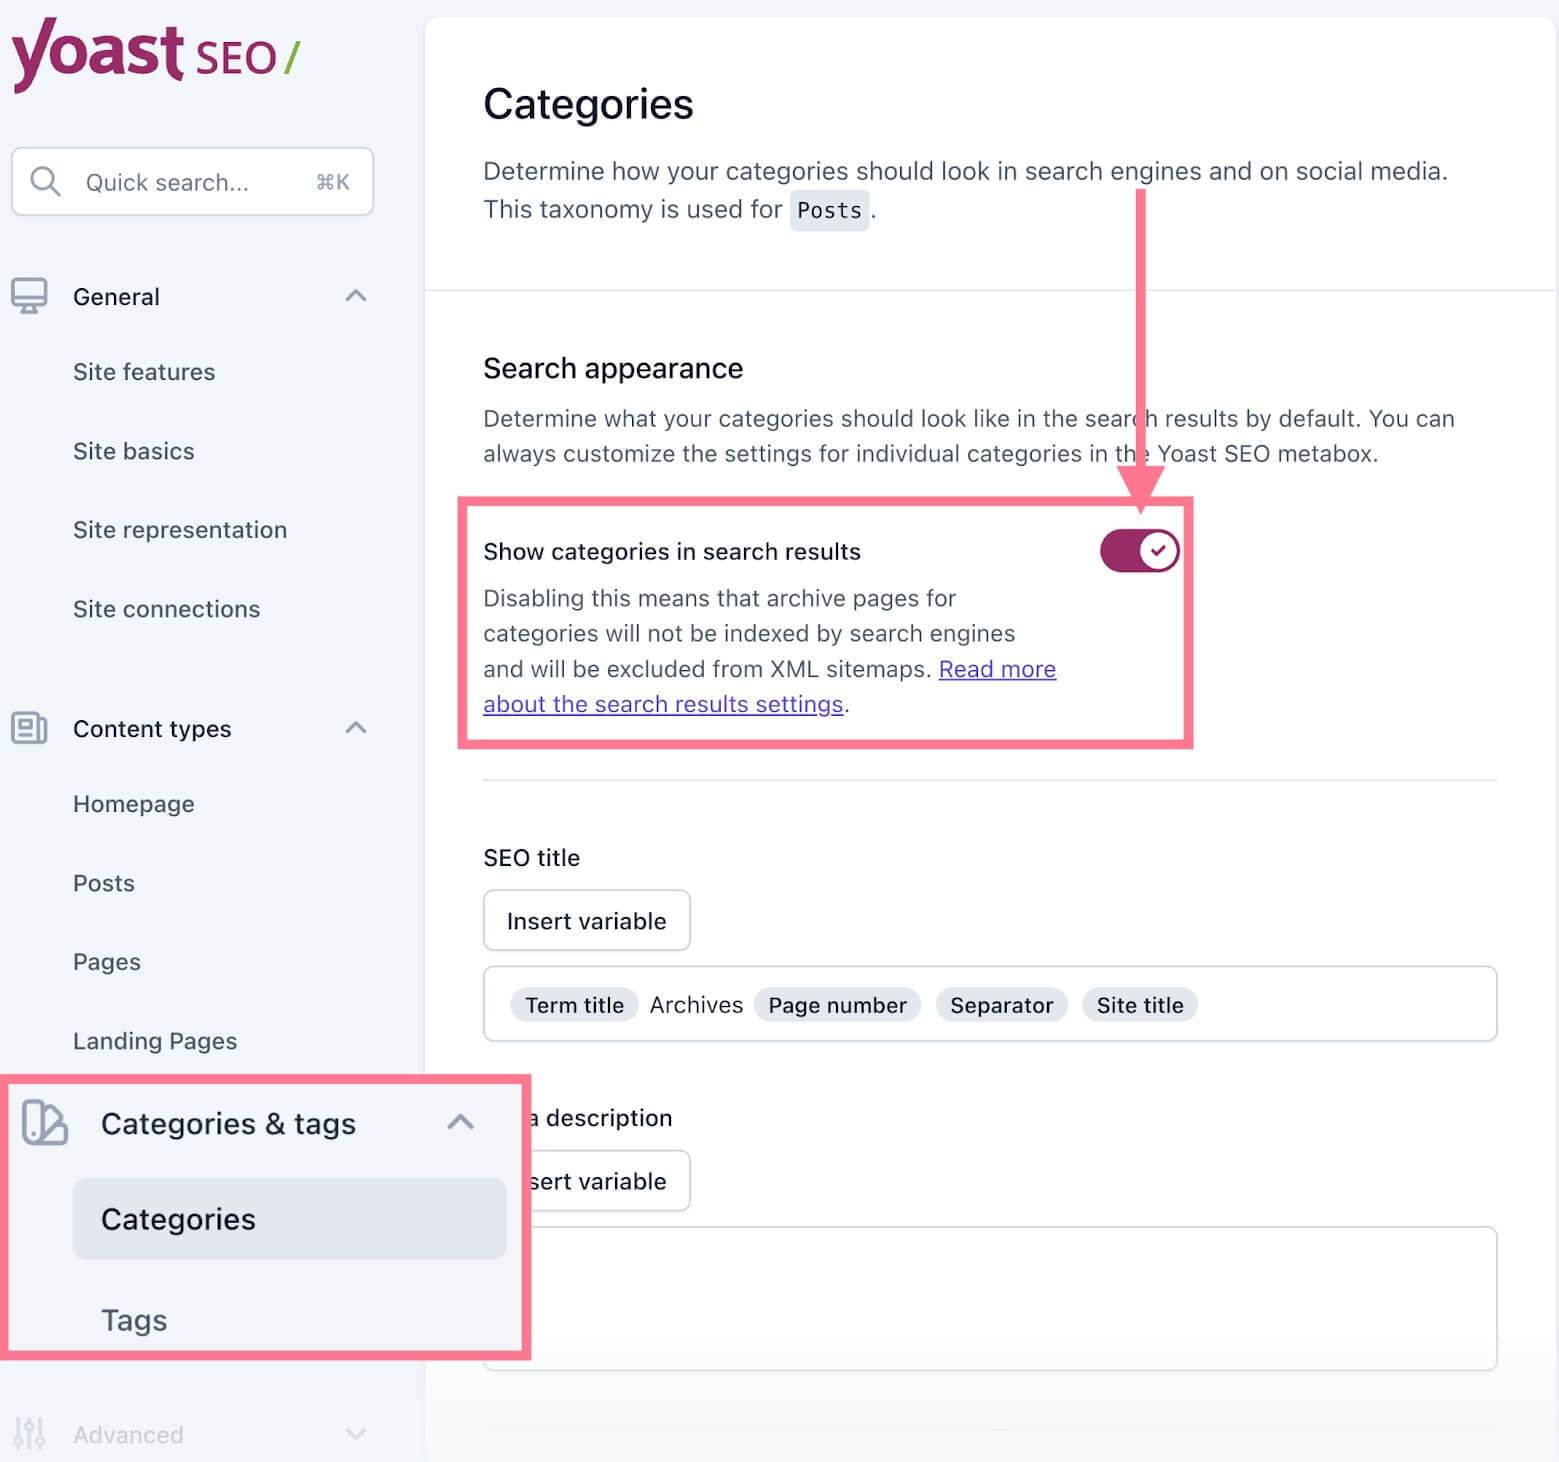
Whether this is worth doing depends on whether or not you are actively using these taxonomies.
Advanced section
The Advanced section of the Yoast settings has several subsections.
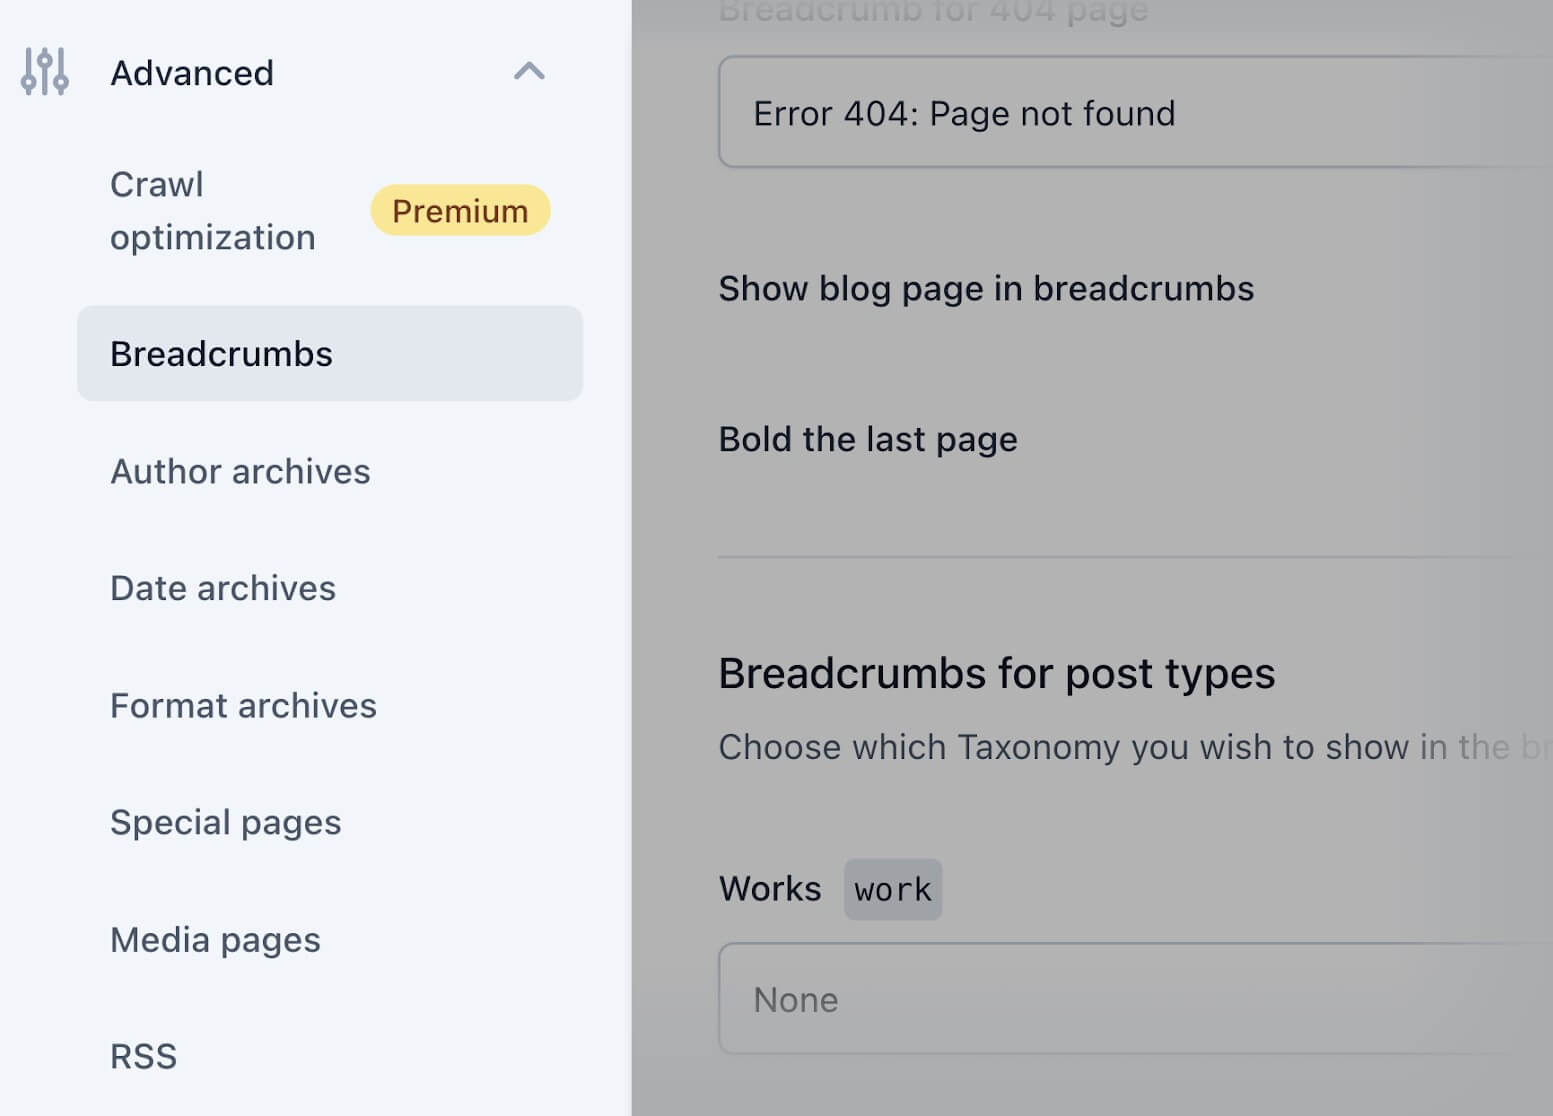
For example, you can customize breadcrumbs here.
Breadcrumbs is a text path with links to various folders and subfolders of the site structure. It can greatly improve the navigation and internal re-linking of a website. Yoast will create code that will allow search engines to display your URL in search results in breadcrumb format. You will also be able to enable breadcrumbs for your theme and customize their appearance.
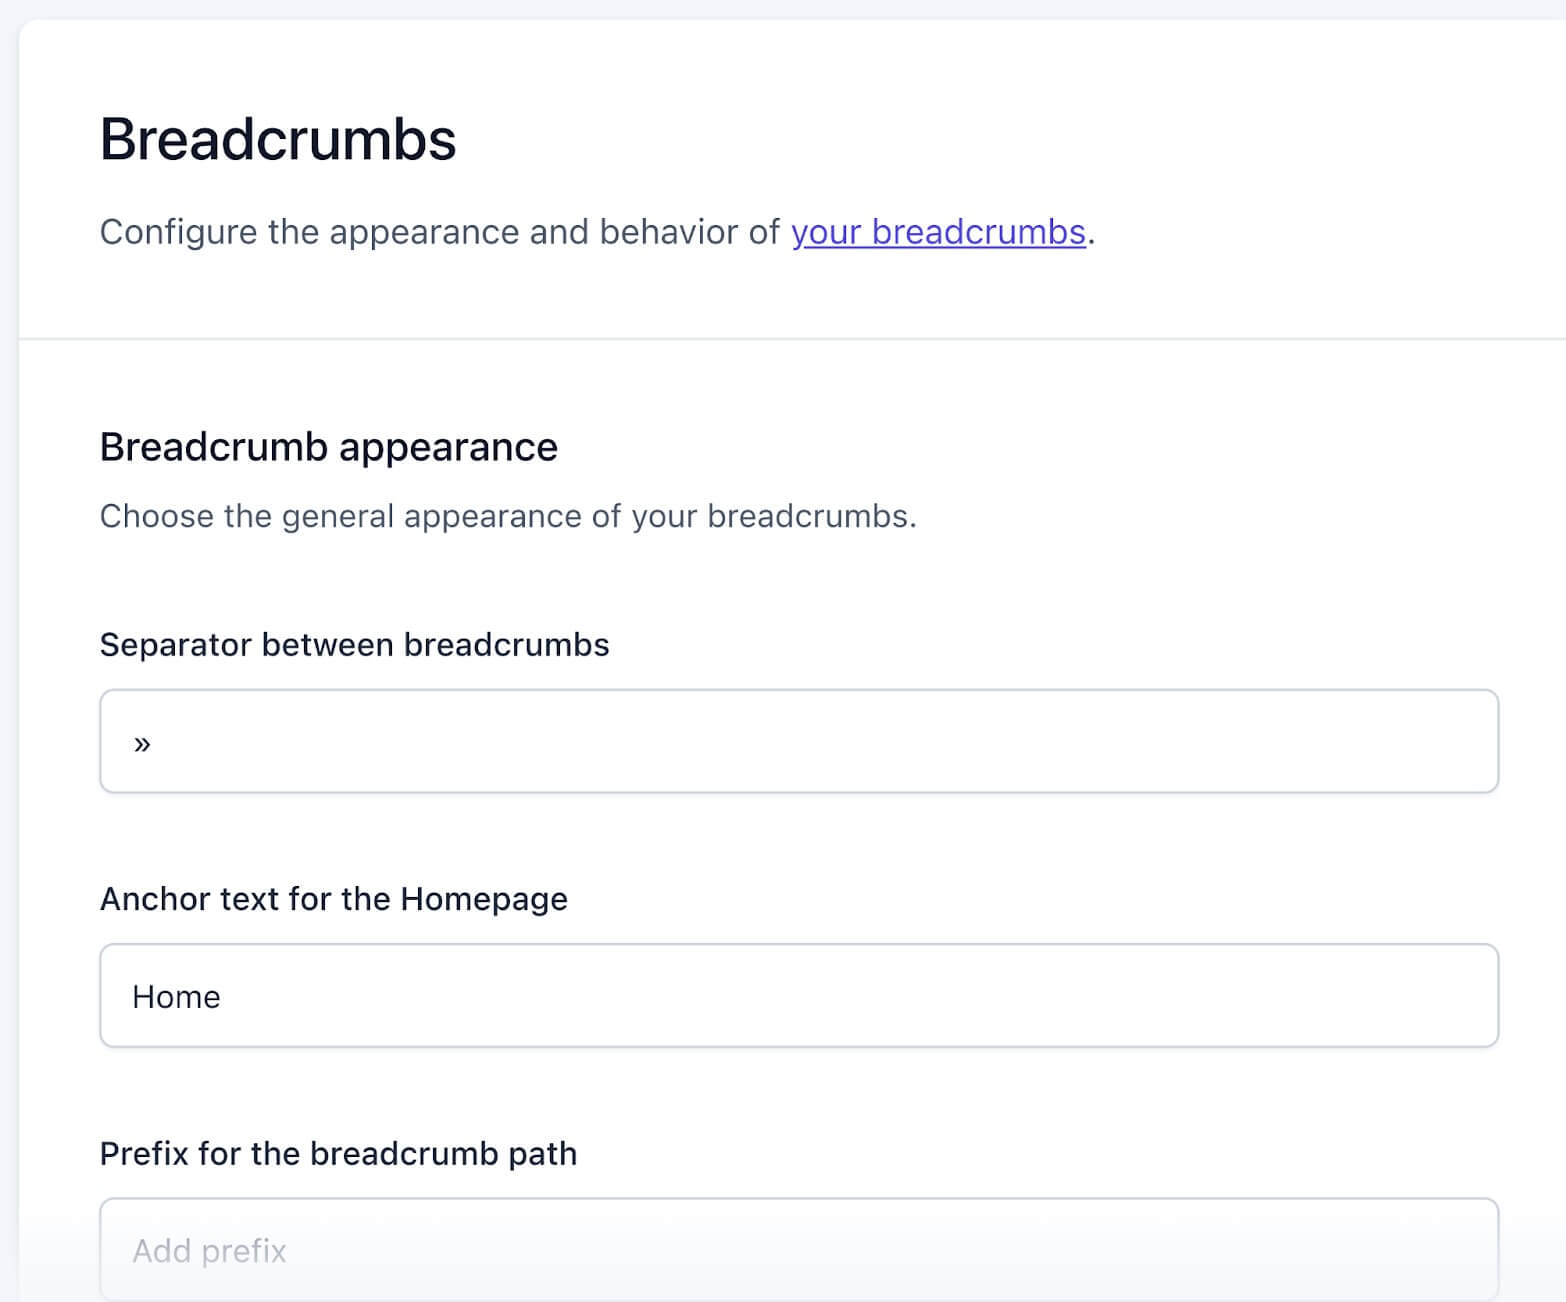
On your website, you can implement breadcrumbs for individual pages or for the entire site.
In the “Advanced” section, you can also enable or disable and manage different types of archives – “Author Archives”, “Archives by Date” and “Format Archives”. Whether you will use these archives and whether they will be indexed by Google depends on the nature and purpose of your site.
To summarize
Yoast SEO is a useful and powerful tool for every website with the help of which you can reach the top of search engines. It is considered the most common plugin for SEO promotion of websites on WordPress. Just remember that in order to make things work, you need to study the industry in detail and conduct a detailed analysis of each failure.

commercial offer
Other articles by the author

07/10/2024
Media planning helps to identify the advertising channels that should be involved, determine the amount of investment required to implement the plan, the schedule of ads, and more, which we will discuss in more detail below. Planning is necessary to know in advance what the result of advertising will be and how the whole concept will work.

04/10/2024
Meta has released its first set of artificial intelligence-based generative capabilities for advertising creatives, which are now available to all advertisers via the Marketing API. This update is aimed at simplifying ad creation, increasing the variety of creative variations, and potentially improving ad performance.

16/07/2025
Choosing a reliable SEO agency is an investment in the long-term development of your brand and sustainable growth in online sales.
Latest articles by #SEO

19/06/2026
Crowd marketing involves placing useful, organic mentions of a brand, product, or service on platforms where your audience is already engaging.

18/06/2026
A marketing director is, first and foremost, a top manager who is part of a company’s senior leadership and thinks in terms of the business as a whole, rather than individual advertising campaigns.

18/06/2026
A strong script for Direct is built as a sequence of logical elements, where each has its own function and does not overload the dialogue.