
 18/08/2023
  4742
4742


Інтернет-маркетинг
простою мовою
Content of the article
- /01 Why do you need Google Tag Manager?
- /02 Advantages and disadvantages of Google Tag Manager
- /03 Concepts used in Google Tag Manager
- /04 When Google Tag Manager is most effective
- /05 Universal way to set up Google Tag Manager
- /06 Setting up Google Analytics with Google Tag Manager
- /07 How to set up a Facebook Pixel
- /08 Problems that may arise when working with Google Tag Manager
- /09 To summarize

What is Google Tag Manager? Its features and settings
Google Tag Manager (GTM) is a free, simple and convenient service that allows you to manage tags without making any changes to the site code and without the developer’s involvement (except for installing GTM code on the site). Scripts regulation and all the necessary settings are done through the user interface of the service. All changes can be implemented quite quickly, for example, to analyze traffic, change analytics configurations, set up contextual advertising more effectively and enable tracking of new forms and buttons.
Why do you need Google Tag Manager?
So, why do you need google tag manager and what are its functions:
- To collect data from Google Analytics, KISSMetrics and other analytics tools.
- To set up remarketing in Google Ads, Facebook, AdRoll and other services.
- To install HTML-scripts for further split and A/B-tests or displaying banners.
- In order to be able to quickly change the tags placed on the site.
In addition, tag manager allows you to track the statistics of advertising in social networks (clicks on buttons), monitor external traffic channels, customize micropartitioning, control the number of bounce rates, monitor the number of external links to the site and much more.
Advantages and disadvantages of Google Tag Manager
Before we get to know how to set up GTM and how to use it, let’s take a look at the pros and cons of this service.
The advantages of the tool include:
- Google Tag Manager is absolutely free, accordingly, no investment is required from you.
- It is possible to integrate almost any tags. In addition to Google Analytics templates, the service has ready-made offers for other popular tools and systems of analytics and advertising. If you haven’t found a suitable template, use the “Custom HTML” template.
- Tag Manager gives you the opportunity to significantly reduce the code of the site, which positively affects the speed of its operation.
- In Google Tag Manager you can view changes and, if necessary, roll back to previous settings
- The service allows you to open a common access for work, which is favorable for the convenience of teams of specialists.
- It is possible to perform text substitution without intervening in the site code, which is very time-saving, as the marketer can test text elements without involving a programmer.
As for the disadvantages of GTM, there are few, but they are there too:
- If you were not careful enough while working and accidentally deleted or corrupted the GTM container code, it will add to your troubles. Because this way you will break all the tags that were created with it. Finding and fixing the error will have to be done manually, and this will consume a lot of your time.
- Installing GTM code on your site will require knowledge of layout and programming. If you do not have such knowledge, you will need to contact a specialist.
- Google Tag Manager lacks reports and online support, and this can create some inconvenience.
Concepts used in Google Tag Manager
To work more effectively with the Tag Manager, it is worth understanding the terms that are used when working with the service.
Container. This is the controlling JavaScript code that is placed on each page of the site. It is the shell for all tags and thanks to it, third-party tools are launched.
Tag. This is a JavaScript code fragment placed on the site that performs the necessary functions: it tracks user behavior, traffic, analyzes the effectiveness of advertising, etc. Examples of tags: Adwords remarketing code, Facebook pixels, Google Analytics tracking code.
Trigger. This is a condition that defines the circumstances for triggering the created tags. Thanks to it Tag Manager understands how, when and where to do what you want. Examples of triggers are: loading a document, viewing pages, clicking links, filling out a form.
Variable. This is additional data that may be required for your tag and trigger to work. They are used in two cases: to store data that is used when triggers are activated; to store and transfer data that is used when tags work. Often, constantly updated built-in variables are sufficient for operation. Examples of variables: click on a link, page scroll, etc.
Data layer. This is a JavaScript object used to pass information from a website to the Tag Manager container. It allows you to assign a value to variables and run tag activators. The system can handle data categories such as: product information (name, category, price); customer data (regular or new); and transaction information (payment date, amount).
When Google Tag Manager is most effective
Tag Manager is quite an effective service for analyzing advertising campaigns, setting up a brand promotion strategy, as well as checking individual components of a website. Today, GTM is an important tool in such cases:
- you use several analytics services and implement third-party tools on your site;
- you do not have a developer on your staff yet, and you do not plan to hire one;
- you conduct A/B testing on a regular basis and actively use remarketing;
- you want to keep a record of all the ways users interact with the site and use this information for more effective promotion.
Plus, Tag Manager is also a convenient service for those who work on several projects at once. It speeds up and simplifies most work processes, while reducing the risk of making mistakes at all stages of work.
Universal way to set up Google Tag Manager
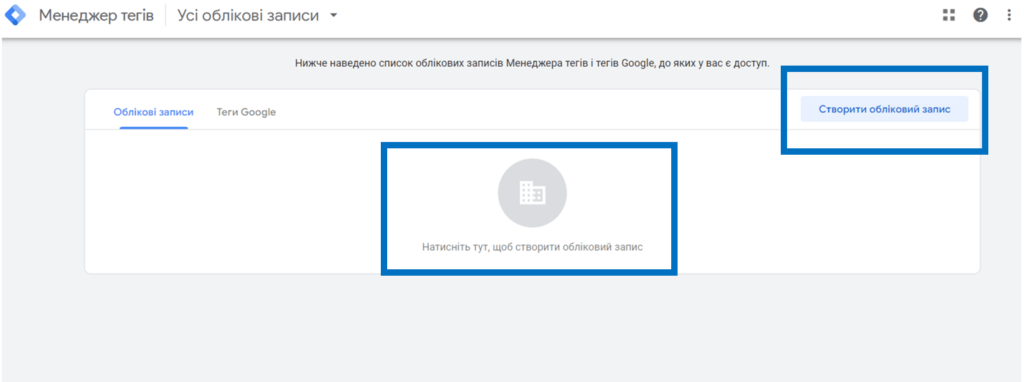
To set up google tag manager, you need to log in to your Google account and go to Tag Manager. Next, click “Create Account” to create an account for your organization.
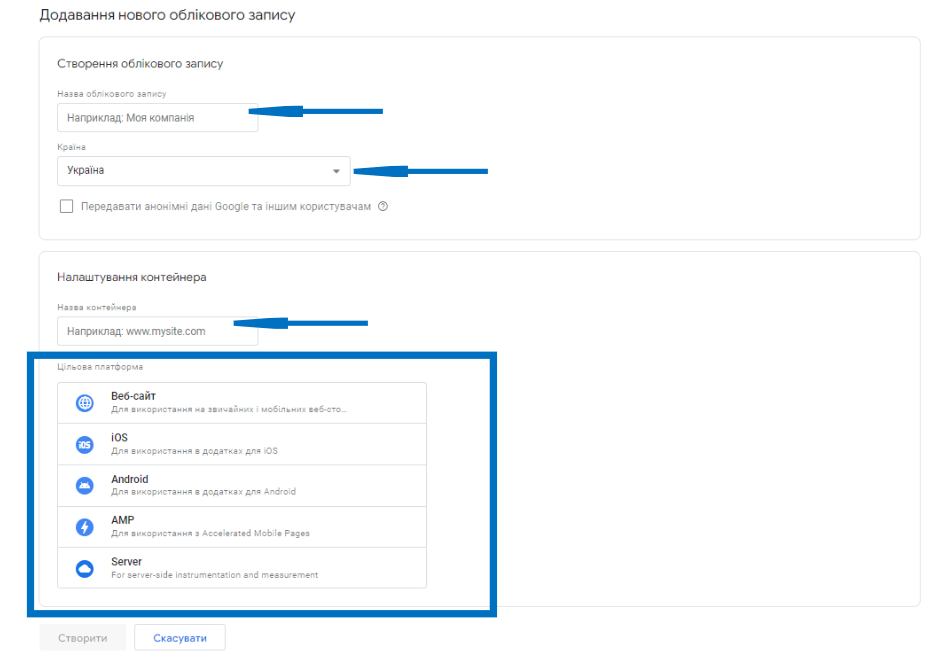
You then need to enter an account name and select a country. Google advises that no matter how many sites your company has, only one account should be created. Next, enter the name of the container. Usually, one container is used for one site. Therefore, the container name could very well be the URL or name of your site. Then decide on the “Target Platform”.
Once you have entered all the data, click the “Create” button. This will give you a Google Tag Manager account and a container. Next, you will see two pop-up windows – terms of use and code snippets that you need to contribute to the site to finish installing GTM. The tag manager code is divided into two parts:
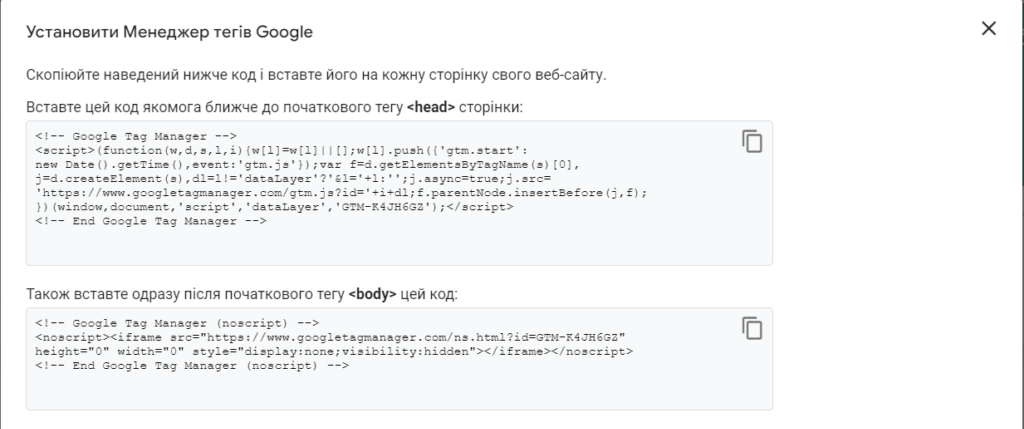
The first part of the code should be placed in the < head > tag. The second one is after the < body > tag. Note that the second part of the code is a backup. It will be needed only if JavaScript scripts are blocked on the site. If the first part is blocked, the second part will trigger the GTM. While this is rare nowadays, it’s still best to consider.
Is it possible to insert the first part of the code not in < head >?
Yes, you can do that, but it is still better to add it in < head > or close to it. For the reason that if it will be higher on the page, it will load faster. And so, you will be able to keep track of more users and find out how they behave. For example, set the percentage of traffic returned before the entire page loads.
Setting up Google Analytics with Google Tag Manager
Most likely, the first thing you’ll decide to set up with Google Tag Manager is Google Analytics. To do this, you’ll first need to sign up for a Google Analytics account. Then create a variable like “Google Analytics Settings.” After that, generate a tag with these settings:
- The tag type is Universal Analytics;
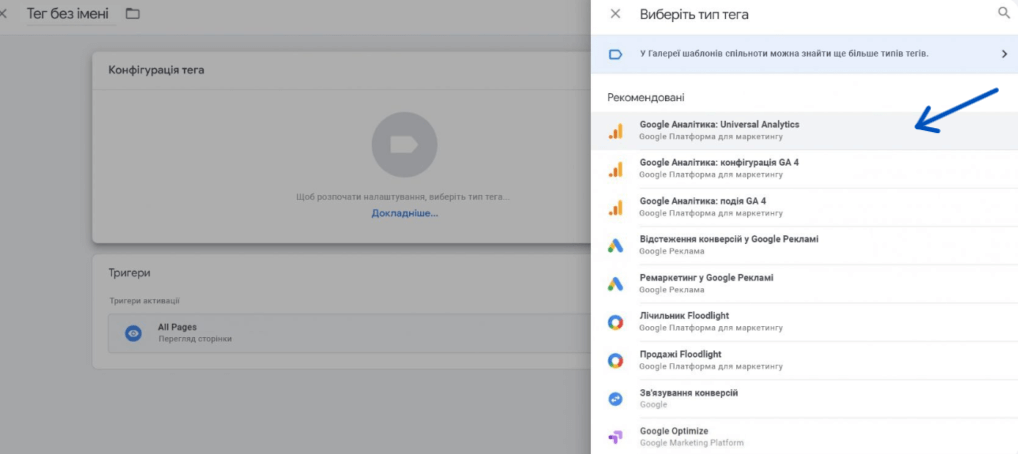
- Tracking type – page view;
- Google Analytics settings – here you need to select the variable formed at the previous point, or enter the resource ID in the format UA-XXXXXXXXXXXX-X;
- Triggers – select All Pages and click “Save” to display the new tag in your workspace;
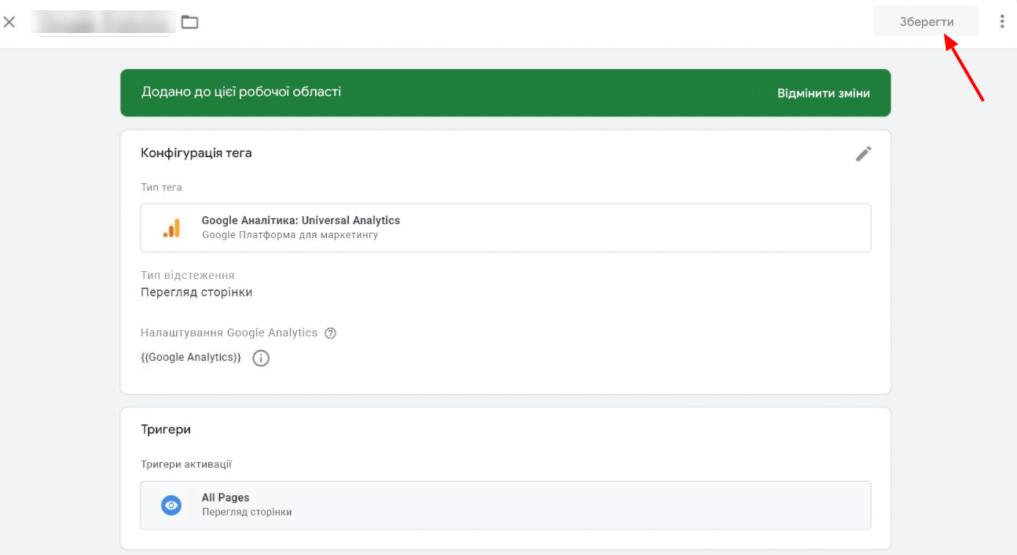
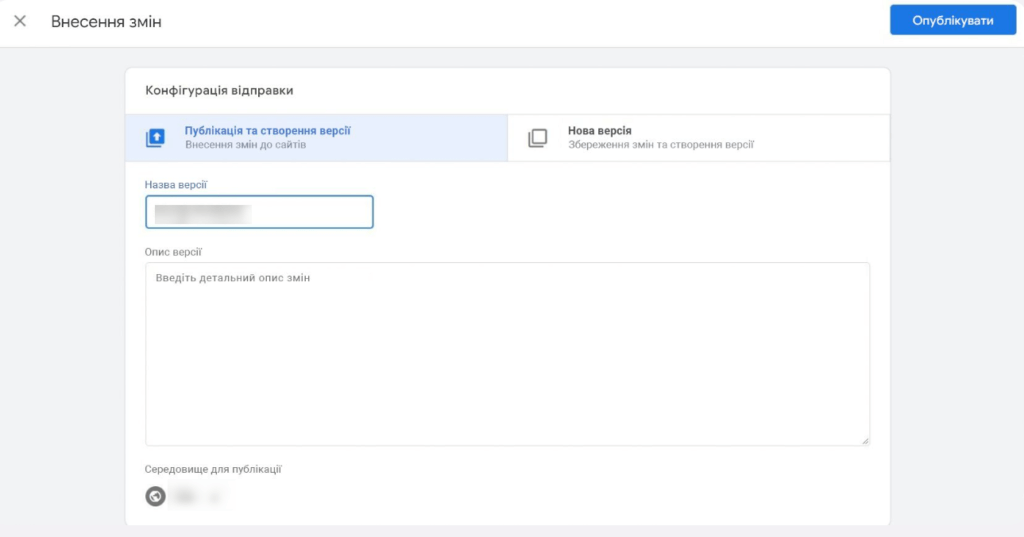
- Next, you need to insert the tag into your site. To do this, make changes using the “Submit” button.

- Then you will see a window where you need to spell out the name of the version and click “Publish”.
That’s it, you’re done! Google Analytics is collecting data from your website.
How to set up a Facebook Pixel
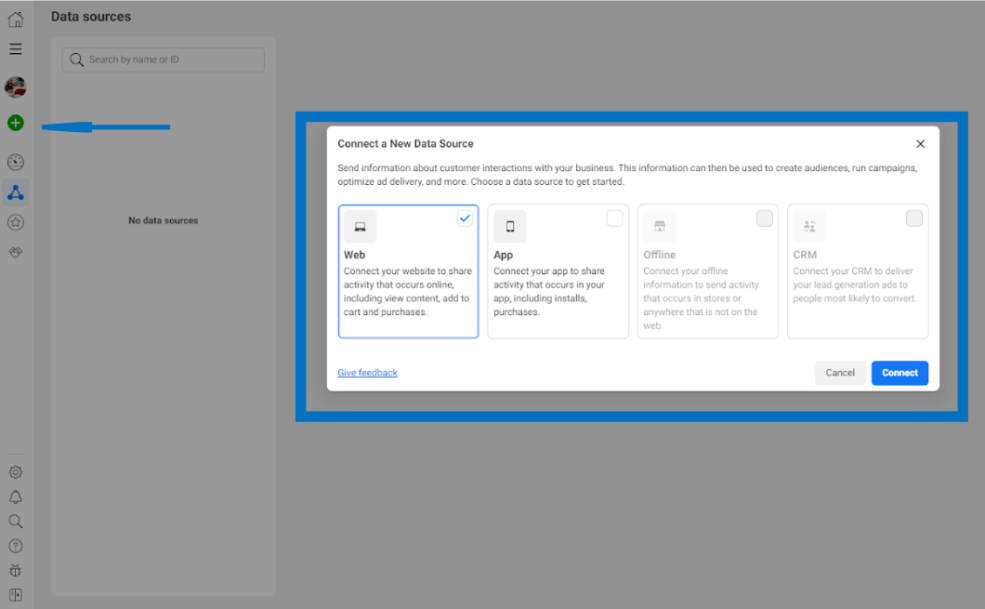
First of all, you need to create your Facebook Pixel in Event Manager Meta Business. To do this, open Event Manager and click “Connect Data Sources”, select “Internet” among the options offered.
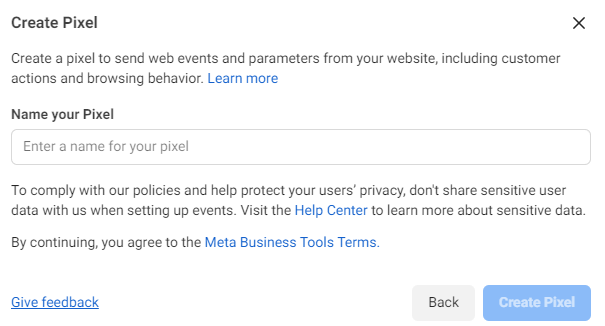
Next, enter the name of the pixel and click “Create”.
After you have created the Pixel, you can proceed to its installation on the site. There are two ways of configuration: automatic and manual.
To manually adjust the setting, follow these steps:
- Select “Add the pixel code to the site manually” and copy the resulting code;
- In Google Tag Manager, create a tag with the following settings:
- Tag type – custom HTML;
- In the HTML field insert the Pixel code;
- In the tag activation settings choose “Once per page”;
- Under Triggers, select “All Pages”.
Next, you need to publish the tag according to the scheme described above in the Google Analytics settings.
For automatic customization, we select “Use Partner Integration”. Among Meta partners, you should stop at the option of installation through Google Tag Manager. Allow access to GTM (specify the email with which you registered in the Tag Manager and click “Allow”), select the desired account and container.
Done! The pixel is installed. You can check if it is displayed among the tags in the Tag Manager container.
Problems that may arise when working with Google Tag Manager
- Installed GTM code and did not remove Google Analytics code
If you are working with Google Analytics via GTM, you should definitely make sure to check if you have removed the GA code you installed earlier.
- Incorrect Google Tag Manager code or no Google Tag Manager code on your site
If you’re working through GTM with many sites, you may have accidentally mixed up the code for the right container. Compare whether the ID of the tag manager container you are working in matches the gtm code hosted on the site.
- Forgot to make changes in preview mode
For example, while checking if the new tags worked correctly before publishing, saw an error. So went back to google tag manager to fix it. After that, you returned to the site, but the error is still present. Most likely, you just forgot to update the preview mode.
- You didn’t publish the settings
For example, you have customized tags, triggers, variables and made sure that they work correctly. After some time, you log into Google Analytics and can’t find the statistics of the new configuration through Google Tag Manager. You probably forgot an important thing – publish the configuration changes to GTM. Pay attention and remember that after making any changes, you should always click the “Submit” button. In a new window, enter the name of the new version and click “Publish”. Only after these actions the new settings will work on your site.
To summarize
In the article we have considered what google tag manager is, familiarized ourselves with the terms that are used when working with the service, told why it is needed, its advantages and disadvantages and how to configure google tag manager. What conclusion follows from all this? GTM is a simple and versatile service that helps you to quickly make changes to your site and manage content thanks to tag activation rules.

commercial offer
Other articles by the author

27/09/2024
The indicator allows advertisers to assess how attractive their messages are to the target audience. Measuring CTR allows marketers not only to analyze which ads demonstrate the highest click-through rate, but also to understand the behavior of their potential customers.

17/09/2024
Google My Business (GMB) is a free online directory of organizations. Creating a profile on Google My Business allows you to provide important information about your company that potential customers can search for, such as opening hours, location, website, phone number, and reviews.

14/08/2024
Viewing a competitor's profile has already become a standard practice, but it's almost impossible to view their stories anonymously. Why is it almost impossible?
Because there are a number of tools that allow you to remain invisible, from online services and browser extensions to tricks like using airplane mode.
Latest articles by #GTM

01/07/2026
The TikTok platform has evolved from an entertainment app into a global marketplace, where the user’s journey from discovering a brand to making a purchase has been reduced to just a few clicks.

01/07/2026
An effective profile header isn't just attractive text it's a clearly structured, modular system in which each element serves a specific marketing function.

18/06/2026
A strong script for Direct is built as a sequence of logical elements, where each has its own function and does not overload the dialogue.