
 05/10/2023
  3667
3667


Інтернет-маркетинг
простою мовою
Content of the article

Creating advertising campaigns in Google Adwords. Part 2
In the previous article, we have sorted out how to create a new account, selected keywords and highlighted minus words from them. We wrote all the necessary data in a template for pouring into the Google Adwords service.
In this article, we will discuss all the subtleties and nuances of importing all the data from the file to the advertising platform using the AdwordsEditor program.
Working with AdwordsEditor
You’re probably wondering why we don’t use the standard web interface to create ads on Google. We use both. There are things that are more convenient to do through the browser version, and there are things that are more convenient through this program. If you have 1 or 2 groups of ads, then perhaps working through the web interface will not be much faster, but when you have a large number of ad groups, campaigns, keywords and ads, the speed of loading and the convenience of formatting Editor has no equal. But some add-ons are more convenient to add through the web-interface. This experience has been gained through more than one year of work and more than one hundred advertising campaigns.
Google Ads Editor features
With this service you can:
- import/export campaigns or separate groups of ads;
- make changes to ads on multiple accounts at the same time;
- make bulk changes to campaigns or separate groups of ads, set your own rules for ads and transfer information between accounts;
- undo and restore changes to an account using drafts;
- view statistics on rk effectiveness using reports.
Installing Editor
Since AdwordsEditor is a full-fledged program on your PC, it needs to be downloaded and installed to work. In order to download it, you need to follow this link https://adwords.google.com/intl/ru/home/tools/adwords-editor/ and click “Download Now”.
You save and run the program downloader. Wait for the program to download and install. The installation time depends directly on the internet speed and computer power.
After installation, you will see a window for adding an advertising account. Click the “+Add” button. In the pop-up window, select “Open browser to log in”.
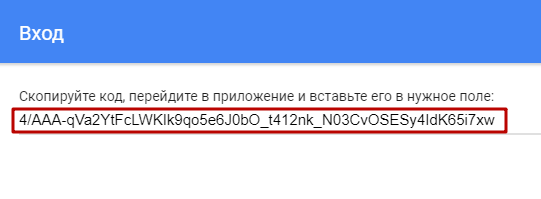
A new tab opens in the browser, in it you need to select the account on which you want to run advertising, and on which there is a created advertising cabinet (it is described in the first article). Choose an account and, if necessary, pass authorization. After that you will be asked a question about allowing the Editor application access to the advertising cabinet. Click “Allow” and copy the code that appears using ctrl+c to the clipboard.
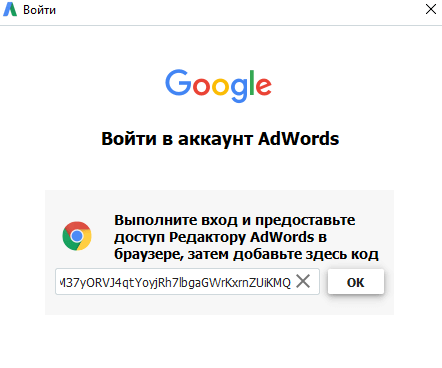
Then go to the Adwords Editor program window and paste the copied code into the window and click “OK”
In the response window, select “All Campaigns” and click “OK” again. Wait for the program to load the account and the “Account Manager” window can be closed. We leave the second window with the name of your account open. This is the main interface of the program. This is where we will enter all the data.
Remember that there is already an empty campaign there and it should be deleted.

Uploading campaigns to Google AdWordsEditor
To import data from files, the editor has several options to work with:
- import from a file;
- import from the clipboard.
We will use the second one, because our file layout is likely to read not all the data. A file made in this way is much more convenient to fill.
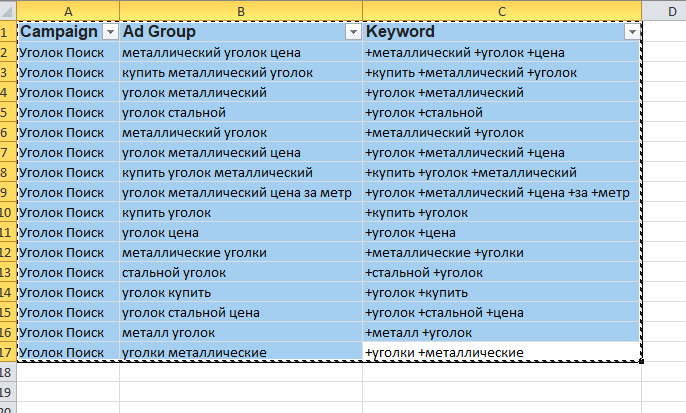
Open our import file and copy the entire first tab “Groups+words”.
Next, open the menu item “Account”, sub-item “Import”, sub-item “Insert text” in the Editor.
In the opened window click “Paste” from the clipboard. Next, check that the column names are correctly pulled up in the table header. If the import file is filled correctly, there should be no problems. Then press the “Process” button.
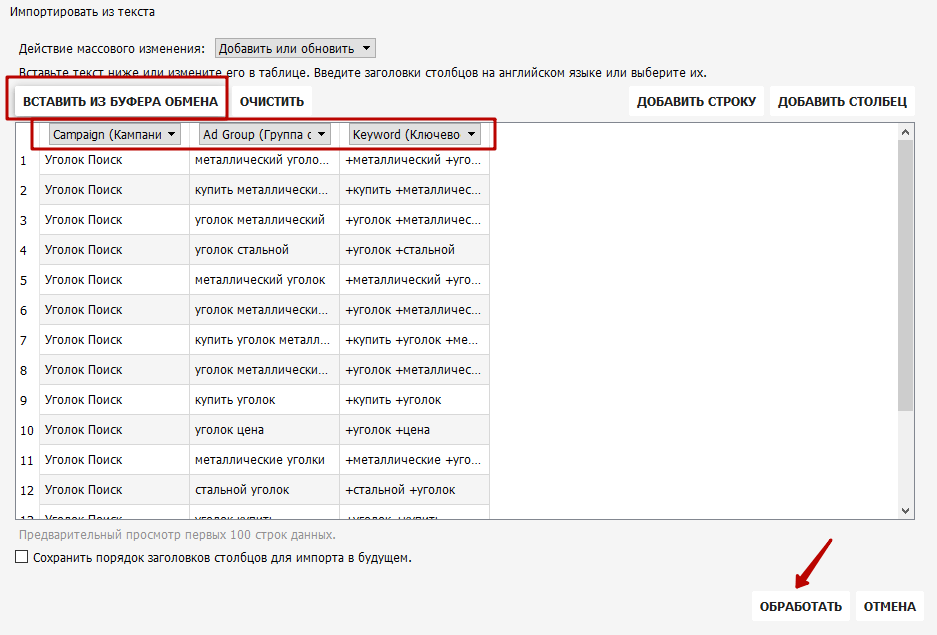
In the window that appears, check the number of added campaigns, ad groups and keywords. If you are using a non-keyword-group strategy, you may have more keys than ad groups. If it’s the other way around, you have no keys in several groups. Click the “Finalize and review changes” button.
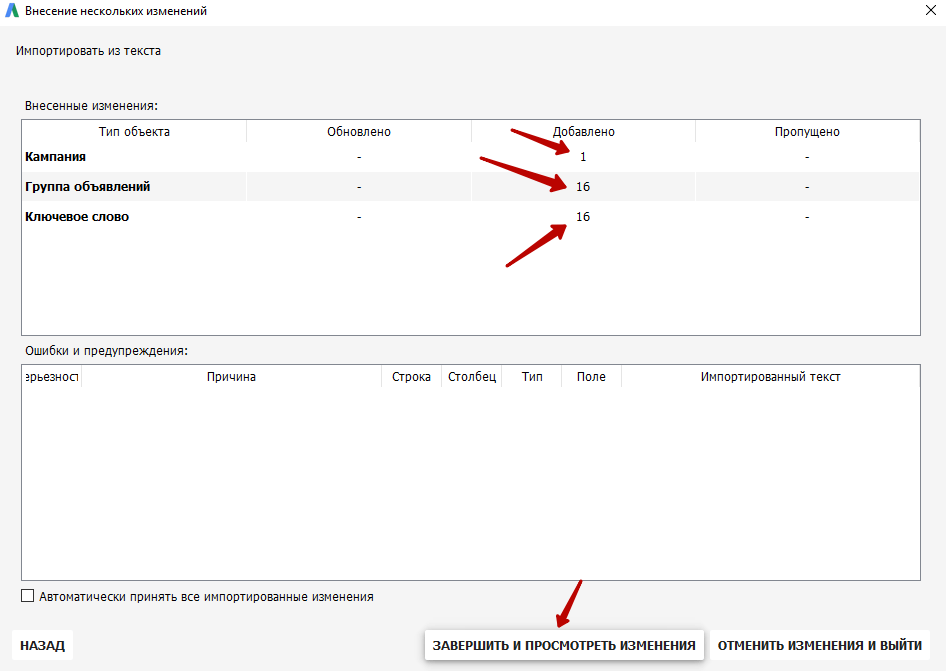
If all is well, then click “Save”.
In the import file, copy all the data on the “Groups+words (2)” tab and repeat the same sequence. Only in the window of made changes there will be no more added Campaigns and Ad Groups, only keywords will be added.

You do the same with all the data on all the remaining tabs in the Excel file:
- Group+Announcements
- Group+Announcements (2)
- Group+Announcements (3)
- BS

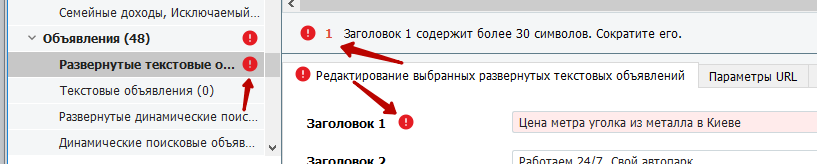
After importing, you should check if there are any errors in the keys and ads. All errors will be highlighted with a red circle with an exclamation mark. The icon will disappear immediately after the correction.
Basic setup of the campaign in Adwords
Once you have imported all the data, you need to do the basic setup of your ad campaign.
In the bottom left block, the “Campaigns” item should be highlighted.
In the bottom right window fill in all the fields you need, especially those highlighted in red – without them we will not be able to save and submit the campaigns for moderation.
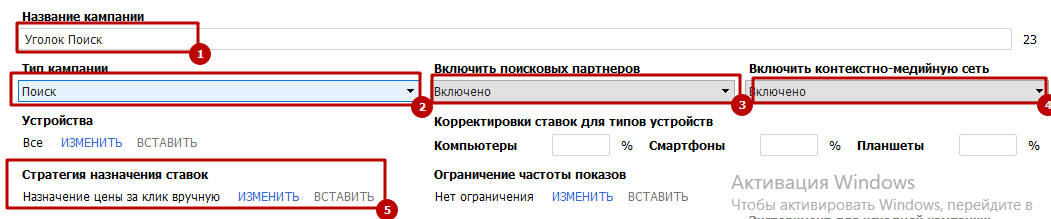
- Specify the campaign name (if you want to change it)
- Select campaign type – Search
- Enable search partners – Enabled (you can turn it off, it won’t affect the ads, they are not common in our country).
- Enable Contextual Media Network – Off (our ads don’t fit it)
- Bid assignment strategy – Assign price per click manually (at the first stages so, then you can change it at will).
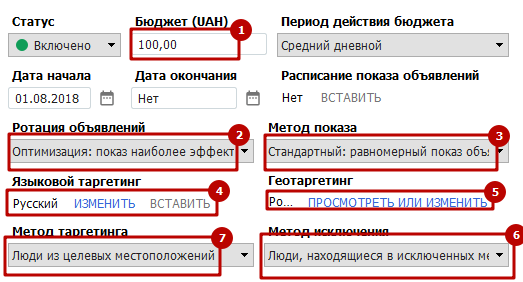
- Budget – Set a daily budget for the advertising campaign
- Ad rotation – Show the most effective ads
- Display method – Uniform display of ads
- Language targeting – it is desirable to set all languages, because not always Google recognizes correctly the language of the keyword.
- Geotargeting – you can change or add a new display region
- Exclusion method – People in excluded locations
- Targeting method – People from target locations
Sending Google Ads campaigns to the server
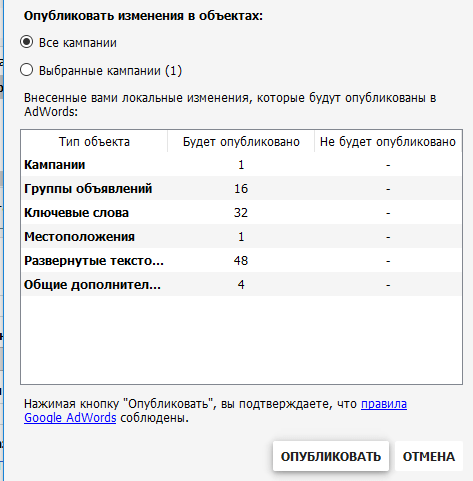
After you have filled in all the necessary fields and data, you need to send your ad campaigns for moderation and data verification. To do this, there is a button “Publish” at the top of the program window. In the new window that opens, choose which campaigns you want to send to the server, if you want to send all campaigns, choose “All campaigns” and click “Publish”.
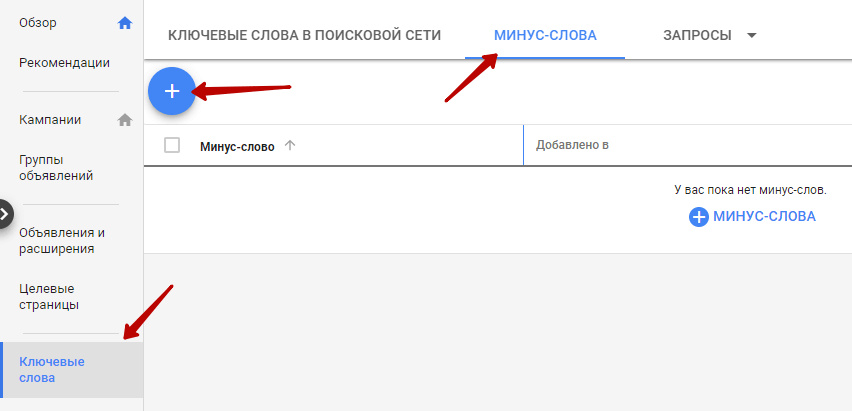
Adding minus words in Adwords
Adding minus words is most convenient to do in the web-interface, so that you don’t have to fill in the tables for a very long time.
Go to Google Ads, select “Keywords” in the left menu block. In the window that opens, select the “Minus words” tab and add by clicking on the blue Plus.
Next, select the “Add minus words” item. Choose where exactly you need to add minus words. In our case, it is a campaign, and look for the necessary one in the list.
In the window you add the list of minus words from the Excel table, where we collected keywords, and in the second column we highlighted minus words. And then click the “Save” button.
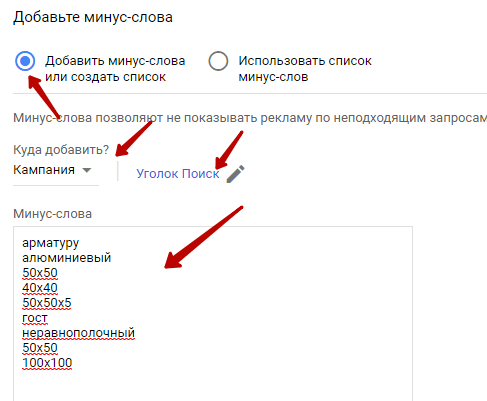
All minus words are now loaded into the campaign.
Assigning bids to keys
In order to understand what bids you need to make, you need to get the predicted statistics for each keyword. To do this, in the upper left window select the necessary campaign, in the lower left window select the item “Keywords and targeting”, sub-item “Keywords”. Then in the top menu click on “View statistics”, item “Get statistics”.
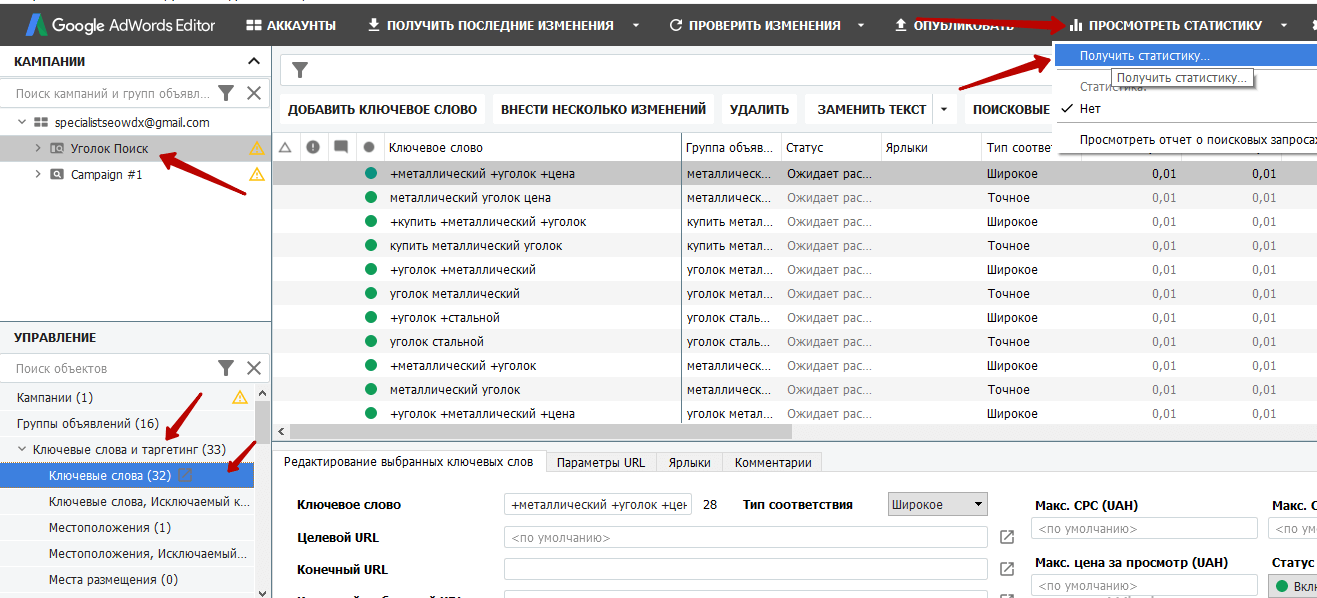
In the window that opens, select the campaign for which statistics are needed, choose the period of statistics collection and the indicators for Efficiency and Conversion and click “Ok”. Wait for the statistics to load.
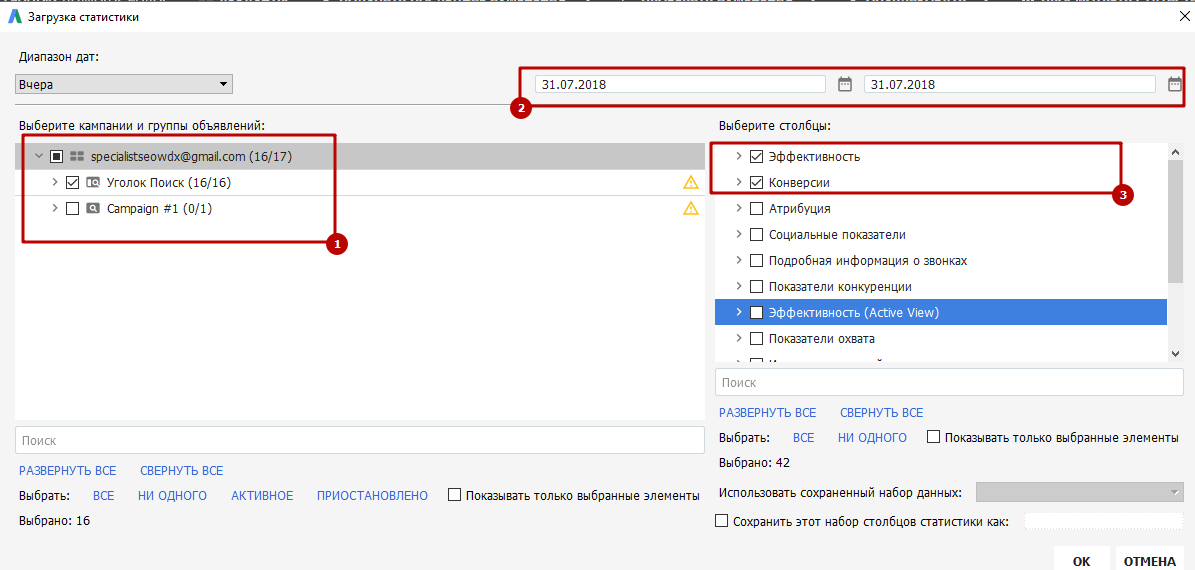
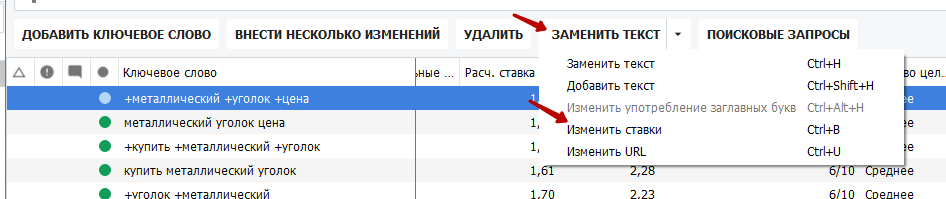
Drag the scroll bar in the top right window to the columns labeled “Calculated rate for top of page” and “Calculated rate for first page”. Next, we need to decide where we want to show up – at the top or bottom of the first page. After that we need to select all (or only necessary) keys. If you need to select all of them, press ctrl+a.
Next, press the “Replace text” button, menu “Change rates”.
Choose the one that suits us and click on the “Change Rates” button.
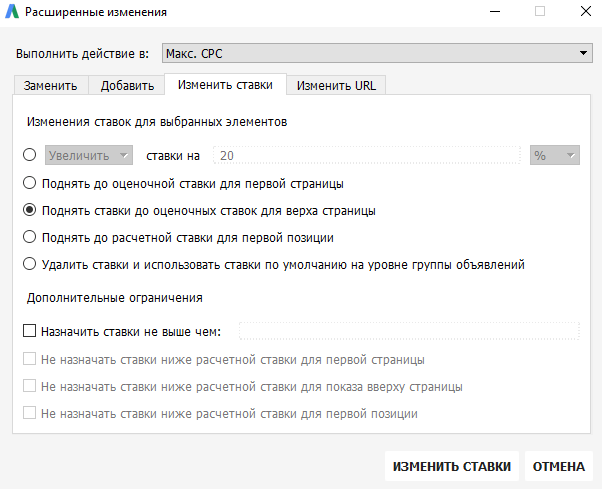
The pop-up window will have information on how many keywords the bids were changed on. Just click the “Close” button. After that, you need to publish the campaign once again using the “Publish” button. If there is money on the account of the advertising account, then soon your ads will start showing.
Let’s summarize
Now you understand how to customize and use Google Ads Editor. And you can safely make it part of your ad management workflow. And in the next article, we’ll tell you how you can add add-ons.

commercial offer
Other articles by the author

26/02/2025
Search engine marketing, also known as SEM or Search Engine Marketing, is one of the types of digital marketing used to improve a website's position in search engines.

01/09/2025
The main goal of CRO is to make the most effective use of existing traffic, focusing not on increasing it, but on improving the user journey and removing barriers to conversion.

06/08/2025
Internet phishing is one of the most common types of online fraud today, with a single goal: to obtain your confidential information.
Latest articles by #PPC

23/03/2026
AI-powered tools are no longer just an experiment. Today, they have become an integral part of the day-to-day operations of many PPC teams.

20/03/2026
Detailed feedback allows you to take targeted action, conserve resources, and increase revenue.

04/03/2026
A loyalty program is not just a discount tool, but a multidimensional business strategy.