
 12/10/2023
  3974
3974


Інтернет-маркетинг
простою мовою
Content of the article

Creating advertising campaigns in Google Adwords. Part 3
In the last two articles we have dealt with the structure of the ad upload file through the Adwords Editor program. We created an advertising cabinet and selected keywords using the built-in functionality of the advertising platform. We filled in all the data required for basic ad loading in the ad cabinet interface:
- campaign name;
- ad group names;
- keywords in 2 variants of matching;
- 3 different first headlines;
- 3 different second headlines;
- 3 variants of description text;
- displayed URLs;
- landing page URLs;
- quick links and their components.
Installed the AdwordsEditor program and loaded all the data from the import file into it.
Set the bids for all the keys and submitted for moderation.
But apart from that, Google provides a very wide range of functionality to customize and augment your ads. This allows you to very beautifully and uniquely design the appearance of advertising snippets and even wider disclose your UTP (unique selling proposition), which can improve the clickability of the ad several times, so do not neglect the customization of add-ons, especially since their filling does not require Herculean efforts.
Among all the add-ons in Google Adwords, we can highlight the most frequently used ones:
- additional links (already added);
- clarifications;
- structured descriptions;
- phone numbers;
- addresses;
- prices;
We will elaborate on each of these further below.
Refinements in Google Adwords
Clarifications in Google search ads are a set (list) of phrases or words that further describe your company, service, product, etc. It is used to create a more complete UTP or to provide a potential client with the information he is interested in.
They are displayed below the description text. Separated from each other by dots in the middle of the line. But nowadays, very often they are combined with the description text itself and are displayed as a whole text.
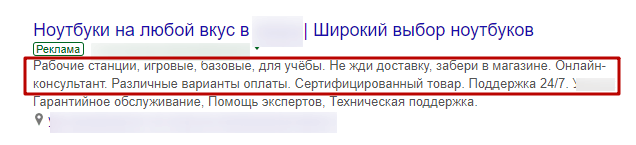
The length of one clarification is no more than 25 characters. Up to 5 clarifications can be displayed simultaneously.
Adding clarifications via AdwordsEditor
In order to add refinements via Editor, you need to select the “General Library” menu in the lower left corner of the program interface, the “General Refinements” item.
After that, click on the “Add general clarification” button and write the text in the line at the bottom of the screen (it will be highlighted in red).
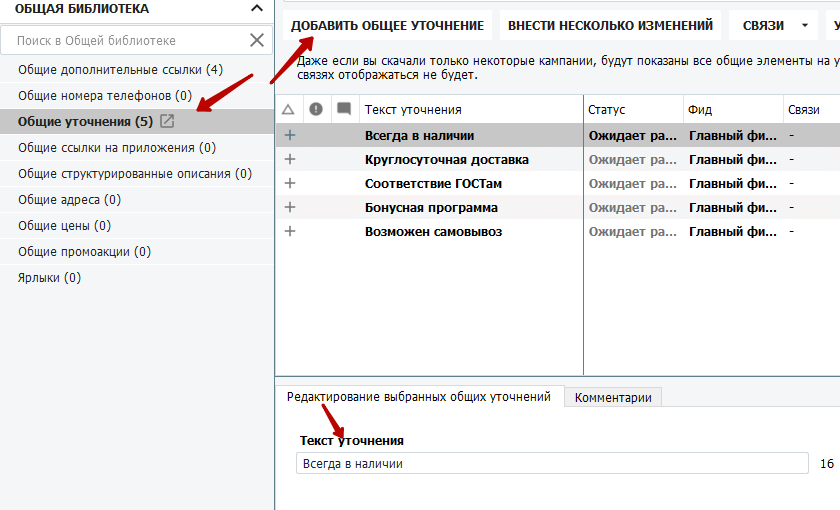
After that we need to link these specifications to our campaign, because there may be several advertising campaigns of different directions on the account and their specifications may differ. To do this, you need to select the necessary refinements. This is done by holding down the ctrl key and clicking on the necessary lines. Then click on the “Links” button at the top of the program window, select “At the level of the advertising campaign” and in the next window select the necessary campaign and click “Ok”.
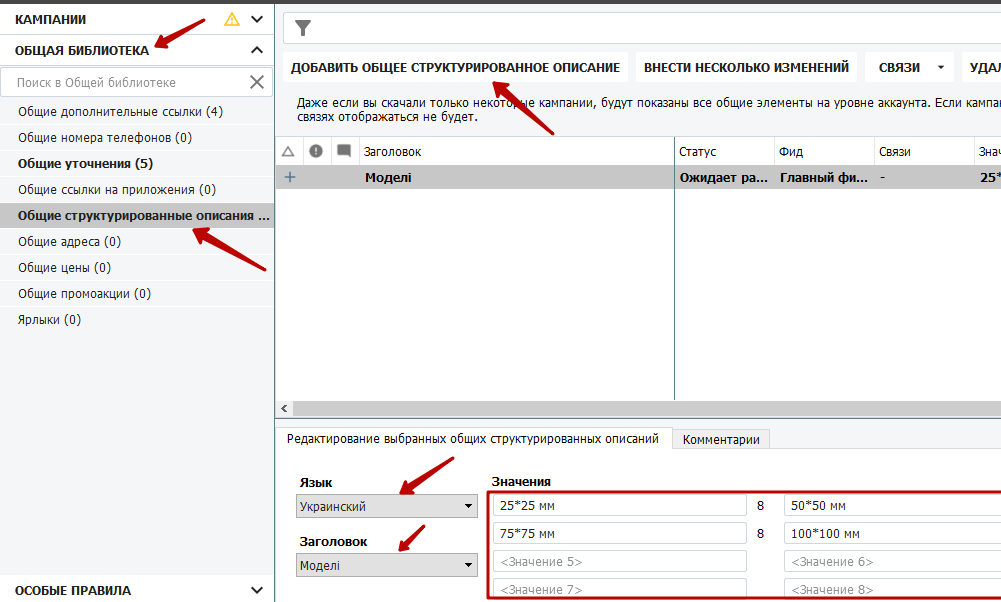
Structured descriptions in Google Ads
Structured descriptions in Google search ads are a way to describe a product or service with an additional line. This is also where you can put those key points of the TSS that you couldn’t place in other text blocks of the ads. It can be used to emphasize certain aspects of the goods and services provided.
This addition consists of 2 parts:
- headline – the part that you can choose from the proposed in the list;
- phrases – the part that is written independently.
Therefore, this add-on has a somewhat limited functionality, not for all ads it can be applied.

Adding Structured Descriptions via AdwordsEditor
In the lower left block of the program interface, select the “General Library” menu. In it, select the “General Structured Descriptions” submenu and add a new one by clicking the “Add General Structured Description” button. Next, we select from the drop-down list the Language of the structured description and the Title of the block. Then we fill in the values, the minimum of them should be 3, the maximum – 8. The main requirement is that the title and text must be relevant. For example, if you choose the title “Services”, then accordingly you need to describe what services you provide. Not a set of text, just to fill space. All additions are moderated separately from the advertising campaign.
After creating the Descriptions, you should also link them to the advertising campaign. This is done in the same way as with the Clarifications, via the “Links” button. We won’t stop here.
Phone numbers
With the help of this extension you can add a phone number to your ad where you can be contacted without going to the site. This can significantly increase the CTR of an ad in some niches. The “Phone Numbers” extension works especially well on mobile devices. Then the phone number turns into a “Call” button, and you can call without going to the site. It is relevant for topics with an offer with a very small decision-making time or for branded queries, when a person knows exactly what he needs.

Adding phone numbers to an Adwords ad
In order to add a phone number to your ad, you need to open “General Library” in the lower left corner of the Editor program interface and select “General Phone Numbers”. Then click the “Add phone number” button, select the country of registration of the number and enter the number itself.
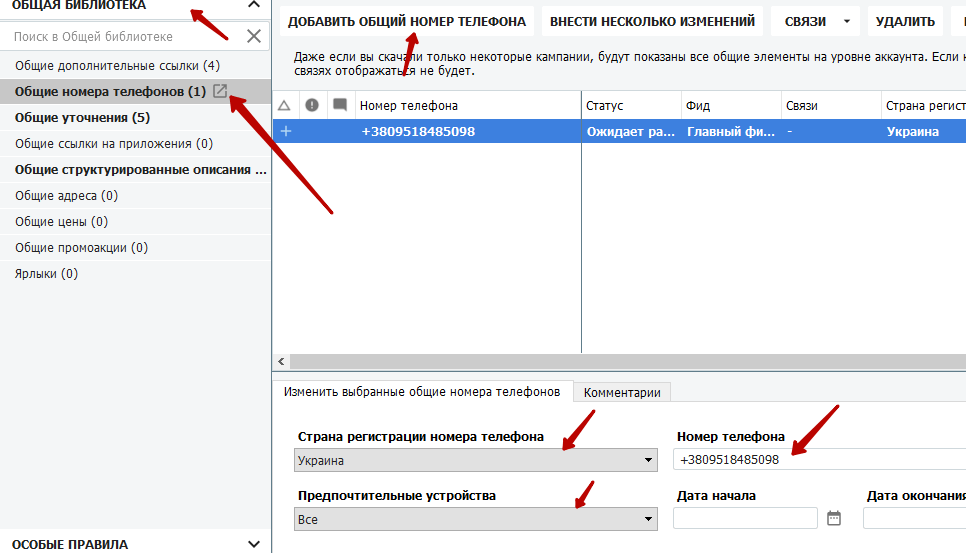
In order to associate a number with an advertising campaign, you need to select the desired one and go to “Links”. Next, select the campaign itself, in whose ads the number should be displayed.
Addresses in Adwords ads
This extension will be available only for those accounts that have confirmed their address using Google MyBusiness service. In other cases, it will not have addresses available.
It will be displayed below the ad itself as a plain text string with a link to Google Maps with a basic description entered via MyBusiness.
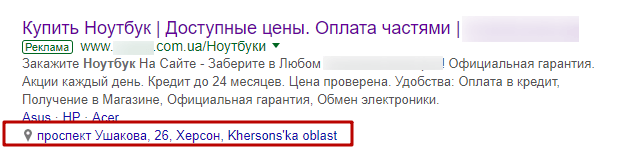
If you have a new account, you will need to go to https://www.google.com.ua/intl/ua/business/ and fill in all the required fields, after which you will need to confirm your physical address with the help of a letter sent to you by mail.
Adding Addresses to Google Adwords ads
If you have a confirmed address, you simply go to the program interface to the “Public Library” category and select the “Public Addresses” menu. After that, you select the desired address and click on the “Links” button, where you specify the campaign in which to display it.
The “Prices” extension in Google Adwords ads
The “Prices” extension is a unique addition to your ads. With which you can specify the specific cost of certain products/services/goods. Another huge advantage of this block is that it can visually expand the ad area, almost double. It’s like another additional block with quick links, only with prices.
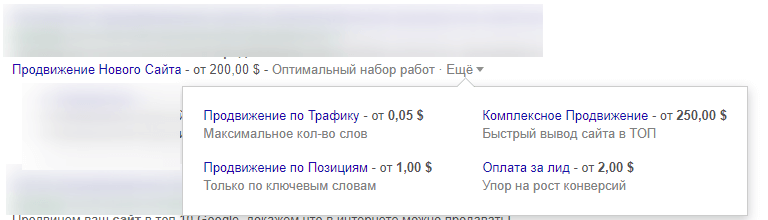
This block should be filled in only if your prices are not higher than the market average, otherwise it may scare off potential customers at the selection stage. But there is a flip side of the coin – specifying a price can cut off customers who are not ready to pay your minimum rates.
Adding Prices to Google Adwords ads
To add extensions with prices, you need to select the “General Library” menu in the program interface. In it, select the “General Prices” item, click the “Add General Price” button and fill in all the necessary fields at the bottom of the program window. Choose the language and currency. When choosing a currency, you should take into account that there is no Hryvnia. The choice of currencies is very limited, so you should specify only the available currency and translate at the exchange rate. Next, you need to select from the drop-down list the Type of service/good offered and the Price Prefix – this is what is displayed before the price.
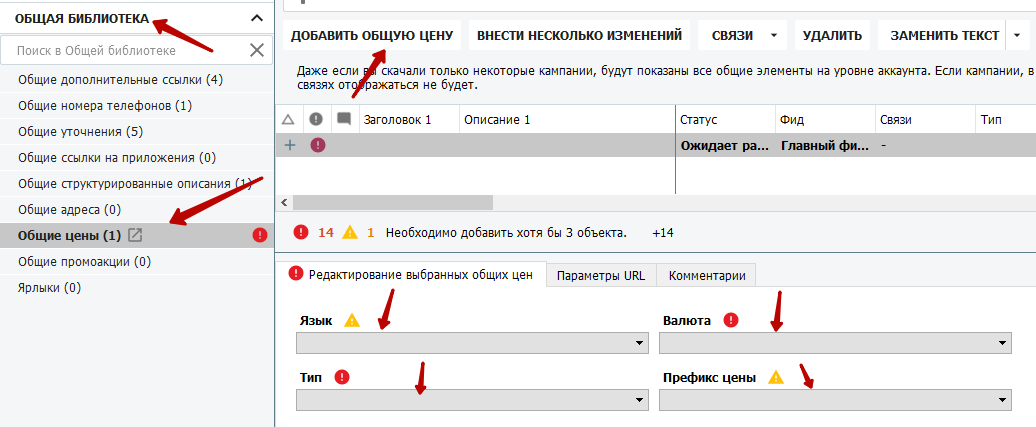
After that, you need to fill in all the fields:
- title – the text on which the link to the product page hangs;
- description – a brief description of the product, displayed under the title;
- price – the cost of this service/good;
- unit – for what period this amount is charged;
- final url – the page with the product.
You need to fill in the data for at least 3 products.

After filling in all the fields, it is necessary to link this add-on to our advertising campaign. This is done via the “Links” button, where you select the necessary campaign.
Sending changes to the server and for moderation
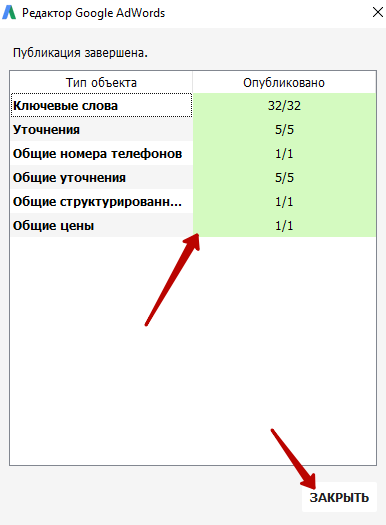
After you have added all the necessary additions, it is necessary to send them to the main server to check for compliance with all the rules of the site, and only after that they can be displayed in ads.
To do this, you need to select the campaign in which you made the changes (with which you linked the additions) and click the “Publish” button and wait for the end of data sending.
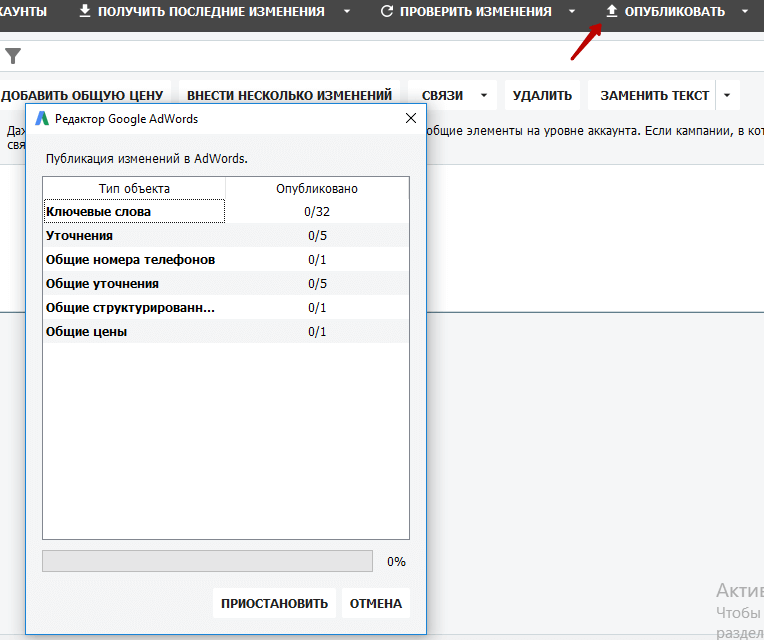
If after sending the data in the window you see that all lines are highlighted in green – all data are filled in correctly. Close the window.
Displaying add-ons blocks in Google Adwords
It is important to remember that when forming the ad snippet, Google connects and disconnects add-ons according to its internal algorithm, and we cannot influence this in any way. The only thing we can influence is the position, and the higher we are displayed, the more likely Google will connect more add-ons.
Let’s summarize
So, to summarize. During the course of reading articles on setting up contextual advertising on Google search, we learned how to:
- create advertising accounts;
- use internal services to collect key phrases;
- select keywords and highlight minus-words;
- compose ads (3 variants);
- compose displayed links;
- import collected data into the Editor interface;
- make additions to advertisements;
- add them to advertising campaigns;
- place bids;
- send everything for moderation.
That is, we have mastered almost the entire cycle of launching search advertising from Google. Do not forget that you need to select extensions for ads, taking into account the specifics of the region and your business. And all added extensions are subject to moderation, which takes some time, so some extensions (for example, “Promotions”) are better to enter in advance, so that they were ready to be shown in time.
High CTR, low click prices and lots of good clients!

commercial offer
Other articles by the author

10/12/2025
Customer reviews are a strategic resource. Ignoring this channel means missing out on opportunities for growth and increased profitability.

25/05/2024
Website indexing is the process of crawling a website by crawlers and adding it to the search engine database in a special form. Therefore, those pages that are in the search results are called indexed. This process is very important for the operation and promotion of the site.

24/05/2024
Very often, all entrepreneurs have a question: "Is it profitable to start a business in this or that niche? How much money do I need to start a business (to make a website and at least minimally establish sales)? Does it make sense, or will I just get crushed by competitors?" We will try to answer all these questions in this article.
Latest articles by #PPC

08/05/2026
For local businesses, a Google profile is often the first point of contact, even before a visit to the website or a phone call.

06/05/2026
DNS, or the domain name system, is a hierarchical system that helps a browser find the correct IP address for a domain.

27/04/2026
Googlebot is Google Search's primary web crawler. It collects information about web pages so that Google can index them and use them in search results.