
 26/09/2023
  4231
4231

Інтернет-маркетинг
простою мовою
Content of the article

What is robots.txt and what is it for
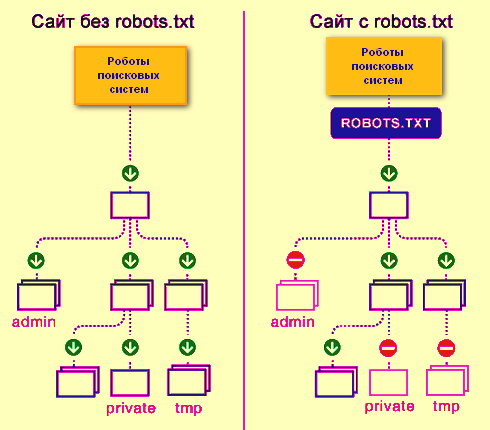
The robots.txt file is a simple text document that contains recommendations for search robots of all types on indexing your site – which pages and files should be crawled and added to the index, and which should not. Please note that these are recommendations, not specific instructions.
Without a robots.txt file, search robots can index all available pages on the resource, which is why duplicates, service pages, pages with site search results, etc. may be displayed in the index.
Since this is an index file (crawlers have its location specified), it should be located in a clearly designated location – in the root folder of the site. It should open at this address – http(s)://site.com/robots.txt, where http or https is used depending on what protocol your site is running on, and instead of site.com you must insert your domain. Also, the encoding must be UTF-8, otherwise it will simply be read with errors or completely ignored.
Advice: to view your robots.txt, you need to open the main page of the site and type “/robots.txt” in the address bar after it.
Note: The Google search engine also regulates the size of the robots file – it should not be more than 500 KB.
Using this file you can perform the following actions with your site:
- Completely close it in the eyes of the search engine
- Open all folders and files for indexing
- Limit the pages the robot can crawl by certain rules.
Server responses when scanning the robots.txt file
- 2xx – file found and information received.
- 3xx – the search robot has been redirected to another address. This can happen no more than 5 times or until he receives another server response. Otherwise, it is considered a 4xxx response.
- 4xx – with this response from the server, the robot believes that the entire content of the site can be scanned.
- 5xx – this code indicates problems on the server side, so scanning is prohibited, and the robot will constantly access the site until it receives a server response different from 5xx.
What is the robots.txt file used for?
Its main function is to configure the site’s indexability by search crawlers. It is usually used to close indexing:
- pages with processing orders, baskets;
- internal search pages on the site;
- PDF, DOCX and other documents that should not be searched;
- personal account, admin panels;
- confidential files and pages;
- service pages without navigation elements;
- third party scripts or services.
If the necessary pages are not blocked from indexing, your clients may suffer (personal data will be revealed) and you (a bunch of duplicates and junk pages will end up in the index, which will lower the site’s ranking).
Note: a page closed in robots.txt may also end up in the results, since it is a recommendation and not mandatory (this is especially true for Google. In some cases, pages need to be closed using other methods – meta robots or x-robots.
Design of the robots.txt file (syntax) and directives
Note: The commands used in this file are called directives.
All commands in the file are formatted in the same way – first comes the name of the directive and a colon (no space is needed between them), followed by a space and after it the parameter itself is written. It looks like this:
Directive: parameter
For robots.txt, only 2 commands are required – User Agent and Disallow; if at least one of them is missing, an error will be thrown during verification.
User-agent directive – greeting for the robot
This is the first thing that is indicated in robots.txt. This command shows which robot this block of commands is written for. Having found its name, the robot will read all commands until the next user-agent directive.
User-agent: (and then the name of the robot for which this block of directives is intended is written).
For example, we have the main Google robot, then it should look like this.
User-agent: Googlebot (readable only by Google bots).
If you need to write commands for all robots at once, then use the symbol – *
User-agent: * (read by all robots).
At the moment there are a huge variety of different bots. Below is a list of the most popular of them in the CIS.
- Googlebot-News – earches for news;
- Mediapartners-Google – AdSense service bot;
- AdsBot-Google – hecks the quality of the landing page;
- AdsBot Google Mobile Apps – checks the quality of the landing page for applications on Android, similar to AdsBot;
- Googlebot-Image – for pictures;
- Googlebot-Video – for video;
- Googlebot-Mobile – for the mobile version.
Disallow directive – ban on indexing
This directive prohibits indexing files and pages that fall under the specified parameter. The writing syntax is the same as for user-agent.
For example, on the site there is a folder named “users” with files with user data, and it needs to be closed from indexing, then we write like this:
Disallow: /users/
Thus, we blocked both the /users/ folder and all the contents in it from indexing.
Note: To specify parameters, you do not need to specify the domain itself. For example, we write not “Disallow: site.ru/users/”, but “Disallow: /users/”.
Allow directive – permission to index
Using this directive, we can open the pages and files necessary for indexing.
For example, in the “users” folder (we wrote about it above) there is an “images” folder, which contains the pictures necessary for indexing. Therefore, we need to write the following line:
Allow: /users/images/
As a result, we get:
User-agent: * Commands are specified for all crawlers
Disallow: /users/ Closes the “users” folder and all files
Allow: /users/images/ Opens the “images” subfolder and all its subfolders
Prioritize directions
If there is a conflict between Disallow and Allow, the one with the longer parameter after the colon will be selected for execution.
For example:
Disallow: /users/
Allow: /users/images/
In fact, the first Disallow command should close the “images” folder too, but since after the colon the first directive has 7 characters, and the second has 14 characters, the Allow directive will take precedence.
If the directives are completely identical, then priority will be given to the one below. For example, when using this sequence, the “users” folder will be opened:
Disallow: /users/
Allow: /users/
Sitemap directive (indication of the site map) or which pages are important for indexing
This directive shows where the file is located and what it is called with a list of all urls of website pages that need to be added to the index. Also, with the correct generation of a sitemap, the robot will be able to clearly understand the priority of pages, the date of their last update and addition.
The Sitemap directive is intersectional. It can be located anywhere in the robots.txt file and does not belong to a specific User-agent section.
Sitemap: http://site.ua/sitemap.xml
In this directive, the path to the sitemap file must be specified in full along with the protocol, and it does not matter whether it is http or https.
If there is no Sitemap directive in the file, the crawling robot by default looks for a file called sitemap.xml in the root folder of the site (root), if it is not there, then the pages on the site are crawled randomly, taking into account the directives in the robots.
Host directive – specifying the main mirror
Often any site opensat two URLs. The first one is blog.ua. The second one is www.blog.ua. In such situations, you need to identify the main mirror and report it to search robots.
The Host directive is used for this. It is indicated at the end of the list (before the sitemap directive):
Host: blog.ua
In this case, robots see that the main mirror is a URL without the www prefix. And even if users enter an address with it, they will automatically be transferred to the main mirror.
It should be taken into account that for Google (and a number of other search engines) the directive is not prescribed – it must be reported about the main mirror in your personal account Google Search Console.
Crawl-delay – “handbrake” for a robot
Using this directive, we can limit the time between robot calls to the site during one session. This was done specifically for sites that operate on very weak servers, and when the indexing robot comes in, the resource begins to freeze or even gives a 5xx server response.
The writing syntax looks like this:
Crawl-delay: 3
where 3 is the time in seconds between the bot’s calls to the site.
Search engines themselves recommend using this directive only in extreme cases.
Special characters *, $, #
To simplify the compilation of the file and to speed up the interpretation of information from the file by machines, special characters are used.
The first and most important character is * (asterisk)
It means that you can substitute any number of any characters instead.
In general terms it looks like this:
1*1=121, 1*1=1234567891, etc.
How can this be applied in our case?
For example, we have pages like this:
site.ua/catalog/123
site.ua/catalog/111
site.ua/catalog/12
site.ua/catalog/23
site.ua/catalog/231
site.ua/catalog/2789
And we need to close site.ua/catalog/123, site.ua/catalog/111, site.ua/catalog/12 from indexing, but not close site.ua/catalog/23, site.ua/catalog/231, site.ua/catalog/2789.
You can, of course, do this:
User-agent: *
Disallow: /catalog/123
Disallow: /catalog/111
Disallow: /catalog/12
But 2 times shorter it will be like this:
User-agent: *
Disallow: /catalog/1*
This can also be used to open all files of the same format in one folder.
For example, in the “catalog” folder there are files with the extension php, rar, pdf and jpg and we need to open the latter and close everything. You can do it like this.
Example:
User-agent: *
Disallow: /catalog/
Allow: /catalog/*.jpg
Important Note: At the end of any parameter in a directive, the robot puts an asterisk by default. For example, the snippet from the example above is seen by the crawler as:
User-agent: *
Disallow: /catalog/*
Allow: /catalog/*.jpg*
Don’t forget this.
Stop line or dollar sign – $
The $ symbol marks the end of the line – it cancels the asterisk at the end of the parameter. How does a robot understand this? We have 2 types of files in the “catalog” folder with the extension jpg and jp, and we need to open the second for indexing, but prohibit the first. You can do it like this:
User-agent: *
Disallow: /catalog/
Allow: /catalog/*.jp$
If $ wasn’t there, then all files would be indexed, not just jp ones
A little poetry with #
Typically, the pound sign in a robots.txt file is used to add comments. The robot does not read the characters to the right of this character and immediately moves to the next line.
User-agent: *
#Opened this block of directives for all robots
Disallow: /catalog/
#Closed the catalog folder from indexing
Allow: /catalog/*.jp$
#Opened files with jp extension for indexing
Therefore, comments CANNOT be placed to the left of directives on the same line.
#Opened files with jp extension for indexing Allow: /catalog/*.jp$
It is allowed to place comments to the right of the directive and parameter.
Allow: /catalog/*.jp$ #Opened files with jp extension for indexing
The ideal robots.txt file
User-agent: * #There is a mandatory directive
Disallow: # There is a mandatory directive
Host: http://site.ua #The main mirror of the site is indicated
Sitemap: http://site.ua/sitemap.xml #There is a link to a file with the url of all pages of the site
How to check if the robots.txt file is written correctly
After the file is uploaded to the root directory, you need to inform search engines about it. But before doing this, be sure to check the correct spelling. Each search engine has its own instructions. We’ll look at for Google:
- Log in to your Google Search Console account (having added your site there in advance);
- Go to the “Scanning” section;
- Select “File verification tool”;
- Specify the path to the file (just add “robots.txt”, since the URL of the web resource is already registered there).
After checking, the search engine will let you know if there are any errors. If there is, you need to correct it, if not, click “Submit”. Ready! Google knows you have a file and will crawl it soon.
Let’s sum it up
From all this it follows that when compiling the robots.txt index file you need to be extremely careful, because one wrong decision and you can say goodbye to the site’s positions, and the site will simply fall out of the search results. There is nothing complicated about adding a robots.txt file to your site, you can do it easily, you just need to take the time and do everything conscientiously.

commercial offer
Other articles by the author

12/10/2023
Google provides a very wide range of options for customizing and supplementing your ads. This allows you to design the appearance of your ad snippets in a very beautiful and unique way and to reveal your USP (unique selling proposition) even more widely, which can improve the click-through rate of your ad several times, so you shouldn't neglect the settings of the add-ons, especially since filling them out doesn't require titanic efforts.

12/06/2025
Thanks to automation, data analytics, and real-time bidding, programmatic advertising allows you to optimize costs and significantly increase campaign effectiveness.

08/08/2024
A typical commercial offer is usually a letter (in other words, a text document) that describes the product and conditions for cooperation with benefits for a potential partner or client. Sometimes an audiovisual format, video presentation, etc. is used instead of text.
Latest articles by #SEO

27/07/2026
The role of a brand manager is multifaceted and encompasses the entire product life cycle.

23/07/2026
Retail today is a dynamic ecosystem that requires businesses to adapt instantly to changing market conditions.

23/07/2026
Today, it’s not enough for businesses to simply adopt new tools; it’s important to understand how consumer psychology is changing.