
 07/02/2024
  4110
4110


Інтернет-маркетинг
простою мовою
Content of the article

How to select keywords in Serpstat?
Serpstat is a multifunctional SEO online platform that replaces many different services and contains 5 modules.
- Search analytics. This module allows you to analyze competitors, collect semantics and find key phrases.
- Analysis of external links. Here you can get data about link donors, anchors, and also monitor changes in the link profile (both of your domain and competitors).
- Position monitoring. Using this module, you can check the positions in the organic search results of your domain and competitors. And also adjust the promotion strategy, thanks to the analysis of competitors and the share of traffic in certain categories.
- Site audit. You can find errors that affect the site’s position. There will also be recommendations for eliminating these errors.
- Clustering and text analytics. You will be able to group a large volume of keys in order to create the correct site structure. You will also receive recommendations for writing content that can reach the top of search results.
Advantages and disadvantages of the service
This is an indispensable tool that is perfect for both large SEO promotion companies and individual SEO specialists. The service is good value for money and also has its pros and cons. Let’s look at them in more detail.
Advantages
- There is a trial period and the Russian language, which makes it easier for many to use;
- Detailed analytics of semantics in a niche;
- You can identify problem areas of the project and receive recommendations for correcting them;
- It is possible to analyze competitors’ advertisements and prepare your own, taking into account the mistakes of others;
- Good database of keywords, fast reports and downloads;
- You will also be able to track changes in the search results, and then improve pages with sagging positions.
Flaws
- You must pay for using the service. The prices are not high, but the more functions you need, the higher the payment;
- Sometimes it takes a long time to update data;
- There is no way to set or change time intervals when receiving data, which can play a decisive role for analytics.
How to use the service to select keywords
How can we start searching for keywords after we have logged into our account?
Let’s simulate a situation: you are planning to launch your own online store, for example, selling children’s clothing. And, accordingly, it is necessary to collect semantics in order to form a good structure and optimize search queries on the pages of your site.
The first thing we need is to select a marker query that best describes the theme of your site. In our case, in order to collect all the available semantics for a children’s clothing store, the best general marker is “children’s clothing.”
But before going directly to the keyword selection tool, we recommend that you first check your marker query against indicators in order to make sure that it really suits us and covers all possible keyword options. For this we need the following tab.
Summary report
On the left side of the toolbar, select the “Keyword Analysis” – “Summary Report” tab.
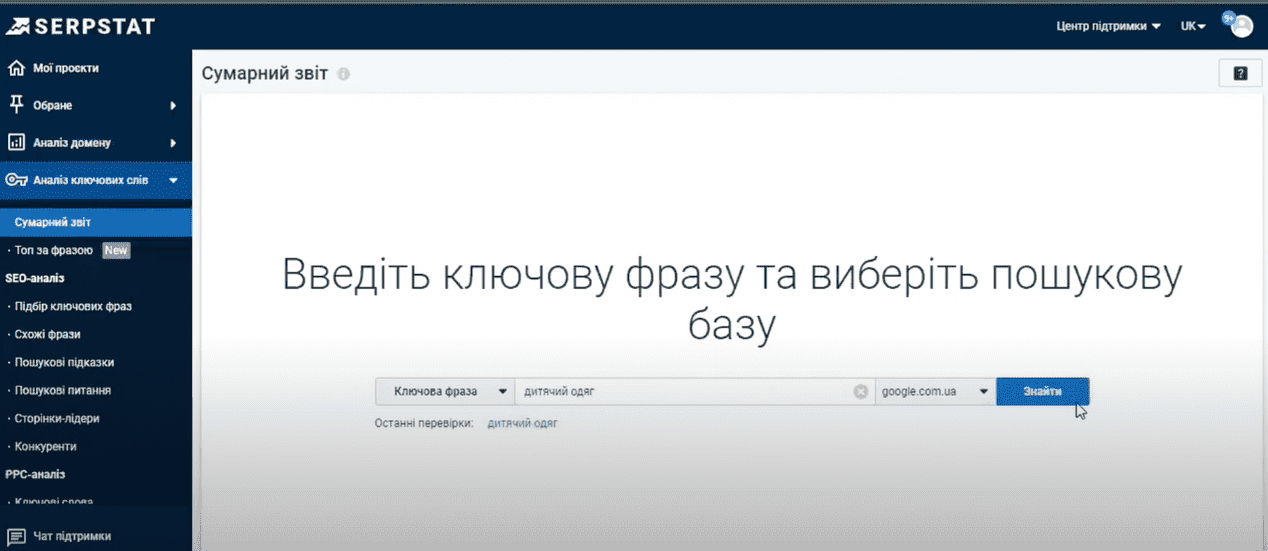
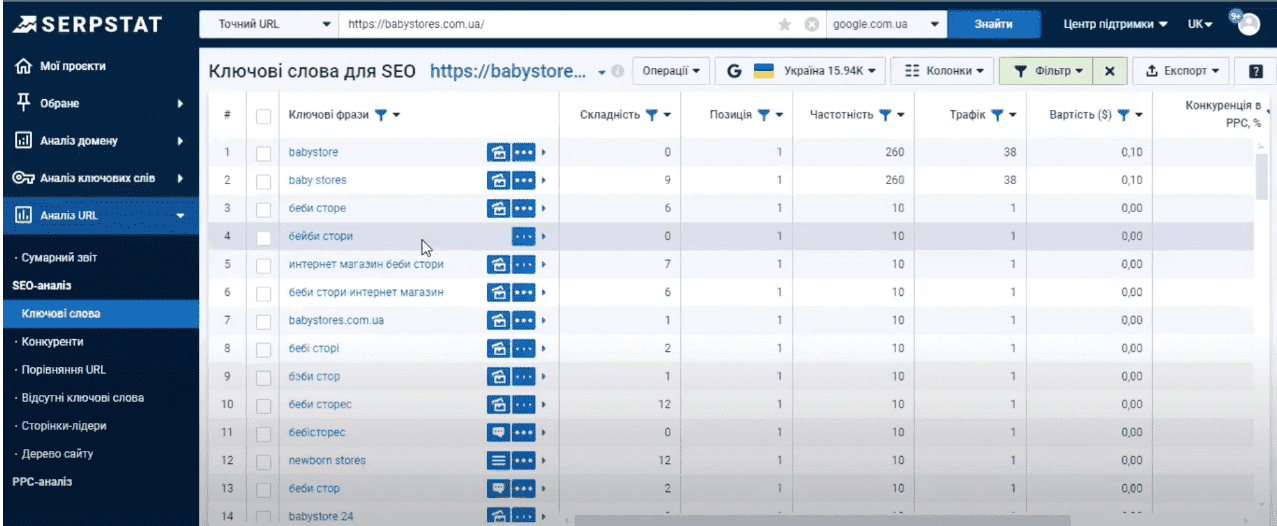
Enter our marker query “Children’s clothing” and click the “Find” button. We immediately draw your attention to the fact that it is necessary to check the correctly selected search region. We are interested in requests for Ukraine, we check – everything is correct.
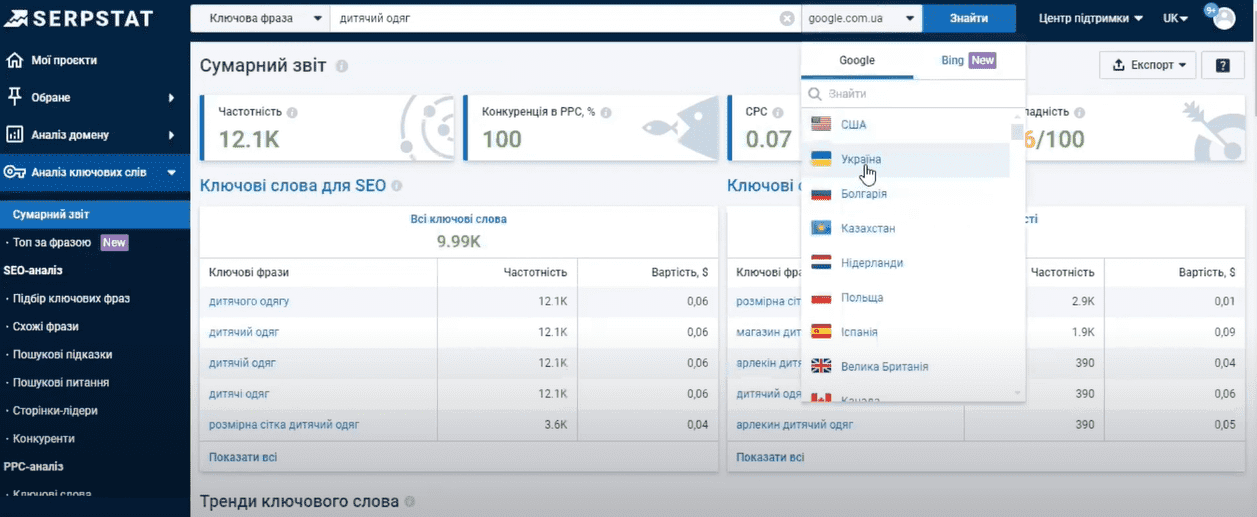
The summary report page provides general information about the marker or search query we are analyzing.
The first thing we see are 4 main metrics:
- Frequency – the average number of requests per month.
- Competition indicator in contextual advertising
- Average cost per click in context. It is indicated in US dollars. But as practice shows, this is a very generalized average cost, which has almost nothing to do with the real cost.
- Keyword difficulty. This indicator gives an understanding of how difficult it is to raise this key to the TOP of Google using SEO promotion.
Further on the page we see two signs with keyword options for SEO and context. Basic information about their number, frequency and cost per click. Below is a trend graph for our marker query.

The service takes this data directly from the service Google Trends. Our default range is year. If we need a wider range, then we can use the Google Trends service or the forecasting tool in Google Ads. This is really useful information that gives us the opportunity to understand the real demand of the keyword (is there a seasonal dependence or what is its dynamics). Because there are situations when we see that the popularity of a certain search query has begun to decrease over time. And this indicates that its use will not bring us the organic traffic we desire in the future.
Below is a general table and graph with domains ranked by our marker query and their main indicators. We see the same sign for domains that use our phrase or its variation in contextual advertising. And separately examples of ads with our marker request.
Now let’s move on to searching for keywords.
Selection of key phrases
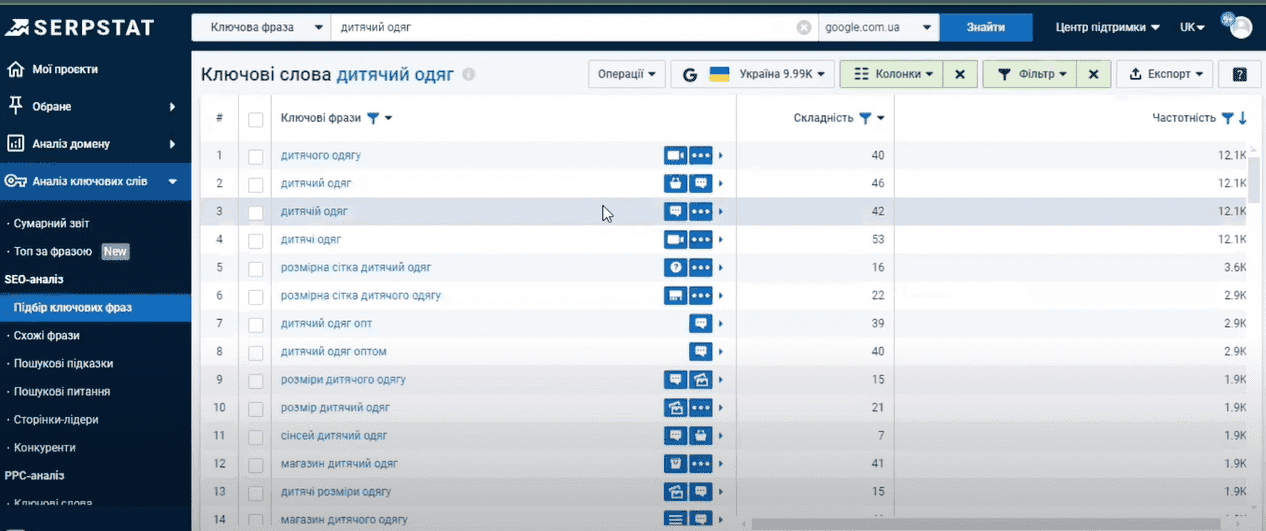
We see all the key options for our marker request.
We immediately draw your attention to one difference from keyword planner in Google Ads – we cannot enter several marker queries at once in order to make the selection more accurate or use several synonyms for a key phrase. Thus, for a comprehensive collection of keys, it is necessary to enter different versions of our marker queries and analyze the results separately. And this is not entirely comfortable. But unlike the same Google Planner, Serpstat shows those variants of keywords that Google Ads does not display because they relate to gray topics.
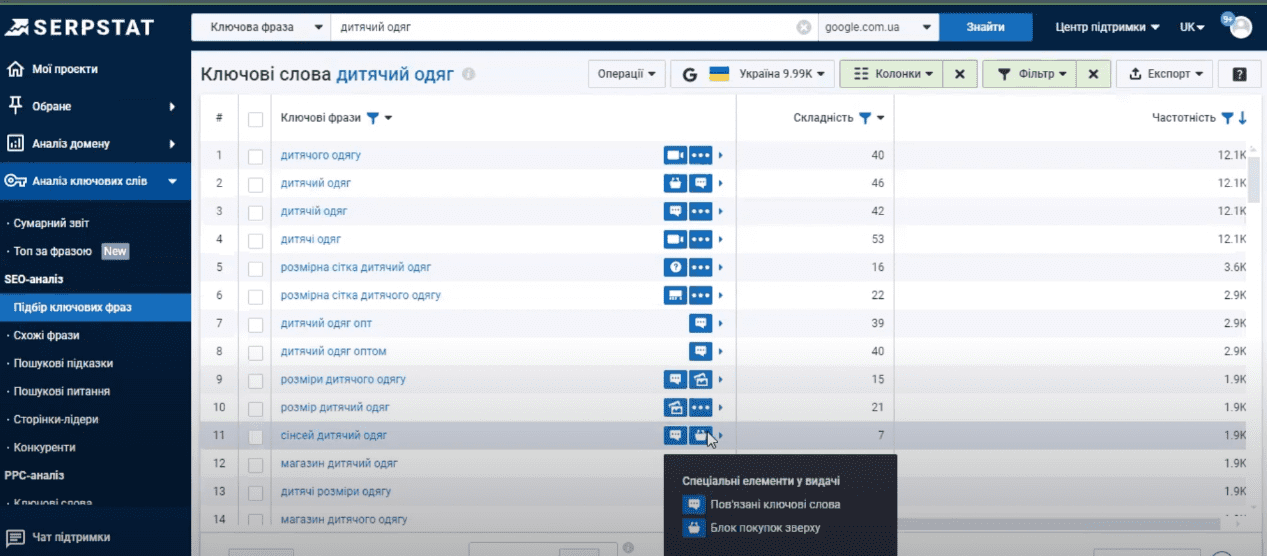
And the second advantage is that Serpstat displays ultra-low frequency queries. In fact, these are queries that users rarely Google, but they can be useful when working with complex niches. For each keyword option, we see information in the form of small icons about where the service found this request, and columns with different indicators for each key request.
If desired, individual columns can be removed or added. There is suitable functionality for this (the “Columns” button), where you can mark the check boxes we need. Each indicator column has its own filter. That is, if we wish, we can sort the table by a separate parameter. For example, you need to see first of all queries with a frequency in the range from 100 to 1000.
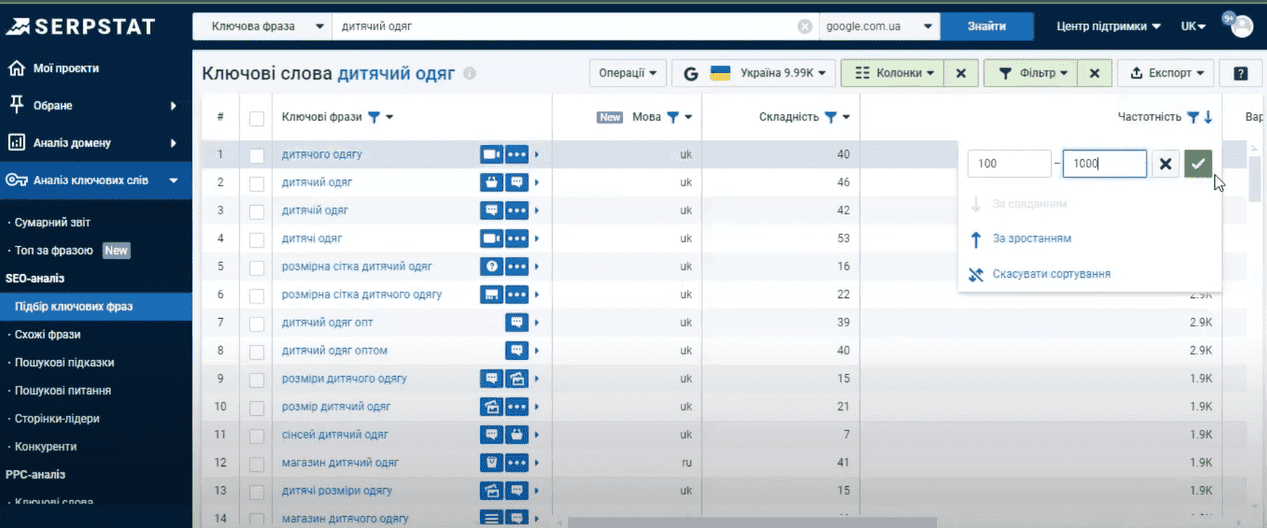
In order not to manually go through tens of thousands of key options, there is a separate filter with which we can configure the parameters we need.
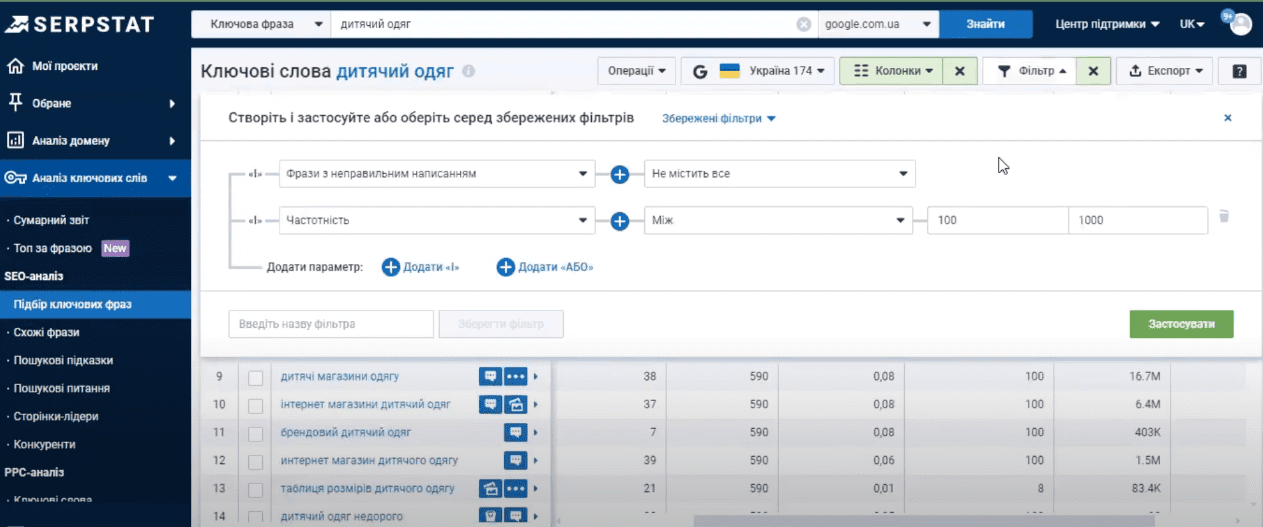
By default, the table does not display words with incorrect spellings.
Next, we want to exclude from the list requests that are 100% not suitable for us. This can be done using the Key Phrases option. Select “Does not contain everything” (broad match) and enter negative words (separated by commas), which should not be in our semantics. For example, “cheap”.
If you select broad match, the service will automatically remove all word forms of the specified negative keywords. For example, “cheap”/“cheap”. And if you specify an exact match, then only those words that exactly match the specified conditions will remain.
You can add a filter to remove all place names. That is, queries containing the name of the city. For example, if you plan to sell products throughout Ukraine, then you don’t need queries like “children’s clothing Khmelnitsky”. To remove them, select the option “Filter by toponyms” – “Does not contain everything”.
Well, we don’t want to use search queries with ultra-low frequency and we need to remove them. To do this, add the parameter “Frequency” – “Greater than” – “500”. Click “Apply”.
And instead of 10,000 options, we were left with less than 300.
There are quite a lot of filter parameters and their values. We recommend that you familiarize yourself with them. This will help you save time when working with semantic searches.
We have compiled our list with keyword options. You can download it as a separate file and use it for your needs. To do this, click on the “Export” button. Select the required format and click “Export”.
A very convenient additional functionality has been developed for the export functionality, with which you can specify which table columns should be exported. It is possible to remove unnecessary things or vice versa – add the necessary data to the table.
After clicking the export button, after 5-10 seconds a notification will appear that the document is ready for download. Or you can go to the Latest Reports page via the profile icon and upload the file.
In addition to exporting a file, there is a separate functionality for interacting with requests through the “Operations” button. For example, we select the keys that we need using checkboxes. Click on the “Operations” button and select the action we are interested in:
- Copy the keys to the clipboard. An entire table, row or phrase.
- Add requests to the monitoring project if you have created a project.
- Add phrases to batch analysis. This is a tool that allows you to collect and store lists of key phrases. These lists can also be edited as needed.
- Add phrases to clustering (we’ll talk about it a little later).
For convenience, in this video we will add our found keys to batch analysis so as not to work with individual files. To do this, click on the corresponding value. Click “Create a project”. We enter a name, select a search engine, select the parameters that should be displayed in the project for keys.

And additionally, according to the limits, we can perform automatic collection of additional semantics in automatic mode. But now we will do it manually. We click “Create Project” and we go to the batch analysis tool where our keys are saved.
We selected keywords using a marker query, but it often happens that when searching, we do not take into account other synonyms of a phrase, some unexpected variations that users use in searches. For example, someone writes “children’s clothing”, someone writes “clothing for children” or “clothing for a child”, and someone writes “clothes for babies or toddlers”. And all these are different requests, with different frequencies and levels of difficulty of search promotion.
Similar phrases
We enter our marker query, click the “Find” button and analyze additional keyword options.

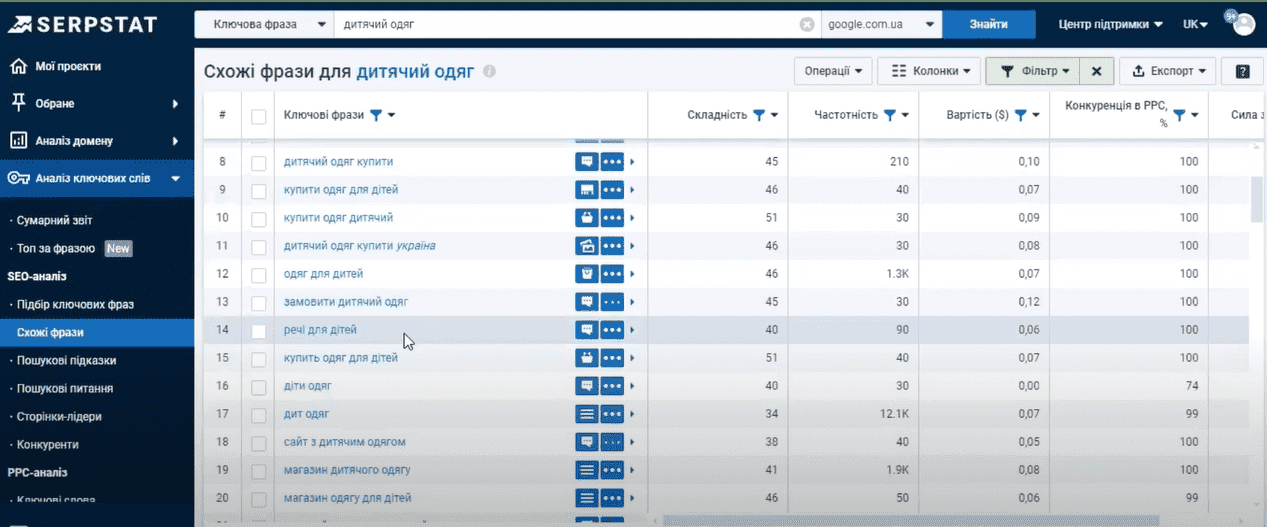
We are seeing new variations of keyword phrases that can be used for optimization on our site. The functionality of this tool is absolutely identical to the keyword selection tool.
Let’s filter the keys by frequency from 500 and add new phrases to our batch analysis project. If among the new phrases there are already existing ones in the batch analysis project, they will be automatically deleted.
This completes the basic selection of search phrases. But, if you need to qualitatively work out the semantics and collect the most complete semantic core, then we move on to the next tool.
Search tips
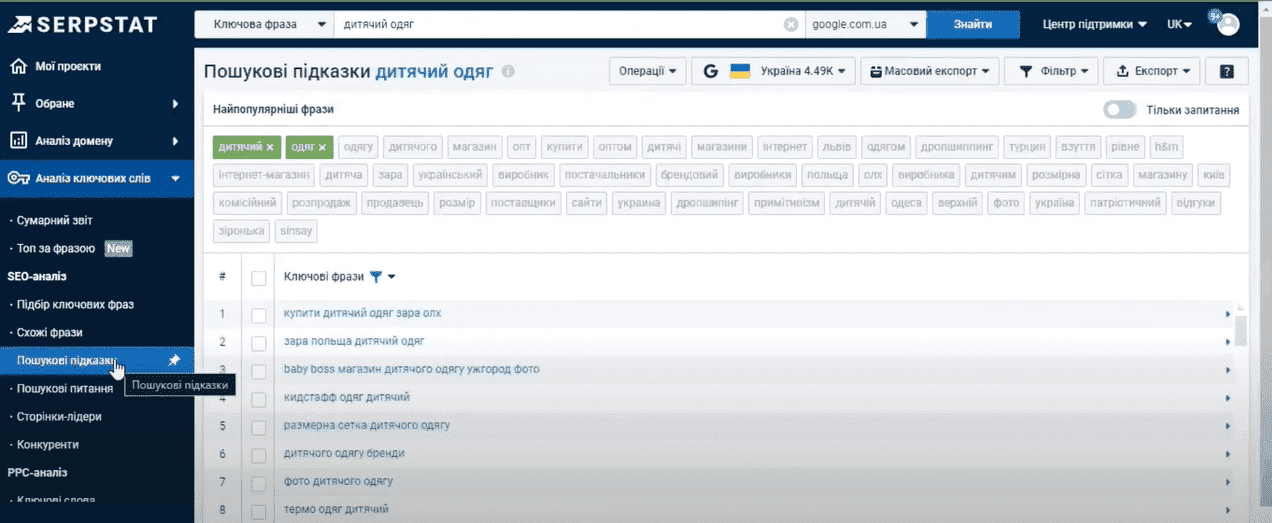
The special thing about this tool is that it is generated in real time and displays queries and questions of people who are looking for answers and information now. That is, these are the suggestions that appear when you start typing a query into the search bar. Using our marker we find more than 4000 options.
The filter in this report does not work in the same way as in previous reports, but the query selection can be refined by adding words to the phrase. For example, we add the words “Store” and “Internet” to our marker. Click on these words directly in the list above. After this, we are left with only 190 phrases, which we can also add to our batch analysis project.
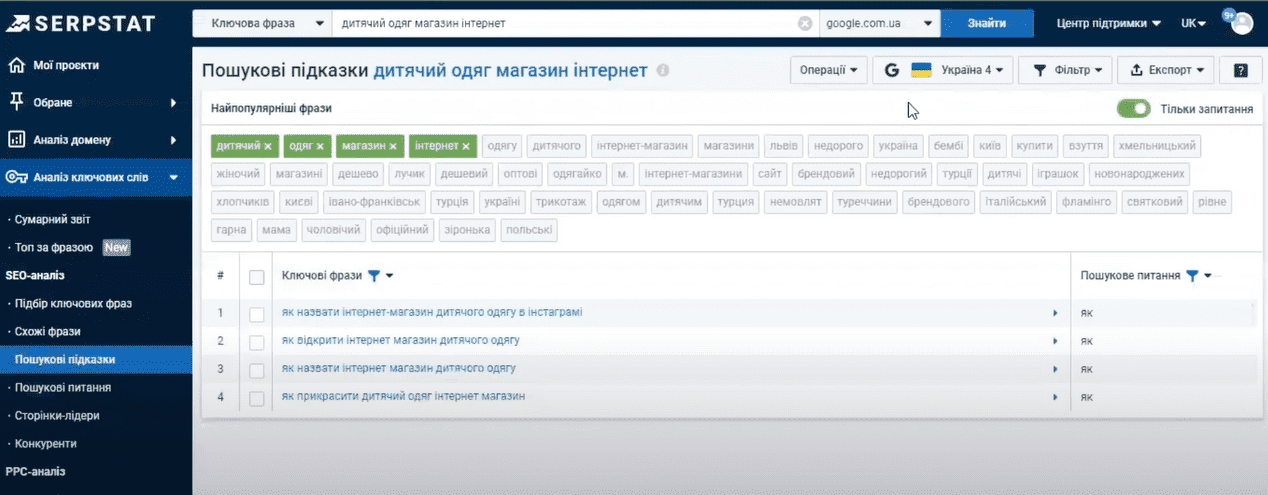
Search questions
This tool has another useful functionality – the “Question Only” button.
With its help, you can filter phrases only through questions. And it should be noted that there is a separate tab on the toolbar for this, which performs exactly this functionality, namely, analyzing queries in the form of a question. Here we see all the possible questions containing our marker phrase. These phrases can be used to select topics for a blog, create a content plan, or create a FAQ block on the site.
The functionality of the report is no different from the report for searching for hints. Let’s take all these question options and add them to our batch analysis project. To do this, we still check the box next to “Key phrases”, then – “Operations”, “Add phrases to Batch phrase analysis”.
In addition to searching for keys using a marker query, you can perform competitive analysis. Let’s take a closer look.
Leading pages
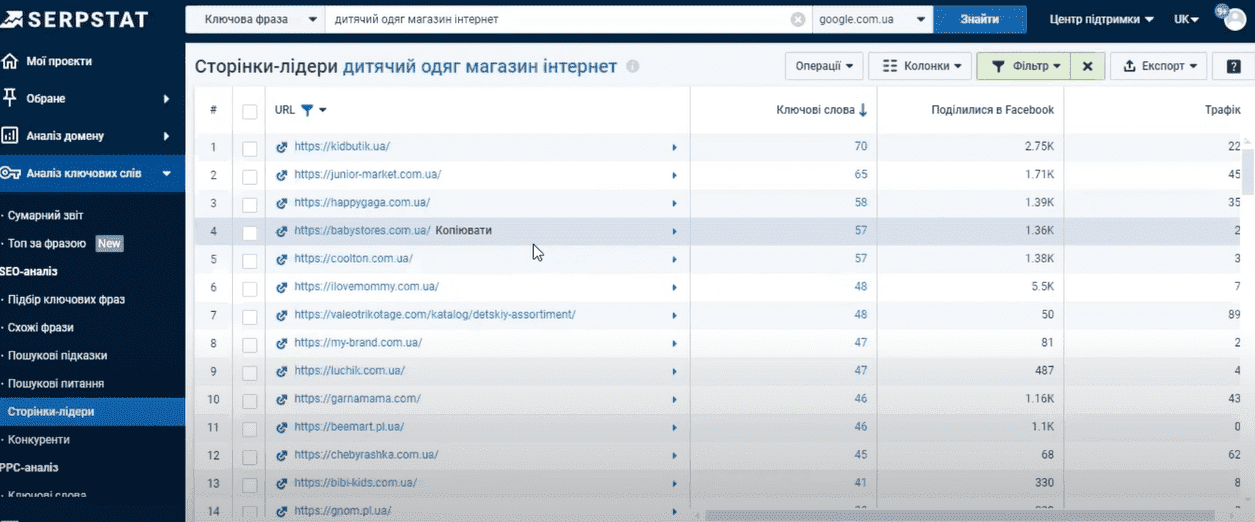
In this report we see a list of pages that rank for our marker query and receive the most traffic. If we take a quick look at the list and navigate to these pages using the appropriate buttons, we can generally understand which of these pages are relevant to our future site. Select a competitor and click on the link.
The summary report opens at our URL. In it we see a complete list of queries, their complexity, frequency and position occupied by the current page. That is, we get an understanding of what specific queries the competitor’s page is optimized for and how we can interpret this experience on our own resource.
We can also filter the report, export it completely, or select the keys that interest us and add it to the batch monitoring project.
Competitors
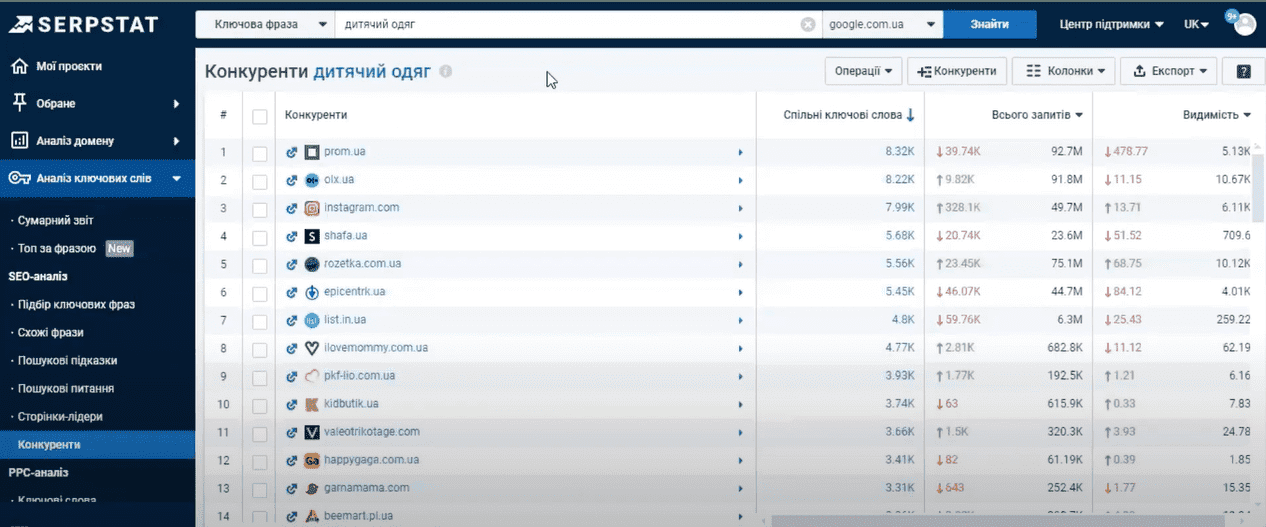
This tool is not so interesting to us in terms of semantics, but rather serves to generate a list of potential competitors for our marker phrase. We see a list of domains ranked for our search query. The report is also generated in real time, so sometimes it takes some time to generate it.
In the report we see a list of domains and columns with general information. The most interesting thing for us is “Common Keywords”, that is, how many keywords in the domain contain our marker phrase.
Correct selection of competitors is important at the development stage. After all, it is better to form the structure and think through the qualitative functionality of the site, taking into account the experience of competitors who have already taken high positions in the search. This list of competitors can be exported and further worked with the file. This concludes the search for semantics.
Let’s return to the batch analysis project.
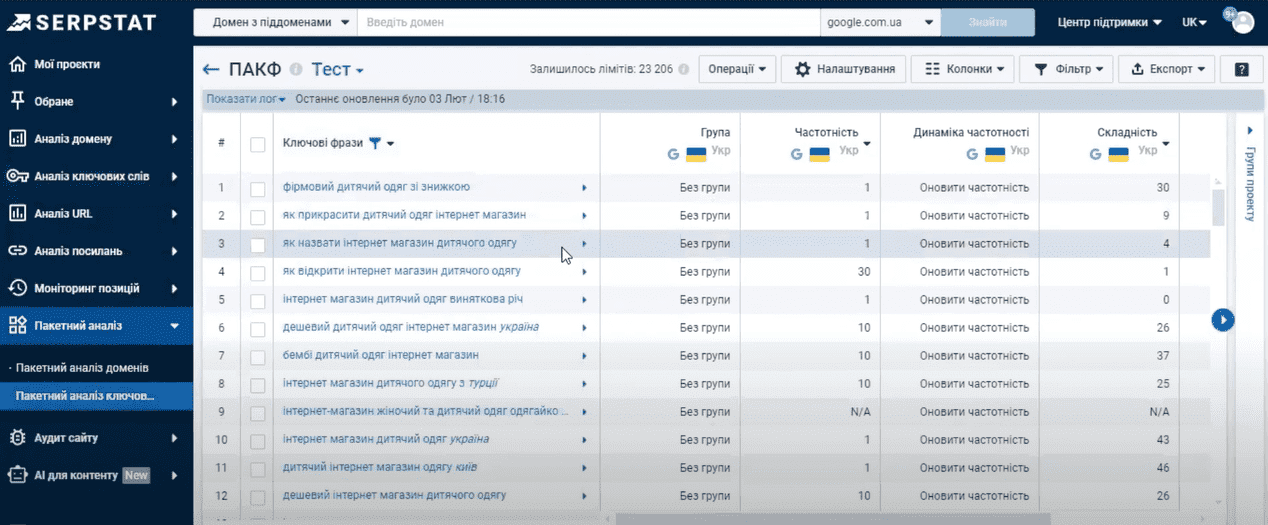
It stores all the keys that we have collected in various reports. We can simply export it and use it at our discretion. But in order to form a high-quality semantic core, it is necessary to cluster queries. That is, distribute all our keywords into groups, which will further form the hierarchy of our site.
- Clustering can be done manually.
To do this, create a group on the batch analysis project page, mark the necessary phrases and add them to the group. Click “Add group”, give it a name, then “Ok”, select phrases, then the “Operations” button and “Add to group”, then select our group and “Apply”. Ready.
- Another option is automatic clustering.
To do this, select all our phrases, open “Operations” and click on “Add phrases to clustering”. A window with projects opens for us. Click “Create a new project”. Enter the name of our project. We enter the domain if we already have a website; if not, we leave it blank. Select a search engine and region. We select the region and city as needed. In our example, we are moving through Ukraine, so we leave it blank.
Link strength is a clustering condition, where strong – each phrase must have 12 common URLs to be combined into a cluster, and weak – only 3 common URLs.
The second condition for cluster formation is the choice of clustering type:
– soft type – phrases can be added to the cluster if at least one pair of phrases has 3, 8 or 12 identical URLs (depending on the preliminary choice of connection strength).
– hard type – all phrases in one cluster will have the same 3, 8 or 12 URLs in the top 30 for the phrase (depending on the preliminary choice of connection strength). The result of this method is an accurate core with a large number of groups, since phrases are included in a cluster only with pronounced semantic similarity.
For example, leave the default settings and click the “Save” button.
The clustering process is quite time-consuming, so we prepared an identical project.
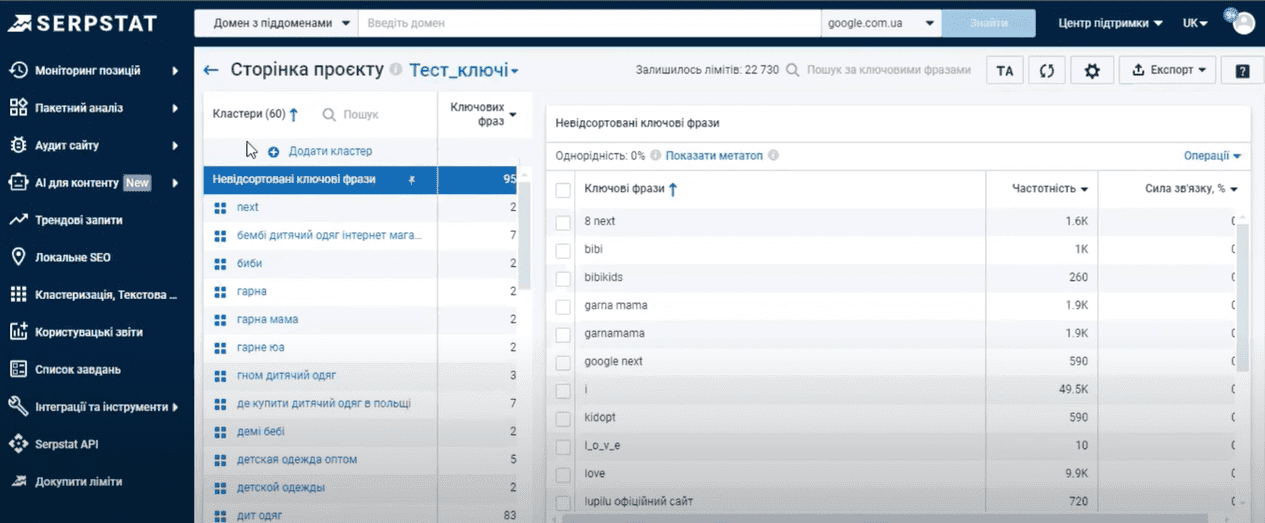
We see that our phrases are divided into separate groups/clusters. We can see a list of keys for each group, the percentage of homogeneity, and there is also metatopes functionality. This is a list of competitor pages in the search for cluster phrases. The higher the page is in the metatop, the more relevant it is to the topic of the cluster.
Now we can download our finished semantic core as a separate file. You can unload both the entire core and individual clusters by clicking “Export” – select the desired format – “Export”. Ready.
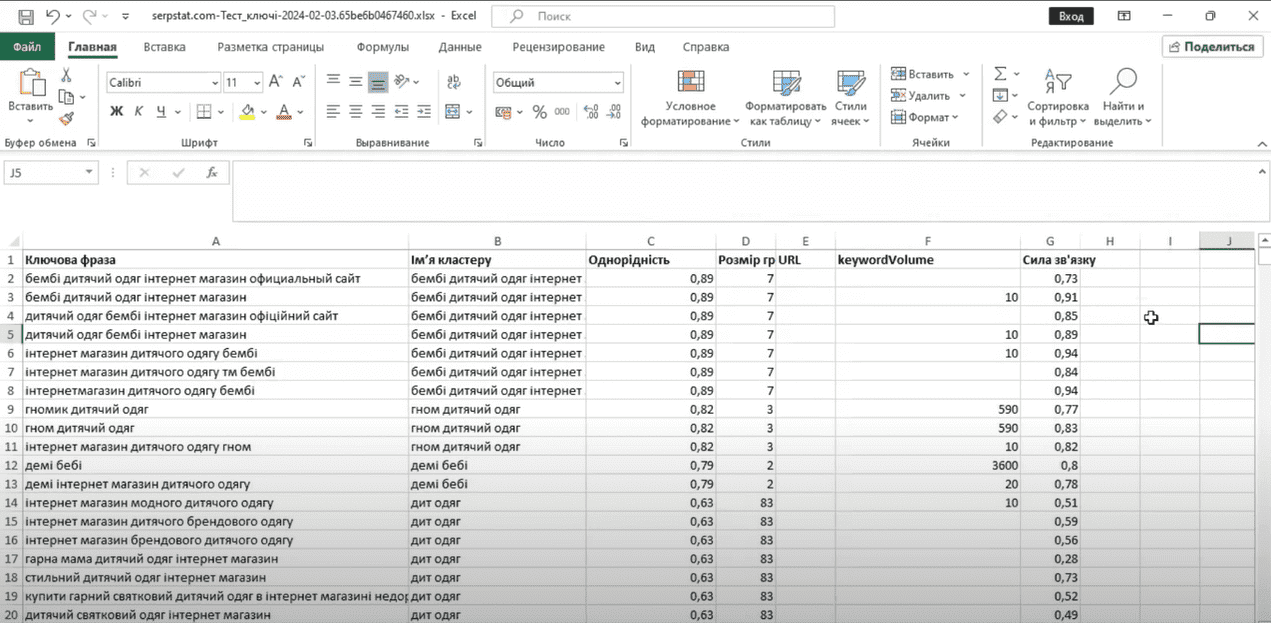
This is what the finished semantic core looks like. We see a list of phrases, the name of the cluster group and frequency.
Let’s sum it up
In the article, we examined the advantages and disadvantages of the tool, and also provided step-by-step instructions for selecting keywords. Serpstat can easily replace almost any other service for SEO specialists and is a really good option for both beginners and professionals.

commercial offer
Other articles by the author

27/08/2024
Marketing is a key part of your success. Regardless of whether it is an online clothing store or an offline outlet, you need to not only create an attractive assortment of clothes, but also plan an advertising campaign that will attract the attention of your target audience.

09/09/2025
Удачное доменное имя должно быть удобным для пользователей, легко запоминаться, гармонично смотреться в рекламе и не создавать юридических или технических проблем.

11/03/2024
Ahrefs is a useful and powerful tool in the arsenal of any SEO specialist. It allows you to track the positions and actions of competitors and improve the ranking of your own website, as it will point out mistakes that were made when the resource was created but affect its position now.
Latest articles by #SEO

29/06/2026
If you analyze search queries correctly, you can better understand your audience, design a more precise website structure, create relevant content, and improve your SEO results without unnecessary expenses.

19/06/2026
Crowd marketing involves placing useful, organic mentions of a brand, product, or service on platforms where your audience is already engaging.

27/05/2026
For businesses, this isn't just a technical detail it's the foundation for SEO, content, website structure, and launching advertising campaigns.